Tuesday, August 15, 2023

I've Missed Cardmaking!


Has it really been over a year since I posted to my blog? I can't believe it but it's true!

I've really missed card making but I've been busy with my daughter putting on our planner conference, Planning By The Beach

I'm not really a planner but I have enjoyed being exposed to a whole new hobby filled with it's own form of crafty goodness. The planner community like the card making community is very welcoming and encouraging. Next year in April my daughter and I will be attending Go Wild once again and we will be traveling to Dallas, TX this time. If you like planning at all you should check out the Go Wild conference. It's a huge party with 1400 of your closest friends!🤣


Last night I got to sit at my craft table and create a card and it's amazing to me that I stayed away so long! Even though I haven't been creating cards, I never stopped stalking all of my favorite card makers and watching card making on Tik Tok and YouTube!

I watched a video by Mindy Eggen the other day and her card inspired the card I made last night.

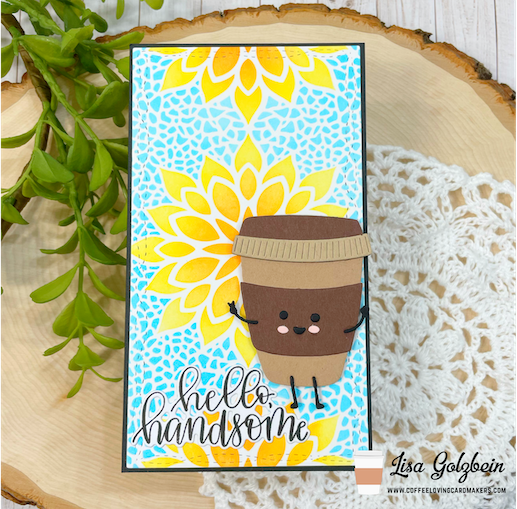
It's no secret that stenciling is one of my favorite techniques and I just love the way it looks over this scripty background!

I started with some Spicy Yogurt Cardstock from Altenew and stamped the background with the background stamp A Faithful Letter from Unity Stamp Co. using my faithful MISTI stamping tool.


I created some beautiful stenciled flowers using the Joyful Blooms Layering Stencils from 
LDRS Creative. There are a total of 7 stencils in this set but I only used 1a and 1b for the flowers.
I repeated this step a few more times and ended up with 6 gorgeous flowers!


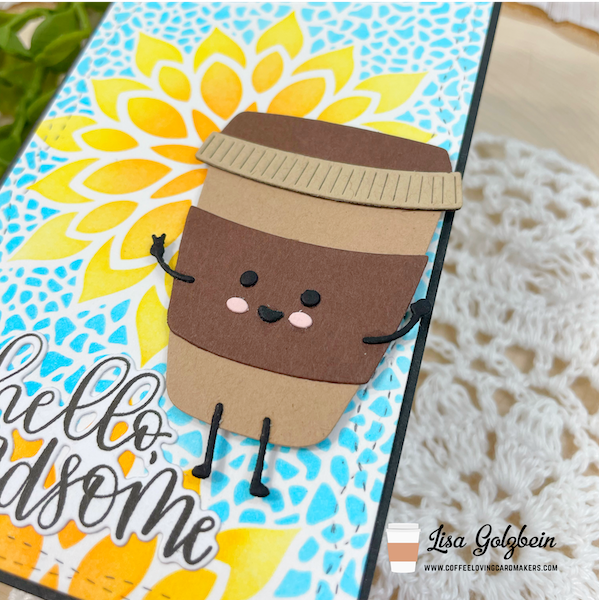
I just love these color combos together! I also used the 3a, 3b and 3c stencils to add some gorgeous green leaves to my flowers. The stencils are so versatile and can be used in so many different ways!

I finished off my card with a clean and simple Thank You die cut from Simon Says Stamp!


I layered black card stock onto vellum and popped the sentiment up with foam tape for some dimension.
I couldn't resist adding some fun black splatter before I popped that TY onto the card.
I just love the way the whole card turned out! 


If you've stuck around for this whole post than thank you from the bottom of my card making loving heart! I can't wait to get back to my craft room today and resume my favorite hobby of all time! Who knows, maybe I'll dust off the old YouTube channel and make the videos I've always wanted to make?🤷🏼‍♀️

Until next time friends......
Have a great day! I already am!

**Affiliate links are used occasionally

at no additional cost to you. These

are products that I may have been sent

or ones that I purchased on my own.

Either way, they are products that I 

use frequently and LOVE!


Tuesday, March 8, 2022

Peace Love Coffee


Good morning Coffee Lovers! I'm up on the Coffee Loving Carmaker's blog today and I have an easy peasy caffeinated creation to share with you!

As card makers do you ever get stuck on a technique and find yourself doing it on every card or every other card? It's like a rut that you just can't get out of because you love it so much? Well my technique is ink blending rainbow colored backgrounds and then stenciling over them with a bold pattern. Today's card is exactly that and I love how it turned out.


For my background I blended 4 colors of Distress Oxide Inks in:
Kitsch Flamingo, Squeezed Lemonade, Cracked Pistachio and Broken China.
Once that panel was all blended I took the coffee stencil from Sugar Pea Designs and used brown ink to stencil on the coffee beans and cute hearts.

For my main panel I wanted to keep it small and simple. I cut out a piece of white card stock using the A2 Diagonal Stitched Layered Card Topper from LDRS Creative and stamped my 3 images and sentiment.

The peace sign and heart are from an older Lil’ Inker stamp set and the coffee cup is from the La La Land Take it Sloth stamp set. Since I needed small letters I searched my stash for the perfect alphabet and came up with an older Stampin Up set called Rough Type. I just love the vintage typewriter feel of this set.

I'm loving this technique for quick and easy backgrounds that just make me smile! I don't think I'll be giving it up anytime soon!

Thanks so much for joining me today on the blog! I hope you have an amazing Tuesday and don't forget to get yourself some PEACE, LOVE and COFFEE!

Have a great day, I already am!

Lisa

Inlaid Die-Cutting


Hello friends! I am on the LDRS Creative blog today and I have a real treat for you! 

I have 4 cards to share with you and I used a new to me technique called "inlaid die-cutting". This may not be a new technique for some of you but this was my first time and it was so much fun!

It all started with the Pretty Things Coverplate Die III. This die in particular lends itself perfectly to this technique. I chose to use the whole die for one card and part of the die for another card, I'll explain below.

Let's start with these 2 cards because I used all of
the die cut pieces for one of them.
The process is the same for all the cards but less work for the second pair.
I will walk you through the process for this technique as simply as possible:

Step 1 - Apply ink blending to card stock in whatever colors you choose to make your background.
(OPTIONAL) Stamp Joyful Blooms Stamp in clear embossing ink and sprinkle clear glitter embossing powder over panel for subtle detail on background.
*click on picture to enlarge and see detail*

Step 2 - Die cut inked and stamped panel with the
Pretty Things Coverplate Die III and make sure to leave on cutting plate for next step!

Step 3 - Cover pretty side with sticky side down using Press'n Seal film.
*trust me on this one*😉

Step 4 - Flip panel over using Press'n Seal to hold panel together and add foam tape or dots to back side of large die cut shapes. 
Step 4b - Remove backing paper from foam and adhere white card stock panel to foam to cover entire panel in same size.

For my birthday card I added foam dots to ALL the tiny shapes but in the above picture you can see the foam dots on just the large pieces.
(Just as pretty with less work!)

Step 5 - After you've adhered your white panel to the foam dots flip panel over to make some MAGIC! Now you get to peel off the frame surrounding the shapes that stuck to the backing paper. 
*Bonus, you get to use this frame for a second card!*


For my second set of cards I used the same technique but I shaded the back panel of the pop up card to add some color to the background. 

The sentiments on all the cards are from the 
For the background detail on the "So Glad You're My Mom" card I used the Brocade Stencil for the added detail instead of the  Joyful Blooms Stamp on the birthday card.

Here is one more look at all 4 cards separately:


Thank you so much for joining me today for some fabulous LDRS Creative inspiration! I hope you enjoyed my tutorial on inlaid die-cutting and that you'll give this technique a try! 

Have a great day, I already am!
Lisa

Tuesday, February 22, 2022

Cats and Coffee!


Hello my coffee loving card makers! It's my day on the Coffee Loving Cardmaker's blog and I'm so happy to be here and not at work in my real ICU! I'm sure every nurse, teacher, and Indian chief will tell you they are severely understaffed and overworked! Honestly though, it makes me even more grateful for my card making hobby because it is my escape and my sanity!

My card today incorporates 2 things I LOVE! Coffee and cats... I have 2 cats of my own and iced coffee runs through my veins! I love making my own cold brew at home, it's delicious! My card today features a new stamp set from the Ink Blot Shop.


I'm just in love with that fat cat! The set is called Fat Cats and there are 5 cute cat images in the set with lots of feline accessories! The coffee cups in the background are from an older Lawn Fawn set called Love You a Latte and the sentiment is from the Perk Up stamp set from Jaded Blossom. I matted everything on to the Postal Cover Panel from Reverse Confetti.

This was a fun card to make and I can't wait to color up the other 4 kitties in that stamp set!

Have a great day! I already am!

☕️ Lisa 🐈

Friday, February 18, 2022

Coffee Date My Daughter


Hi everyone, today is my day up on the Coffee Loving Cardmaker's blog and I have a very special post for you! This blog post is dedicated to all the incredible teachers out there! More specifically my favorite teacher of all.... my daughter Taylor! 


Taylor is my coffee date for today and I am so proud of her. As you all know teaching is one of the many jobs that became infinitely more challenging when COVID hit. Taylor has been working way too many hours every week past her contracted time just to give her students everything they deserve..... sadly it leaves very little personal time. Despite Taylor's lack of personal time she still agreed to be my Coffee Date for today.

Taylor is a planner girl at heart and she loves all things planner related! She agreed to do a planner layout for the week of Valentine's Day and make it coffee themed. But of course real life got in the way and her layout as of tonight was only half done. As she sat writing an IEP for a meeting tomorrow she felt guilty about not finishing her planner layout for our coffee date.  I am going to share the gorgeous layout she started and as you can see she has a COFFEE CUP sticker on Friday the 18th to signify our "date". Taylor is a big fan of the Erin Condren Life Planner and Krissyanne Design's stickers and she uses them frequently in her layouts. Taylor's Instagram account is @prettypaperpieces4u if you'd like to check out all of her other amazing layouts!

Here is a picture of her layout and I am in love with the color scheme and adorable stickers she used for the week of Valentine's Day! Notice the AWESOME "Drink Wine Day" on the 18th!


In keeping with the Valentine's Day theme I decided to make a love themed card that sums up my relationship with Taylor. We definitely go together like coffee and donuts! We craft together and support each other's hobbies. She attended Creativation with me and I am attending Go Wild with her next month. Go Wild is a huge planner convention that takes place once a year for the die hard planner fans.

For my card today I used the adorable Yum Yum stamp set from the Not 2 Shabby Shop. That little hamster is just adorable and her little hands hold lots of little accessories. Today she is enjoying coffee and a donut!


I stamped that adorable hamster onto a panel cut from the Waffle Flower A2 Lacy Layers Die set and colored her up with my Copic Markers. The sentiment is from the same stamp set. Although it's difficult to see in the picture I did use the Love Splash stencil from A Colorful Life Designs on the card base for some fun pink hearts!

Thank you for joining me today for our Coffee Date! I am honored that Taylor agreed to virtually meet me for coffee and I can't wait to see her completed layout when she is done!

Have a great day! We already are!

Lisa and Taylor

Tuesday, February 8, 2022

You Are So Beautiful To Me

 Good morning crafty friends!  I'm so excited about the new January release from LDRS Creative and I've been busy creating some beautiful cards to share with you! The possibilities are endless with the new Strip Dies and in my opinion they are excellent for getting your creative juices flowing!

My card today features the:

1/2" A2 Background Strips Die
Joyful Blooms Stamp Set
A2 Diagonal Stitched Layered Card Toppers


This card was so much fun to make. These new strip dies really lend themselves to endless possibilities! I decided to go with a monochromatic look for this card. I chose 6 different colors of teal card stock and cut each color out using the brand new 1/2" A2 Background Strips Die. I glued them to a piece of white card stock and then I stamped the gorgeous flower cluster over top using the Joyful Blooms Stamp Set.

Next I used the second largest die from the A2 Diagonal Stitched Layered Card Toppers to cut out my main panel. Once the panel was cut out I added the pretty sentiment from the Joyful Blooms Stamp Set to the bottom left corner.

I attached my panel to a white A2 card base with some foam tape for dimension and added some clear droplets for some extra shine.

Here is one more picture with all the products used on today's card.

I hope you enjoyed today's card. I encourage you to check out all of the new stamps, dies and stencils from the new January release! You won't be disappointed!

Have a great day, I already am!

Lisa

Tuesday, January 25, 2022

I Miss You a Latte


I am up on the Coffee Loving Cardmaker's Blog today and I'd like to welcome you to my ICU! It's so much more relaxed here than my regular ICU at work. Even though I work nights and drink a lot of coffee, I'd much rather be drinking it here and sharing cards with you guys!

Today I have a fun and fresh card to share with you featuring dies from Super Sponsor Jaded Blossom and Simon Says Stamp and a sentiment from My Creative Time.


I don't know about you but whenever I see a cute little smiley face on inanimate objects it just makes me smile too! The cute little coffee cup is from the Jaded Blossom Coffee Dies and the adorable little face is from their Fresh Faces stamp set.


Since the Heart Sprinkle Wreath has cut outs, I decided to do some ink blending on the bottom panel with Squeezed Lemonade, Worn Lipstick and Wilted Violet Distress Oxide inks so that a pretty little rainbow would show through to the front of the card.


I popped the adorable little coffee cup on some foam tape in the center of the wreath and I added a fun caffeinated sentiment from the My Creative Time "Not a Decaf Day" stamp set.


I hope you enjoyed taking a break in my ICU today and you got some inspiration from my adorable little smiling coffee cup!

Have a great day, I already am!
Lisa 🙂

Tuesday, January 11, 2022

You Warm My Heart


Good morning coffee lovers! It's Lisa here with you and today I'm taking a trip down memory lane thanks to a new app I just downloaded on my phone. It's called Color My Life and I'm using it to catalog all of my stamps and dies. One of the first stamp companies I discovered and fell in love with when I started card making was Papertrey Ink. Recently I was entering a stamp set into the app called Warm Happiness and I decided to use it for today's post. 


I really love the vintage shabby feel of this card! I started with the Tag Sale die and added the lace circle to it and then placed the coffee cup on foam tape to give it some dimension. I love the sweet pink heart above the cup.


The Mix and Mat Confetti die was the perfect backdrop for the tag. The pretty teal polka dot paper tied everything together and I added some sparkly Stickles to the heart and mat. All supplies from Papertrey Ink. It's so rare that I use one company for my whole card. Sounds like a fun challenge!

Thanks for stopping by today, I'm off to continue cataloging the rest of my stamps and dies and look for more caffeinated treasure!

Have a great day, I already am!

 ☕️ Lisa  ☕️

You're The Best

 Hi there! I'm up on the LDRS Creative blog today with a floral beauty! I've been obsessed with rainbow colors ever since I'm a kid and I love the look of a stark black stamp over top of a rainbow blended background!  I mixed and matched some of my favorite LDRS Creative products from my stash and made this pretty floral card!


I started out with a white piece of heavy card stock and used the second largest die from the A2 Diagonal Stitched Layered Card Toppers to cut it out. I blended my favorite rainbow colors onto it smoothing out the transitions. The next step was to stamp the Garden Grandeur Slimline Stamp Set on top of that gorgeous rainbow.


Once I stamped the pretty flowers I cut out a center panel with the second largest die from the Diagonal Stitched Layered Frames so I could pop that panel up on foam tape as a focal point. I backed both floral panels on to black card stock so they would really pop!


After I placed the smaller floral panel on to foam tape I added a sentiment from the Essentials Stack Stamp cut out with the Sentiment Stack Die. I heat embossed the sentiment with clear embossing powder to give it a nice shine.


I just love how bright and colorful this card turned out and it really came together quickly! The Garden Grandeur Slimline Stamp Set is so intricate and stands out so beautifully against the rainbow background!

Thanks so much for stopping by today! I hope you have an amazing day!

I already am!

Lisa


Tuesday, December 28, 2021

Hello Handsome!


Hello Friends! Today I'm up on the Coffee Loving Cardmaker's blog serving up some coffee goodness! I recently got the Simon Hurley Mosaic Florals Slimline Stencil and I'm in love! I used it for the background of my mini slimline card and it was so much fun to use!


The adorable little coffee cup is from the Coffee Cuties die set from Sugar Pea Designs. How cute is that little face with those pink cheeks and who can resist those little arms and legs!


I added a sentiment from the Penned Elegance 2 stamp set from Papertrey Ink and cut it out with the matching die.  I just love how this card came out!

Have a great day! I already am!
Lisa