Tuesday, June 30, 2020

The Rabbit Hole Designs July Release Day 2


I'm back with Day 2 of The Rabbit Hole Designs July Release!
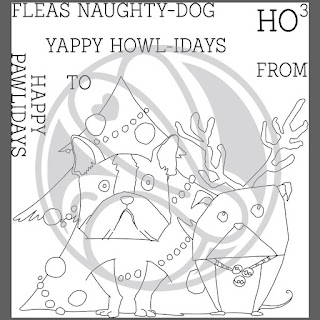
Yesterday we brought you Santa and today we are introducing 2 mischievous doggies in a stamp set called Pawlidays! I just love how the dog on the left is literally hiding in the Christmas tree!


I also used the Light Me Up Stencil in the background of the card to match the whimsical style of the card.  I just love how those cute dogs look like they are up to no good! I made sure to add some sparkly Stickles to the lights once they were stenciled in place.


Check out what the design team has in store for you today using the Pawlidays stamp set!


To celebrate the next three days of release, The Rabbit Hole Designs is giving away two gift certificates; one to a lucky Instagram Follower and one to a lucky Fan Page follower. Winner will be chosen at random from the comments left on the INSTAGRAM post, and tagging friends, and also from commenting on the Fan Page post. So make sure to head on over to INSTAGRAM and look for the giveaway post @therabbitholedesignsllc and look for the post at The Rabbit Hole Designs Fan Page by 11:59 p.m. PST 07-02-2020. Winner will be announced on The Rabbit Hole Designs blog 07-03-2020.

You can also find The Rabbit Hole products at Simon Says Stamp!

For more inspiration, updates, and news make sure to check out these places ...

Thanks for stopping by today.
Have a great day, I already am!

🐶  Lisa 🐶 

Monday, June 29, 2020

The Rabbit Hole Designs July Release Day 1


Welcome to day 1 of The Rabbit Hole Designs July Release!
It's the proverbial Christmas in July over here and we are starting the release off with Kris Kringle himself! The stamp set is even called Kringle and features a super fun Santa, 2 happy trees, a banner and 5 sentiments in a fun curly font!


Although it's difficult to see I used the brand new stencil that is also being released today called 
Slice of Christmas. This stencil has so many different elements you'll want to use it on every card!


Look at all that Christmas fun! There are 2 different trees, the letters H and O to spell out HO or OH and there is a snow bank and some icicles for hanging off of a house or just a border on a card.
I used both snow shapes on my card but they are rather hard to see because I used matte medium and glitter on them.


There is one more surprise today that you will just LOVE!
The Rabbit Hole Designs have also come out with their very own Blending Brushes!


They are so beautiful, soft and LARGE! The soft fluffy head feels like BUTTAH!
Trust me when I tell you that you are not going to want to get them inky the first time.
You might just want to order one extra to keep white and pristine.

🐇🐇🐇🐇🐇🐇🐇🐇🐇🐇🐇🐇🐇🐇 

I used one of the brushes to apply white ink over the stencil on to my kraft card stock panel but I redid the card with matte medium and glitter.  Here is a picture of the panel after I applied the ink with one of the new brushes. It applies ink so smoothly, you're going to love them!


Here is another look at my card with the supplies used.


I also added some fun white puff paint to Santa's cuffs for some extra fun!
I love how this card turned out and that happy Santa just makes me smile!

Check out what the design team has in store for you today using the new release!


To celebrate the next three days of release, The Rabbit Hole Designs is giving away two gift certificates; one to a lucky Instagram Follower and one to a lucky Fan Page follower. Winner will be chosen at random from the comments left on the INSTAGRAM post, and tagging friends, and also from commenting on the Fan Page post. So make sure to head on over to INSTAGRAM and look for the giveaway post @therabbitholedesignsllc and look for the post at The Rabbit Hole Designs Fan Page by 11:59 p.m. PST 07-02-2020. Winner will be announced on The Rabbit Hole Designs blog 07-03-2020.

You can also find The Rabbit Hole products at Simon Says Stamp!

For more inspiration, updates, and news make sure to check out these places ...

Thanks for stopping by today.
Have a great day, I already am!

🎅🏻 Lisa 🎅🏻

Have an Unbe-leaf-able Birthday


Welcome to my blog! Today I have a card for you using the latest i-Crafter release.
One of the new stamp sets is called Positively Plants and it features several different succulents with various pots to put them in. There are also 7 different sentiments to choose from that tie into the whole plant/succulent theme.


I started by stenciling a very light background to really make the plants stand out.  Next I lined up the pots along the bottom of the stenciled pattern and stamped them first. I only used the pots that had top layers that you could stamp separately to give them a pattern.  I added the plants next and gave thenm all a black outline to really define them. Lastly I stamped the sentiment on black paper and heat embossed in white before cutting it out with a banner die.
I matted the main layer on a piece of olive green card stock and then to my card base.

I don't usually make one layer cards but I really love how this card turned out!

Thanks so much for joining me today.
Have a great day, I already am!
🌵🌱 Lisa 🌱 🌵


Saturday, June 27, 2020

Aim for the Stars!


Hey there, thanks for stopping by today, I have an out of this world card to share with you today using one of the newest stamp sets from The Rabbit Hole Designs. It's called Space - Infinity and Beyond and it has the most adorable little astronaut holding the moon on a balloon string! I just love that image and I decided to go with a rainbow theme for this card. I also used the brand new 
Aim For The Stars Stencil on my card for the background and the sentiment.


To begin I stamped my astronaut directly on to my card panel and colored him up with my copic markers.  I decided to color the little strip on his chest in rainbow colors to match the theme of the rest of the card.  The stars at the top of the card and the sentiment were both done with the Aim For The Stars Stencil. I selectively stenciled the sentiment in rainbow colors and added white highlights with my gel pen. I matted the stamped panel on to a piece of rainbow patterned paper and added both panels to my card base.

I don't usually make one layer cards but I really like how this card came out. It's simple but colorful and I love how this stencil can be used in so many ways.


For more information, news and updates check out these links:


Have a great day, I already am!
👨‍🚀💫 Lisa  💫👨‍🚀 

Friday, June 26, 2020

Look For Rainbows


Hi and welcome back to my blog. Today I have a fun rainbow card to share with all of you using lots of goodies from Kat Scrappiness!

Rainbows and shakers are two of my favorite things so I love to create them any chance I get. 

I started out by using a raindrop stencil from my stash that is similar to the Newton's Nook Raindrops Stencil. For my inks I love to use the Atelier Inks from Inkon 3 because they blend so smoothly and the colors are so vibrant! I used a piece of Bristol Smooth card stock and a mini blending tool and then I ink blended in rainbow order over the raindrops using these ink colors:


Once I had the ink blending done I took my panel and cut out a smaller panel using the largest die from the Stitched Postage Stamp Edge Rectangle Dies from Kat's store
Next I took the smaller cloud die from the He Is Risen Dies and I placed it in 3 different places on the raindrop panel and cut it out so I could make 3 different shaker wells on the front of my card.
I turned the panel over and covered it with a piece of acetate making sure to cover the open cloud areas. To pop the panel up and create the shaker wells, I used foam tape to section off the clouds and pop the whole panel up. Now the fun part! I filled all 3 shaker wells with some fun Rainbow Bright Sprinkles! I covered the backs of the clouds with white card stock and then matted the whole panel on to a purple panel measuring 4 1/4" x 5 1/2". 
I then placed the finished panel on to a white card base.

For the sentiment I used Versafine Black Onyx ink and the Rainbow stamp set by Taylored Expressions and it fit so perfectly with the theme of the card. I also used some Sparkling Clear Droplets around the finished card to add some extra shine!
For one extra fun added element I used the Rainbow made of polymer clay that is included in the 
Teal Kawaii Cloud Sprinkles. What a fun element to add to any card!


This card is just all full of color and whimsy and I love how it turned out! 
Kat Scrappiness is definitely your go to shop for all things shaker related!
There are literally hundreds of different sequins and sprinkles in stock to fit any theme card or any style card you can dream of! From food to animals to jewels, Kat has you covered!

Don't forget to follow Kat Scrappiness on all
social media platforms to be alerted to new releases, sales and giveaways!


Thank you so much for stopping by my blog today!
Have a wonderful day, I already am!
🌈  Lisa  🌈 


Disclaimer: My blog uses affiliate links 
whenever possible at no additional cost to you.
I only promote products I actually use and think 
other crafters would like as well!

Tuesday, June 23, 2020

Wild About You & Coffee


Hello and welcome to my blog! I am up on the Coffee Loving Cardmaker's blog today with a brand new card but I'm not wild about it! Let's face it, we can't love every card we make but that just comes with the territory right? The funny thing about the cards that I don't like is they seem to be very popular which always makes me think, I have no idea what people like......... or the age old story of "different strokes for different folks". 


 For the base of my card I used a leopard pattern stencil by Kindred Stamps and cut it out with the Kat Scrappiness Wonky Wavy Rectangles.
I saw the stencil used by my friend Justin on a card and I knew I had to have it! I had recently tried to make my own leopard stencil on my scan n cut by failed. I love a good diy but even I know when to throw in the towel! 
😂 😂 😂 😂 😂 😂 
I absolutely loved how the background came out and I wanted to turn it into a wild themed coffee card.  That's where it all went wrong. I just couldn't get all of the elements to play nicely together on the card. I used a Distressed Edge Rectangle die and cut out some vellum so I could mute the background and add some elements. The cute little coffee cup is from Spellbinders but I tried many different color combos before I came up with the orange and brown and I wasn't thrilled with that combo either.  I tried a brown cup, a gold cup, a floral cup....... NOTHING WAS WORKING!
You've had those card making sessions........ right? Lie to me and tell me you have!
😩😩😩😩😩😩😩


I stamped the sentiment from the Hello Bluebird stamp set Jungle Littles in brown ink and heat embossed it with clear embossing powder.  In hindsight I should have stamped it in white ink on brown paper to make it pop more. The large ampersand die is from an older Clearly Besotted Monogram stamp and die set and the pretty Coffee die is from a Sugar Pea Designs coffee die set.
I just love decorating with those cute Kat Scrappiness Coffee Beans, they are so much fun! 


Oh well there is my whole story and I'm sticking to it! It's not the worst card I've ever made but it certainly isn't my favorite. Oh well, you win some you lose some! At best I enjoyed using that awesome new stencil and I will be using it again very very soon!

Thanks for joining me today and you have a great day!
I already am!
🐆  Lisa  🐆

Thursday, June 18, 2020

i-crafter / Sassy & Crafty Collab Hop


Hello and welcome to my blog! Today I have a real treat for you!
i-crafter has teamed up with Sassy and Crafty to do a blog hop featuring some fun products from both companies! Sassy and Crafty is a brand new stamp company with some cool stamp sets and today the DT's from both companies are featuring the Sassy Girls - Sweet stamp set. 


This stamp set has a real comic book feel to it so it pairs very well with these 
i-crafter products that we are showcasing today:


Today I created 2 projects using all of these products from both companies.
The first is a shaker card I created using the Sassy Girls - Sweet stamp set, the Comic Half Tone Dots Stamp Set and the Comic Words Dies. I also used the Skysail Blue, Candy Coated, and 
Majestic Lilac hybrid inks.  I did an ink blended background using the i-Brush Blender Brushes.
Here is a look at that card:


After I created the ink blended background I stamped the  Comic Half Tone Dots rectangular stamp on the top and bottom diagonal corners of the card. I love how they look over the bold colors!
Next I created the shaker window to place over the background. I colored the girl from the 
Sassy Girls - Sweet stamp set with my Copic markers so I could glue her to the front of the shaker window.  I also added in the OMG die cut letters from the Comic Words Dies in the top corner and I thought they went so well with this fun card! I added in some sweet shaker bits that look like mini cupcakes, candy and cookies.  These shaker bits are from Kat Scrappiness and are called 
Sweet Candy Sprinkles.  They were the perfect addition to this SWEET card!
Here is a closer look at some of the elements on this card:


I just love how this card turned out, the stamps and dies just work so well with each other!
My next project is a tag and I used the other Sweet Girl image from the 
Sassy Girls - Sweet stamp set.


For this tag I started out by die cutting a tag using the i-crafter Zip Gift Tag Die.
I then took the Cosmic Flare Stencil and 2 different inks, Skysail Blue
Candy Coated and created the background for the tag using the 
i-Brush Blender Brushes. After I stenciled the background I stamped the circular stamp from the 
Comic Half Tone Dots Stamp Set in Hushed Darkness to give the tag that comic book feel.
I then colored the sweet girl with my Copic markers and cut her out on my Scan n Cut.


I added her to the front of the tag and stamped the SWEET sentiment under her using the Hushed Darkness ink once again. I just LOVE how this tag turned out!
I finished it off with some light pink and blue tulle at the top.


Here is the hop list for the collab. Make sure to hop along and see all the inspiration that both design teams are sharing today! There is so much talent and creativity to see!


Lisa - you are here


Each company will be giving away a $10 gift certificate to one lucky hopper. Be sure to visit each blog and comment by June 25th at 11:59 PM PST in order to enter.


Here is one more look at both of my projects:


Thanks so much for joining me today for this fun hop!
Have a great day, I already am!
🧁 Lisa 🧁 


Disclaimer: My blog uses affiliate links 
whenever possible at no additional cost to you.
I only promote products I actually use and think 
other crafters would like as well!

Tuesday, June 16, 2020

Paper Sweeties June 2020 New Release Rewind!


Hello everyone and welcome to the Paper Sweeties June 2020 New Release Rewind!
I hope you enjoyed the New Release Party yesterday! This month we are introducing a new stamp set with matching dies called 
Here is a look at the stamp set and dies that are available for purchase now in the 
Paper Sweeties online shop!


For the final day of the release I used the brand new Farmhouse Sweet Farmhouse and Farmhouse Sweet Farmhouse Sweet Cuts plus I added in another older die that is one of my favorites as well as the Love You To Pieces stamp set.  I absolutely adore the fun font of those sentiments!
The Rectangle Scallop Frames is my go to die when I want to showcase a small image.


For my card today I wanted the focus to be on that sweet little pig image and I stamped him 3 times on white paper and added the "squeal" stamp and then cut the images out with the largest Rectangle Scallop Frame. I also cut out some pretty patterned paper with the largest frame to add some pretty color around the pig.


The sentiment from the Love You To Pieces stamp set was the perfect sweet addition to this card!
I added some paint splatters and jewels to finish this card off and I love how it came out!

Like many of you I get my inspiration from browsing Pinterest and when I was browsing the other day I came across a card that was my inspiration for my piggy card today.
The funny thing about this story is that my inspiration came from a good friend of mine who just so happened to be a design team member of Paper Sweeties for a long time! She is super talented and she also shares my name! Her name is Lisa Bzibziak and she is a sweetie who I had the pleasure of meeting at Creativation back in January! 
Here is the card that she made that gave me the idea for my card today:


Lisa actually made this card back in April of 2017 and I just adore it!
Lisa was making slimline cards before they were even the rage!
Here is a link to her blog post from that card if y'all are interested:

Paper Sweeties April 2017 New Release Rewind!


Thank you Lisa for the inspiration, I have always loved your style!

Well that about wraps up the Paper Sweeties June 2020 new release! I hope you've enjoyed the inspiration over the last 3 days and that you add this adorable Farmhouse stamp to your collection!
Don't forget to hop around to all of the DT's blogs to see what they made for the final day of the release!


Have a great day, I already am!
🐷  Lisa  🐷