Showing posts with label i-Crafter. Show all posts

Monday, July 27, 2020

Snowflake Wishes and a Goodbye


Hello everyone and welcome to my blog, I'm glad you're here!
I have some news to share with you today. This will be my last post for the i-crafter design team. I have had the pleasure of watching this company grow since the beginning and I wish them continued success in the future!

For today's card I have used the i-crafter Flip Card - Snowflake die and some fun patterned paper.
This die is meant to make an interactive card but I chose to make a flat card. This snowflake is so pretty it is perfect on it's own. Once I cut the snowflake piece out I adhered it down to a cream card base.  I cut out the Warm Wishes sentiment in some pink glitter foam and adhered it to the bottom of the card.  I added some beautiful sequins from Unity Stamps to finish the card off. 


Thanks for joining me today for my last i-crafter post!

Have a great day, I already am!
❄️ Lisa ❄️ 

Monday, July 13, 2020

Rustic Happy Holidays


Hello and welcome to my blog! Today I am up on the i-crafter blog with a holiday card using the recently released Holiday Wiper Insert die set.  I just love the fun font of the Happy Holidays die and the big bold holly leaves and berries! I thought they would look great against a rustic background and cut from glitter foam to really make them pop!

I started by die cutting a base panel from kraft cardstock using the Wonky Wavy Rectangle dies from Kat Scrappiness. I stamped a script word background stamp and then inked the edges with some distress ink. I wanted the Happy Holidays sentiment and holly leaves and berries to really stand out against the background so I used red and green glitter foam to cut them out.


I really love the rustic look of this card and I think these dies will be used quite a bit for this upcoming holiday season!

Thanks for stopping by today.
Have a great day, I already am!

πŸŽ„ Lisa  πŸŽ„

Wednesday, July 1, 2020

i-Crafter July Release


It's July 1st and that means it's time for the i-Crafter July release!
This month there are 4 new dies and 1 new stamp set being released.
Here is a list of the new products available today:

Holiday Wiper Insert
Snowflake Border Die
Christmas Sentiments Stamp Set
Tunnel Card; Santa
(works with Tunnel Card Base; Swan)
Flip Card; Snowflake

For my card today I used the Snowflake Border Die set on some beautiful Sugar Crystal Glittered card stock and the results are stunning! I layered the glittered card stock on to some kraft card stock and added in some snowflakes with red glittered card stock for a pop of color. The Merry Christmas sentiment is also from the Snowflake Border Die set and it also looks great in the red glittered card stock. On the inside of the card I used 2 of the leaf dies from the Snowflake Border Die set and I added a sentiment from the Christmas Sentiments Stamp Set.


Make sure you check out the i-Crafter online store to see all of the new products being released today! You can also head over to the i-Crafter blog for more inspiration from the design team.


Thanks for stopping by today!
Have a great day, I already am!
❄️Lisa ❄️ 

Monday, June 29, 2020

Have an Unbe-leaf-able Birthday


Welcome to my blog! Today I have a card for you using the latest i-Crafter release.
One of the new stamp sets is called Positively Plants and it features several different succulents with various pots to put them in. There are also 7 different sentiments to choose from that tie into the whole plant/succulent theme.


I started by stenciling a very light background to really make the plants stand out.  Next I lined up the pots along the bottom of the stenciled pattern and stamped them first. I only used the pots that had top layers that you could stamp separately to give them a pattern.  I added the plants next and gave thenm all a black outline to really define them. Lastly I stamped the sentiment on black paper and heat embossed in white before cutting it out with a banner die.
I matted the main layer on a piece of olive green card stock and then to my card base.

I don't usually make one layer cards but I really love how this card turned out!

Thanks so much for joining me today.
Have a great day, I already am!
🌡🌱 Lisa 🌱 🌡


Thursday, June 18, 2020

i-crafter / Sassy & Crafty Collab Hop


Hello and welcome to my blog! Today I have a real treat for you!
i-crafter has teamed up with Sassy and Crafty to do a blog hop featuring some fun products from both companies! Sassy and Crafty is a brand new stamp company with some cool stamp sets and today the DT's from both companies are featuring the Sassy Girls - Sweet stamp set. 


This stamp set has a real comic book feel to it so it pairs very well with these 
i-crafter products that we are showcasing today:


Today I created 2 projects using all of these products from both companies.
The first is a shaker card I created using the Sassy Girls - Sweet stamp set, the Comic Half Tone Dots Stamp Set and the Comic Words Dies. I also used the Skysail Blue, Candy Coated, and 
Majestic Lilac hybrid inks.  I did an ink blended background using the i-Brush Blender Brushes.
Here is a look at that card:


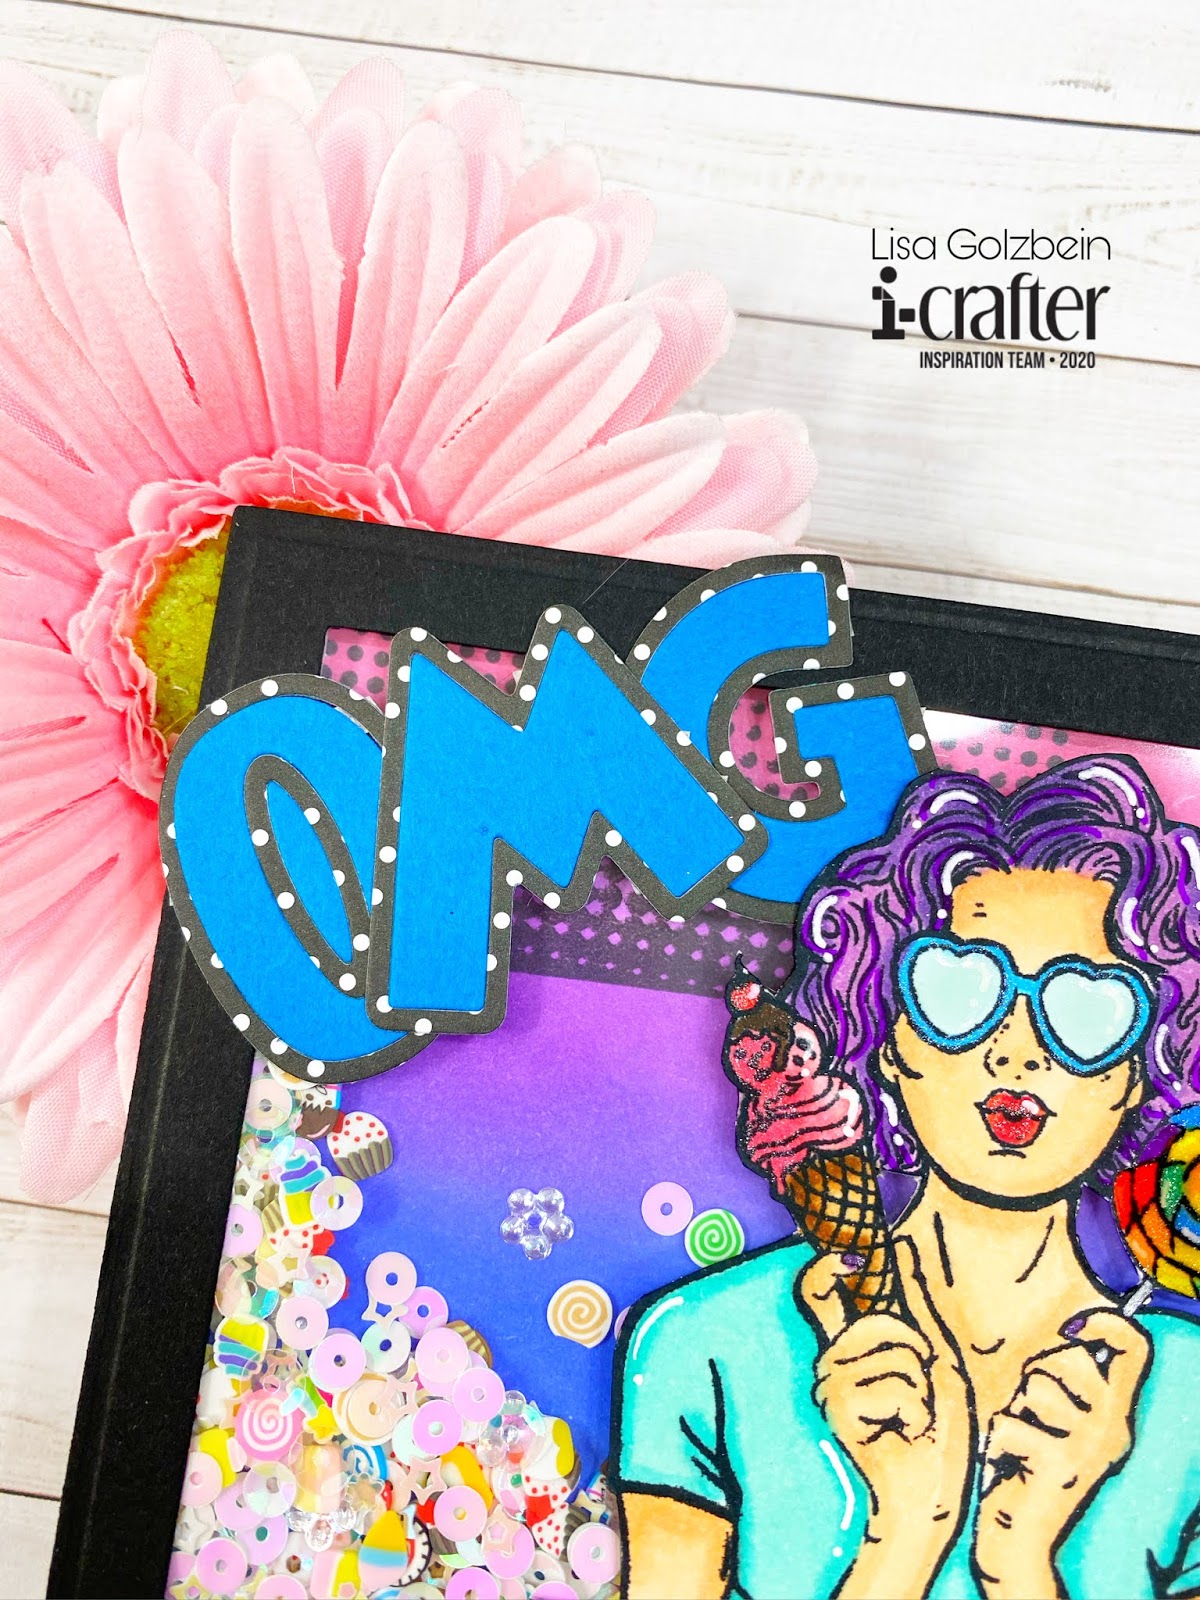
After I created the ink blended background I stamped the  Comic Half Tone Dots rectangular stamp on the top and bottom diagonal corners of the card. I love how they look over the bold colors!
Next I created the shaker window to place over the background. I colored the girl from the 
Sassy Girls - Sweet stamp set with my Copic markers so I could glue her to the front of the shaker window.  I also added in the OMG die cut letters from the Comic Words Dies in the top corner and I thought they went so well with this fun card! I added in some sweet shaker bits that look like mini cupcakes, candy and cookies.  These shaker bits are from Kat Scrappiness and are called 
Sweet Candy Sprinkles.  They were the perfect addition to this SWEET card!
Here is a closer look at some of the elements on this card:


I just love how this card turned out, the stamps and dies just work so well with each other!
My next project is a tag and I used the other Sweet Girl image from the 
Sassy Girls - Sweet stamp set.


For this tag I started out by die cutting a tag using the i-crafter Zip Gift Tag Die.
I then took the Cosmic Flare Stencil and 2 different inks, Skysail Blue
Candy Coated and created the background for the tag using the 
i-Brush Blender Brushes. After I stenciled the background I stamped the circular stamp from the 
Comic Half Tone Dots Stamp Set in Hushed Darkness to give the tag that comic book feel.
I then colored the sweet girl with my Copic markers and cut her out on my Scan n Cut.


I added her to the front of the tag and stamped the SWEET sentiment under her using the Hushed Darkness ink once again. I just LOVE how this tag turned out!
I finished it off with some light pink and blue tulle at the top.


Here is the hop list for the collab. Make sure to hop along and see all the inspiration that both design teams are sharing today! There is so much talent and creativity to see!


Lisa - you are here


Each company will be giving away a $10 gift certificate to one lucky hopper. Be sure to visit each blog and comment by June 25th at 11:59 PM PST in order to enter.


Here is one more look at both of my projects:


Thanks so much for joining me today for this fun hop!
Have a great day, I already am!
🧁 Lisa 🧁 


Disclaimer: My blog uses affiliate links 
whenever possible at no additional cost to you.
I only promote products I actually use and think 
other crafters would like as well!

Monday, June 15, 2020

Hello Sunshine!


Hello and welcome to my blog! Today I am sharing a happy card I made using stamps and dies from the i-crafter June release! I used the newly released Hello Sunshine Dies for the sun and sentiment.
I just love how the fonts that the "HELLO" and "sunshine" word dies come in.  
They compliment each other so nicely! 
I also love how adorable that sun is, the sweet pink cheeks just make me smile!


The adorable pandas are from the Playful Pandas stamp set.
I stamped out the pandas and heat embossed them with clear embossing powder to 
give them a glossy look.  


The background was made with a cloud stencil using the i-crafter Tropical Pool hybrid ink.
For the grass I used another hilly stencil with i-crafter Backyard Grass hybrid ink.
I added the bamboo shoots from the Panda's stamp set and matted the panel on a black background.


Thanks so much for joining me today!
Have a great day, I already am!
🐼 Lisa  🐼 

Monday, June 1, 2020

i-Crafter June Release


Today on my blog I am featuring 2 of the new stamp sets being released by i-Crafter for the June release! They are the Purrfect Birthday and Hedge Hugs stamp sets.
They are adorable and they come with some great punny sentiments as well.
Here is a look at the 2 stamp sets:


I made 2 cards with these stamp sets that I'd like to share with you today.


The first card features the Purrfect Birthday stamp set and I used the i-Brush Ink Applicator Brushes
to stencil a fun confetti birthday background for my kitty cat card. The i-Crafter ink pads come in a variety of rainbow colors and here are the colors I used on my card:

Candy Coated
Mango Madness
Lemon Drop
Sparkling Apple
Skysail Blue
Majestic Lilac

The  i-Brush Ink Applicator Brushes are awesome and they make applying ink in small places a breeze.  They have a tightly packed brush tip and they are so soft to the touch.  Even though they look like daubers they are actually soft bristles that make applying ink a smooth process!

For my second card I used the Hedge Hugs stamp set.


These little Hedgehogs are super cute and for my card today I decided to stamp them on a kraft colored card and skip the coloring.  They have so much personality that even uncolored they are still so cute! I decided to dress them up by giving the little girl a hair bow and the little boy a bowtie. The die I used for their hair bow and bowtie is from the Making Faces die set. I used a heart stencil for my card and once again I used the  i-Brush Ink Applicator Brushes and the Fire Ruby ink pad to apply my ink to my card.

This new release is packed with adorable stamps and dies that coordinate with so 
many other i-crafter products! 

Thanks for stopping by today.
Have a great day, I already am!
🐱 Lisa  🐱 

Monday, May 25, 2020

Five Projects Using the i-crafter May release


Hello and welcome to my blog, thanks for stopping by! Today I have quite a few cards to share with you that I created using the recent release over at i-crafter!
The recent release had some awesome stamps and dies to create some very unique projects ranging from comic strip words and dies all the way to a succulent die set and even a plastic dome to created 3-D projects for shaker cards.

Here are the 5 projects I have to share with you today:


The first 2 cards are colorful and bold and I used a variety of stamps and dies on both of these cards. 

The #1 Dad card was made using the 
i-crafter also has their own line of ink pads and I used the Fired Ruby,  Lemon Drop  and Mango Madness  colors for my card.  The i-brush Ink Applicators  make applying color a breeze! They are tiny daubers that actually have a smooth brush on each of them. They look like foam daubers but they are actually soft brushes that apply colors smoothly and evenly. If you haven't seen them in action, head over to YouTube to see them in action!

My second card also uses the Comic Half Tone Dots stamp set and the Cosmic Flare Stencil  and I added some fun words using the Comic Words die set. I stamped each letter with the Comic Half Tone Dots stamp set to give them that comic book look. These stamps and dies are great for so many types of cards ranging from Father's Day to birthday cards and they are also awesome for masculine cards that I struggle with so much!


For my second and third cards today I used the Tiny Succulent Terrarium die set and the 
Scattered Thoughts clear stamp set. I just love the succulent dies in the terrarium set. They make the cutest little cacti and succulents and you can decorate them with mini flowers or shade them for extra dimension.  I made a tag and a shaker card using these dies and stamps.


The last project I have to share with you today is a tag made using the Zip Gift Tag die set and the Happy Birthday Wiper Insert dies. I didn't make a wiper card but instead I used the Happy Birthday word dies to make this floral tag and added some fun gold leaves from the Flower Bursts die set and a fun butterfly from the Love Bugs die set.


These cards and tags came together so quick and easily using the fun products over at i-crafter.  They really spark my creativity and give me new ideas every day! Go check out all of the fun stamps and dies and stay tuned for more to come in the next few months from this awesome new company!

For more inspiration check out the i-crafter Facebook fan group and show off your projects using your own i-crafter stamps and dies!

Thanks for joining me today!
Have a great day, I already am!
🌡 Lisa 🌡 

Monday, May 11, 2020

Free Hugs


Hello and welcome to my blog!
This month i-crafter released a really creative cactus die set called The Mini Succulent Terrarium.
This set includes four different types of succulents with a little added dimension.  With the addition of the Geometric Dome you can create the most adorable 3-D projects.


For my card today I chose to make a square card with a brick wall stenciled background.  I thought it would be the perfect backdrop for my mini terrarium. I used the Geometric Dome to make a mini shaker with a cactus from The Mini Succulent Terrarium dies and some pretty little gold stars inside. I finished off my card with a sentiment that I made using the Carly Alphabet. I love this alphabet because it is so versatile and can fit any style card.

Thanks so much for stopping by today!
You can also find lots more projects at the 
i-crafter Fan Club on Facebook!

Have a great day, I already am!
🌡 Lisa 🌡 

Monday, April 27, 2020

Four Fun i-crafter Projects!

Today I want to share 4 fun projects with you!
They are all made with some fun new dies and gorgeous
 embossing folder from i-crafter!

The first project is a re-purposed tin that I decorated and turned into a keepsake that could be used as a jewelry box or to store any fun trinkets! For us crafters it could hold sequins, die cuts or any small items that need some organization!


To begin decorating my box I chose some pretty patterned paper to cover the top of the box. Next, I used the Folded Butterfly Die cut from some pretty floral paper to sit on top of the box. I also used some gold wire to hold the butterfly together and form the antennae. 


For the word "dream" under the butterfly I used the 
I just love how such quick and easy decorations makes such a lovely piece of decor for you night table or craft room!

-----------------------------------------------------

The next project up today is a shaker card I made using the new Water Lily 3-D Embossing Folder


This embossing folder is like the Cadillac of embossing folders!
The details are stunning and you won't believe the depth that this folder gives to your cards!  I used the embossing folder on some kraft paper and used the panel as the base of the shaker card. Next I made a frame from pale pink card stock using a Stitched Scalloped Rectangle die and backed it with an A2 sized acetate sheet. To fill my shaker I used Pale Pink Heart Sequins and some 
Sparkling Clear Jewels.  For the sentiment on the front of the card I used the "Love" die from the Heart Hand Wiper Insert Dies and the word "you" was cut using the Carly Alphabet Dies.  Both words were cut from pink card stock, treated with sticky embossing ink on the bottom half and heat embossed with gold embossing powder. I love the elegance this embossing folder gives to this card!

------------------------------------------------------

The next card up today was actually a collaboration between my friend Niccole and I.  Niccole created some beautiful alcohol ink backgrounds for her friends to use any way they wanted to. She asked us our favorite colors and then went about making us some gorgeous backgrounds! Here is the card I created with my handmade background.


I made a frame from pale teal card stock using a Stitched Scalloped Rectangle die  and for the sentiment on the front of the card I used the "Love" die from the Heart Hand Wiper Insert Dies and the word "you" was cut using the Carly Alphabet Dies.  I used glittered black card stock for the letters to match the elegance of that dreamy background. Big thank you to Niccole for making us those beautiful backgrounds to play with.

-------------------------------------------

The last project up on my blog today was made from an amazing interactive die from  i-crafter called The Exploding Shaker Box.
Here is a description of this amazing product:

A fun exploding gift box with an interactive shaker window to make an exploding shaker box. The box measures 3″ x 3″ x 3″ when closed. Remove the lid and the sides flip open to reveal the contents of the box. Set includes 11 thin metal dies.


It's hard to get an idea just from pictures of all the crafty goodness that went into this box but I sure did have fun making it!
Honestly the sky is the limit when you are creating a box with this die because you can add as much or as little as you like.  You can add pockets and windows and shakers and layers and so much more! Here is a look at the inside of the box when the top is lifted and it falls open.


Isn't that shaker window at the bottom of the box fun? You can fill it with any shaker bits you want! I used some pretty Mirrored Hearts in my shaker for some sparkle and shine. I decorated the 4 walls with some butterflies from the Floral Garden Dies and I used the HB2U die from the Zip Gift Tag Dies


This set even comes with a pocket die so you can make a small insert to stamp or write a message on. How cute is that!


To top off my beautiful box I die cut the Folded Butterfly Die out of purple foil card stock and added the "For You" sentiment from the  

---------------------------------------------------------

Thank you so much for joining me today on my blog! I had a lot to share with you and I hope you'll check out the i-crafter shop and blog for some more crafty inspiration!
You can also find lots more projects at the 
i-crafter Fan Club on Facebook!

Have a great day, I already am!
πŸ¦‹ Lisa πŸ¦‹ 

Friday, April 17, 2020

#spreadjoynotgerms Official Blog Hop


Welcome to the Spread Joy Not Germs Blog Hop!

First off thank you to Catherine Pooler and Alexandra Stapleton from The Hedgehog Hollow for putting on this hop! There are 31 sponsors and approximately 150 bloggers participating today to bring you joy!

The theme of this blog hop is to show off our happy cards and to make people smile! It is also intended to inspire people to send their hand made cards to friends and loved ones during this time!
Won't it be nice to spread a whole lot of JOY πŸ˜ƒto those that are doing their part, staying home and NOT spreading germs 🦠!


There are 31 amazing sponsors for this hop and they are giving away some terrific prizes!


Today I have 2 happy cards to share with you using products from 3 of the companies that are sponsoring prizes in today's hop! Here are the links to their shops and the prize amounts:


i-crafter ($20 Gift Certificate)
Paper Sweeties ($50 Gift Certificate)
and
Pear Blossom Press ($25 Gift Certificate)

πŸ€—πŸ€—πŸ€—πŸ€—πŸ€—πŸ€—πŸ€—πŸ€—πŸ€—πŸ€—πŸ€—πŸ€—πŸ€—πŸ€—πŸ€—πŸ€—

The first card I have for you today is a light up card using the
EZ Lights from Pear Blossom Press and the Rose Heart die from i-crafter.  I placed the EZ lights behind the center of the rose so it would light up when you pressed the button.  I really enjoyed making this an interactive card and what a smile it would bring to someone's face to see their card light up! The Rose Heart die  from i-crafter  is such an intricate beautiful die and is perfect for so many types of cards! The sentiment just says it all, "you brighten my day"! Don't we all need a little brightening no matter what is going on in our lives! 


 Here is what the card looks like when it is lit up:


And here is the card in action:


For my second card today I am featuring products from the Paper Sweeties April Sweet Kit and I used the sweet bicycle embossing folder with the Hello Sweet Cuts die cut. This card just makes me smile! What could be more fresh and happy than some pretty puffy clouds and a fresh bouquet of flowers in a sweet bicycle basket! I think this card would cheer anyone up who needs it right now!


You should have arrived here from Kathya Kalinine's blog and
Your next stop on the hop is Jessie Banks' blog.

If you get lost along the way you can always visit the Catherine Pooler blog or Hedgehog Hollow blog for a full hop list and details!

PRIZE INFO

 The prizes will be randomly drawn from all the blogs and all the comments. You can leave as many comments on as many blogs as you can! Some of the companies are also offering discounts and freebies! That info can be found on the individual companies blogs!
The deadline to enter is April 24th for prizes.  Winners will be announced on Monday, April 27th on Catherine and Alexandra's blogs. You can find a full list of all the sponsors and prizes being offered on Catherine Pooler's blog or The Hedgehog Hollow blog.

Now keep on hopping, there is still A LOT of inspiration and smiles waiting for you!

Thank you so much for stopping by my blog today!
Have a wonderful day, I already am!
πŸ˜‹ Lisa πŸ˜‹