Welcome to my blog! Today I have 2 cards for you using some of the newest Slimline Dies from Kat Scrappiness. I used the same Stitched Scalloped Nesting Slimline Dies on both cards yet they have 2 very different looks to them!
---------------------------------------------------------------
Let's start with the card that uses the Stitched Scalloped Nesting Slimline Dies in the traditional way that you are used to seeing it.
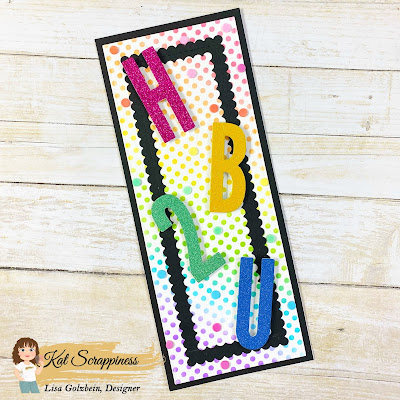
For this card I cut a piece of Bristol Smooth card stock using the largest die from the
Embossed Edge Nesting Slimline Dies and did some rainbow ink blending with a polka dot stencil.
The black scalloped inner frame was made using the second and third largest dies from the Stitched Scalloped Nesting Slimline Dies. I nested them inside each other and sent them through my die cut machine together together at the same time and the result was that cool scalloped black frame that I adhered to the inside of the polka dot panel.
For the sentiment I used the Condensed Uppercase Alpha Dies and the Condensed Number Dies to cut out HB2U in glitter paper which is short for "Happy Birthday to You". I popped the letters and number up on foam tape for some dimension. To finish off the card I added some fun and colorful
Party Confetti Sprinkles to mimic the fun polka dots in the background.
I took the entire panel and matted it on to black card stock and then adhered all of that to a side opening slimline card base measuring 8 1/2" x 3 1/2".
The brand new Triangle Embellishment Trays and
Embellishment Pick Up Tool are super helpful when picking up and adhering embellishments to my cards.
---------------------------------------------------------------
For my second card today I also used the Stitched Scalloped Nesting Slimline Dies but in a less traditional way.
I began by using the largest die and cutting out a piece of Bristol Smooth card stock so I could do some ink blending. After I cut out the paper, instead of using it as a traditional slimline panel, I folded it in half to make a notecard.
These dies are the perfect size when folded to make the cutest little notecards!
Once it was folded I did some ink blending using Distress Oxide inks and then some stenciling in the same colors.
I just love the way this panel came out. These 3 colors blended together so well!
For the main focal point on my card I stamped and Copic colored the adorable little giraffe from the
Lola the Giraffe Stamp Set. She cut out perfectly on my Scan n Cut but she could be easily hand cut as well. Before I adhered that cute little giraffe down with foam tape I stamped the sentiment in black ink on the bottom of the card. That beautiful "Thank You" is from the Friendship Greetings Stamp Set and looks lovely on any card! After I had Lola down and the sentiment stamped I added a few random sequins from the Aww-tumn Sequins Remixed and Fall Blessings embellishment sequin packs.
Pictured above are the brand new Triangle Embellishment Trays and
Embellishment Pick Up Tool and I love using them when I have to place sequins or sprinkles on my cards.
Here is one more look at both cards photographed with all of the supplies I used on them.
Thanks for stopping by today! I hope I gave you some new ideas for using your slimline dies in a not so traditional way. The sky is the limit with your imagination and creativity!
Here is a complete list of Kat Scrappiness products used on both of my cards including links.
Have a great day, I already am!
🎉 Lisa 🦒


No comments:
Post a Comment