Friday, November 30, 2018

Cheat Day Shaker Card

Good morning crafty friends!
It's my turn on the Kat Scrappiness blog today and I have a fun circle shaker card to share 
with you!  There are some super fun new Sprinkle confetti mixes in the store 
now and they inspired this card.  
They should probably come with a warning label that says:
DO NOT EAT!!!
Seriously though, they look exactly like the sprinkles you would
order in your favorite ice cream store!


For my card I cut 2 circles out of patterned paper using the Double Stitched Circle Dies.
I cut a window out of one of them using the same dies. I backed the window with acetate
and framed the circle opening with foam tape. After I made my well to add my shaker bits
I added lots and lots and lots of Birthday Cake Sprinkles Embellishment Mix and 
Fairy Dust Confetti Sequins.  The two complimented each other so well!
For the front of the card I colored some ice cream and donut images from the
Punny Snacks Stamp Set and I added a sentiment from the Cheat Day Stamp Set !

Such a fun card to make!
Make sure you check out all of the new sequins in the shop right now,
there is Chocolate Cake Sprinkles as well!

Thanks so much for stopping by today!
I hope you enjoyed my shaker card today and if you'd like to purchase any of the products
I used on this card, you can use code Lisa10 to save 10% on your purchase!
Have a great day everyone, I already am!
🍩Lisa🍦


2018 Fall / Winter Coffee Lover's Blog Hop


Welcome CRAFTY COFFEE lovers to the 2018 Fall / Winter Coffee Lover's Blog Hop!
 Kat Scrappiness is participating in the hop once again and I have created a 
coffee themed shaker card to join in the fun!


My card features the Kat Scrappiness  Layered Coffee Cup Die front and center and I cut the coffee cup directly out of the front panel so I could back it with acetate and make a shaker card out of it.
I filled the shaker well with Caramel Latte and Espresso sequin mixes, 
both of which are available in the Kat Scrappiness store.
For the adorable focal point I chose the adorable Gerda Steiner stamp 
called Warm fuzzies! I just love that fuzzy little bear holding his coffee / cocoa mug!
The sentiment on top of the card is from the same stamp set.
I think shaker cards just might be my favorite type of card to make.
It's so much fun picking out just the right shaker bits to go in the card.


Kat Scrappiness is giving away a gift pack of products including (stamps, dies, sequins, etc.)
with a minimum value of $35.00 to one lucky hopper!

 Make sure to grab your favorite hot beverage 
and hop along with us! You can save 15% off everything in the store 
by using code COFFEE18 at checkout!

Click on this link to start hopping and to see what all of the 
amazing design team members have created to give you some inspiration
to create your own coffee themed projects!


If you want to pick up any of the products I've used on my card you 
can use my code Lisa10 to save 10% on your purchase at checkout all year long!

Thanks for stopping by!
Have a great day, I already am!

☕️Lisa ☕️


Thursday, November 29, 2018

Cold Twigs ~ Warm Heart


I'm excited to share a project with you today that I made for the Kadoodle Bug
Design Team. I created a shaker tag with the Cold Twigs Snowman and 
I am so happy with the way it turned out!
If you have seen any of my projects on Instagram or Facebook over the last 2 days
you'd see that I've gone snowman crazy! I just can't stop creating projects with
these fun Snowmen! A friend of my mom asked me to create some tags and
a card for her with a snowman on it and I just kept going from there.
For today's project I cut out the Cold Twigs Snowman SVG out with my 
Scan n Cut and inked all the pieces before putting him together.  
I used the largest tag to cut out 2 pieces using matching patterned paper from the 
Lawn Fawn Into the Woods paper pack. Next I took a square die from the 
Stitched Scalloped Square Dies and cut a window out of one of the tags.
I backed the window with acetate and framed it off with foam tape.
Next came the fun part, picking out shaker bits!
I used 2 different sequin/sprinkle mixes for my tag.
and
They really complimented each other and picked up the red and blue in the snowman!
All that was left to do was finish off the tag with some ribbon at the top.
I used some gorgeous Oatmeal Seam Binding from Paper Sweeties and tied 
some red and white twine around it.

For the sentiment I printed it off of my computer on white paper and 
inked the edges for some dimension.

This project was a lot of fun to make, thanks for stopping by today!
If you'd like to pick up any of the Kat Scrappiness products I used today
you can use my code Lisa10 to save 10% on your purchase!

Have a great day, I already am!
☃️Lisa ☃️


Tuesday, November 20, 2018

You Mocha Me Crazy

Hello crafty friends, I have a card to share with you today!
I'm interrupting this winter holiday cardmaking time of year to bring
you a card with pink and hearts for a day!
I'm up in the KaDoodle Bug Facebook group today and for my design
team project I used an adorable file called
Valentine Frappuccino Cutie!
I saw an awesome video on the Unity Facebook page and fell in love
with the technique they showed.  They made their own background for a donut 
card and I knew I had to try it out!
Here is the card I made with the cute Frappuccino image
and the handmade background.


I started with a piece of Bristol Smooth Cardstock and die cut a panel
I then stamped a scribbled heart image in Versamark Ink from a Maymay Made It 
stamp set called "Love Is".


I heat embossed the hearts with WOW gold embossing powder.
The next step was to mask off the outer edge of the card with purple tape and 
ink the panel with Spun Sugar Distress Oxide Ink.

After I was done sponging I removed the tape to reveal a crisp white border.
The gold hearts had white areas in between the embossing so 
I colored them in with my Copic marker RV21 for a little
added color. Next came the fun part, splattering the background
with 2 different color oxide inks.

I smooshed the colors on to my Tim Holtz media mat
and sprayed them with water.  I put my paintbrush into the colors
and tapped them onto my background.  I just love the effect I get from
splattering paint randomly on my cards!


The only thing left to do was to pop my cutie Frappuccino up on 
some foam tape and add my sentiment!

I am in love with this background and I think I will be making a lot more
of them!  There are so many colors, stamps and themes it could be used for.

I'm so glad you stopped by today, I hope you like my card and technique!
Have a great day, I already am!
πŸ₯€Lisa πŸ₯€


Saturday, November 17, 2018

Dreidel Kids

I have another adorable Chanukah card to share with you today.
This is definitely the year for cute Chanukah stamp sets!
On my previous blog post I shared a card made with a Stamping Bella
stamp set and for this card I used a new Chanukah set by Neat and Tangled.
OMG it's soooooo cute!
I'm in love with these darling little Dreidel kids!!!
Here's the card I made with the Darling Dreidels stamp set.


I colored them with copic markers and cut them out with my Scan n Cut machine.
The gold star wreath is a die from Avery Elle called Star Frame die.
I love how the star wreath looks against the star embossed background!
These little cuties are coming to the Kat Scrappiness store soon!
If you want to do some shopping there in the meantime you can save 10% by using
my code Lisa10 at checkout. There is a ton of crafty items for sale in Kat's shop and 
she has every color, shape and size sequin you could ask for!
There are also the most beautiful jewels in ALL colors!

Thanks for stopping by today, I'm glad you came to visit!
Enjoy your day, I already am!
 ✨Lisa ✨


Chanukah Is Almost Here!

The Holidays are fast approaching!
5 days til Thanksgiving and Christmas is close behind, but before Santa gets here
we have to light the Menorahs and spin the Dreidels!
Chanukah comes early this year on November 3rd!
In my house we celebrate Chanukah and I love decorating every year!
The one thing that can be hard to find is Chanukah decorations but there are 
definitely more now than years ago.
I have the same trouble with stamp sets but this year I found a Chanukah
stamp set that I absolutely love and is very unique!

The set is from Stamping Bella and is called 
This adorable stamp set is available at Kat Scrappiness 
Here is the card I made using this stamp set.

I just love that sweet little girl up on a ladder lighting the menorah.  
I colored her with my Polychromos pencils and added some shading
under the menorah with a grey copic marker.
I used the Stitched Scalloped Rectangle Dies to cut out the patterned paper.
The adorable polka dot paper is from the Doodlebug Swiss Dot Petite Prints Paper Pack.
To give the card some extra dimension and shine I used some
Kat Scrappiness Blue Jewels and Yellow Jewels.

Thanks for stopping by to see my Chanukah card!
All of these products are available at Kat Scrappiness and if you use my
code Lisa10 at checkout, you can save 10% on your order!

Happy Chanukah everyone and enjoy your Turkey Day!
✨Lisa ✨


Friday, November 16, 2018

Paper Sweeties November 2018 New Product Release Rewind

Thanks for joining me on day #3 of the October 2018 *NEW* product release for
Today is Release Rewind day and I will be sharing 2 cards with you
that combine some previous stamp sets and the new Merry stamp set!

For my first card I decided to make a baby card and what better sentiment to use than the word "Love" from the new Merry stamp set that was released yesterday. This card was actually inspired by Sweeties Teammate Karen Letchworth. She used the Merry stamp set to make a love themed card which gave me the idea to use the stamp set for something non holiday related. Thank you Karen!!

 I pulled out an old Paper Sweeties stamp set called Bouncing Baby for the focal point of this card.  Unfortunately that set isn't available anymore but you can purchase Bundle of Joy which has great sentiments to make an adorable baby card. 

Once I was done making this card I knew I wanted to create something holiday related. I was so inspired after seeing Debbie's tag for the 25 Days of Christmas Tags event, that I knew I wanted to create something with that in mind. 

I love how striking this card came out. I used the new stamp set Merry again and stamped out 'Faith,' 'Joy' and 'Hope.' I love how this card came together with the holly stamp that I used from the Planner Series collection. That stamp set is called Planner Series: Happy Holidays Set. The icons from this set were the perfect addition to my cards for this release. 

I added Seam Binding which is in the Paper Sweeties store. 


Make sure you check out all of the other projects from the Design team.
You can click on their blog links below:

DESIGN TEAM

Larissa Heskett
Lisa Bzibziak
                       Lisa Golzbein (you are here)
Maria Patrick
Nancy Salked

Thanks for stopping by, leave me a comment so I know you were here!
Enjoy your day, I already am!
πŸŽ„Lisa πŸŽ„


Thursday, November 15, 2018

Paper Sweeties November 2018 New Product Release Party!


Welcome back to day #2 of the November 2018 New Product Release Party
with Paper Sweeties! Today is the day that you can get your
hands on the awesome new holiday stamp set "Merry" we sneaked yesterday!


For today's card I decided to make a shaker card.
I've always loved making shaker cards, it's so much fun picking out the 
shaker bits to go in the shaker portion of the card.
For my card today I decided it would be fun to include small images from
the Planner Series: Happy Holidays stamp set in the shaker window.
The small Christmas images were the perfect size to fit in the window 
and they added to the holiday theme of the card.
To add a fun winter feeling I added shimmery flaky fillings that resemble snow.


I stamped the "FA LA LA" sentiment from the new "Merry" stamp set 
under the shaker window, I just love that bold cute font, it's so much fun!
To give the sentiment a little more interest I added the sweet little
girl image from the Planner Series: Checklist stamp set.
When deciding what to write in her little sign my daughter gave me the 
super cute idea to add the word "sing".  
I hand wrote in the word "sing" and I thought it went perfectly
with the main sentiment!
You can't help but fall in love with the super sweet Paper Sweeties images!
Here is a close up of that sweet little girl with her glittered hair bows!


Thank you so much for stopping by today!
I love sharing my cards with you and this one was so much fun to make!

I hope you'll join me tomorrow for the New Product Release Rewind! 
Make sure you check out all of the other projects from the New Release team.
You can click on their blog links below:

NEW RELEASE TEAM

Larissa Heskett
Lisa Bzibziak
                       Lisa Golzbein (you are here)
Maria Patrick
Nancy Salked

Thanks for stopping by, leave me a comment so I know you were here!
Enjoy your day, I already am!
πŸ‘±πŸ»‍♀️Lisa πŸŽ„


Wednesday, November 14, 2018

Paper Sweeties November 2018 Product Sneak Peeks

Good morning Paper Sweeties fans! 
I am excited to share with you day #1 of the November 2018 NEW product release!
This month Paper Sweeties is releasing 2 new stamp sets. One is called Merry and it has 11 different holiday related words in a fun clean font. 
The other is called Planner Series: Everyday Basics.
Here is a picture of the "Merry" stamp set being released tomorrow.


The card I have for you today features 3 of the words and 
I have made ornaments out of them.
I stamped the words on circles and glittered them up with some glittered 
embossing powder. Here is my card:

and here is a close up of one of the ornaments so you can see the glitter detail:

Recently Paper Sweeties took part in Tracey McNeely's 25 Days of Christmas Tags 
and I used the Merry stamp set to make 3 tags. 
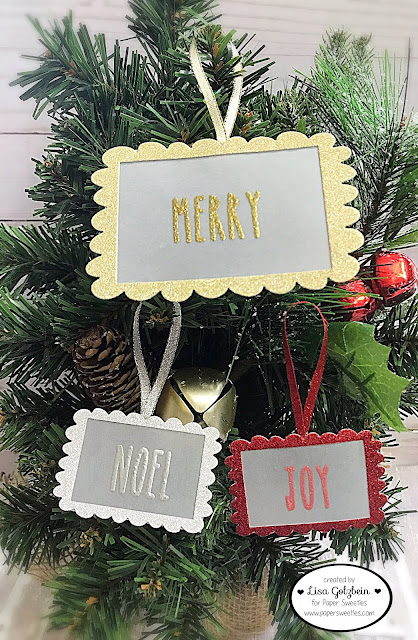
I heat embossed three of the words on to vellum 
and then framed them with the Sweet Cuts Rectangle Scalloped Frames
Here are those tags:


This stamp set is very versatile and can be used in so many ways!
Check back tomorrow to see more inspiration during our new product release party!


Make sure you visit all of the other New Release Team members blogs to 
see what they have created for the sneak peaks!

Nancy Salkeld


Thanks for stopping by and please consider leaving me a 
comment so I know you were here!

Enjoy your day, I already am!
πŸŽ„Lisa  πŸŽ„


Monday, November 12, 2018

Winter Wonderland Shadow Box

It's my turn today on the Kat Scrappiness blog and I have a Winter Wonderland 
to share with you in the form of a shadow box card.

I made my card following a tutorial on YouTube that can be found here.

For my card I used one of the new releases in the shop

This set of dies include:

Two stitched snow drift/hills
One die with three pine/Christmas trees
One deer die
An A2 sized *Cut and Emboss Stitched Snowflake Swirl Background Die
***Click here to see a video on how to cut and emboss with this background die)***

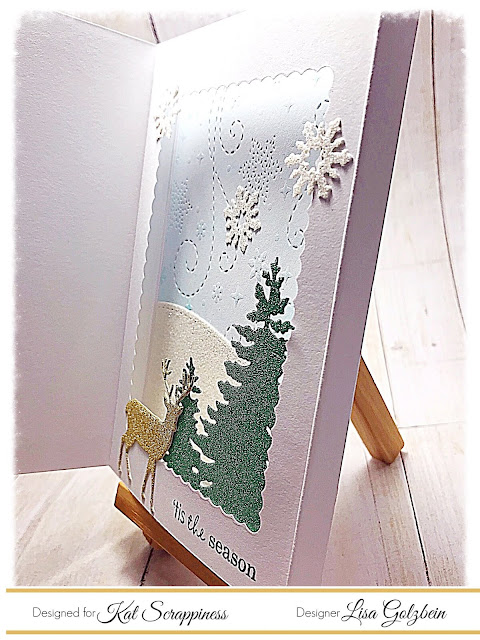
Here is the inside of my card using all of the dies from this new set.


I used the Stitched Swirl Background Die for the backdrop of the card and I layered the stitched snow drift on top of it.  I adhered the trees and the deer to the front layer of the box for some dimension.  The 3 snowflakes are from the Snowflake Kisses sentiment die and I 
glued one down to the background and the other two to the outer frame.
The snow drift, trees, deer and snowflakes were cut with glitter paper 
for some extra sparkle.


I went pretty simple with the front of the card since the inside is so detailed.  
The largest Stitched Scalloped Rectangle Die in glitter paper was the perfect shape 
to showcase the Happy Holidays sentiment
Three snowflakes from the Snowflake Kisses sentiment look so pretty around the sentiment.


Here is a short video showing the 3 dimensional properties of the card.


Thank you so much for stopping by today!
Make sure you use code Lisa10 when shopping at Kat Scrappiness 
to save 10% on your order!
Have a great day, I already am!
🦌Lisa 🦌


Saturday, November 10, 2018

Happy Little Stampers ATC November Challenge


Hello everyone!
I am back again with the 


Every month Happy Little Stampers has an 
ATC challenge and the theme for November is Sew (real of faux).  
For anyone who isn't familiar with ATC cards, they are mini
works of art that measure 2.5" x 3.5" and are traded around the world.
Usually they are numbered and signed on the back by the artist.


For my real of faux Sew ATC I decided to include some real AND faux stitching on my card.
I had a hand sewn yo-yo from my mom in my embellishment box and it was the 
perfect addition for this month's theme!
I added some fun faux stitching with the Button Boutique stamp set from Papertrey Ink and 
the adorable Handmade stamp panel was the perfect background for my sweet yo-yo!
The vintage heart button, lace trim and the 2 pearl stick pins were the 
perfect accents on this gorgeous little ATC card!
Be still my shabby little vintage heart!

I hope you'll play along with us this month
 and enter the ATC challenge at 
The winner for this challenge will receive a $20 coupon to spend at the shop!

IF YOU USE STAMPS BY HAPPY LITTLE STAMPERS 
AND YOU ARE OUR RANDOM WINNER,
YOUR PRIZE WILL BE DOUBLED!

Have a great day, I already am!

πŸŽ„LisaπŸŽ„

Friday, November 9, 2018

Sled Christmas Tag

While browsing through all of the wonderful Christmas tags on Tracy McNeely's 
25 Days of Christmas Tags event I found an adorable tag on day 1 by Lorraine Aquilina.
She used the cute Picture Book Moose die by Simon Says Stamp and combined it with some beautiful ink blending.  Here is her tag:

I was inspired to make a similar tag and I was looking through my Christmas board on Pinterest to get some ideas. I found an older tag made by  Julia Stainton and she used a stag's head die on her tag and it reminded me of Lorraine's moose.  
Julia made a tag that looked like a sled.
I wanted to CASE her tag and this is what I came up with.  


I just love the rustic look of this tag!
I started with a tag from Papertrey Ink and I cut it out half way and then turned the die around and cut it again to extend the length of the tag. 
The wreath die is from Ellen Hutson and I cut it out twice and layered them together with foam tape to give it some dimension. 


The berries on the wreath were made using  Red Berry Nuvo drops 
The stag's head was cut on my Scan N Cut using a free SVG file I found on the internet. 
I just love the stag's head cut out in gold glitter.  
It adds such an elegant look to the tag!


The word Joy at the bottom of the tag is from a Kat Scrappiness die that actually says "Jolly".  It's called the Jolly Brush Script Word and Sentiment die.  I loved the font but I only needed the word Joy so I cut out the two L's from the die and ended up wih Joy!
Sometimes you have to get creative!
The legs of the sled were made with 2 strips of pink paper that were rounded at one end and curled up. The tag is popped up on foam tape above the legs.
For some extra shine I added some mirrored star embellishments by Tim Holtz and for the look of snow I added some white gel pen dots all over the tag. 
All that was missing was the twine to go through the hole at the top and my tag was finished.

I am entering this tag in the link up for the 25 Days of Christmas Tags
why not make a tag and play along too?

Thanks so much for stopping by the old blog today!
I love visitors and I hope you'll leave a comment to let me know you were here!
Have a great day, I already am!
πŸ›·Lisa πŸ›·


Tuesday, November 6, 2018

25 Days of Christmas Tags with Paper Sweeties

Welcome to my blog today crafty friends!
Paper Sweeties is participating in the 8th annual 
25 Days of Christmas Tags and a  
special thanks to Tracey McNeely for hosting this fun event!

Every day in November through the 26th, a different company will be represented and participate by having their 
Design Team Members share Christmas 
tags to inspire you using their new products! 
All the details can be found on Tracy's blog.  

Today it's our turn at Paper Sweeties to share some 
festive tags with you!
I made a trio of Christmas tags featuring a new stamp 
set from Paper Sweeties called "Merry" 
that will be available for purchase on November 15th! 
This stamp set features a great assortment of holiday themed words that are perfect for cards, 
scrapbook layouts, tags and yes even ornaments!


I used 3 of the word stamps from the set and heat embossed them in red, silver and gold on to vellum and I framed them with the Rectangle Scallop Frame dies. I die cut the frames out of red, silver and gold glitter paper to give them some holiday sparkle! I love how elegant they look on the vellum!
Here is a closeup look at them individually.


I hope you liked my Christmas tags and I hope they have inspired you to make your own!

Here is the blog list of the other fabulous
 Paper Sweeties DT members! 
Make sure to visit their blogs so you can see the 
Christmas tags they made 
using Paper Sweeties stamps and dies. 


Don't forget to check back next week to see the brand new stamp set being released in the Paper Sweeties store!
Thanks for stopping by and have a great day!
I already am!
πŸŽ„Lisa πŸŽ„