Monday, April 30, 2018

Crafty Friends are the Best Friends!

Hello Crafty Friends!
I'm up on the Kat Scrappiness blog today and it's time to get CRAFTY!๐ŸŽจ๐Ÿ–Œ
Chances are if you're reading this post you are a crafty person and chances are you have one or more crafty friends!  Today I have 2 cards to share with you that are perfect to send to the crafty friends in your life!  Both cards use the new Kat Scrappiness word die "Hello My Crafty Friend".  This is such a fun die because it can be used as a large focal point on it's own or you can use any of the 4 words in the set on their own like I did on the second card.  

For my first card I used a technique that I love called inlaid die cutting.  I took some smooth white card stock and I blended 6 different Distress inks in a rainbow of color large enough to die cut the Crafty Friends die out of.  The Distress inks I used were a combination of the original colors and the newer Distress oxide pads.  In rainbow order the were:
Picked Raspberry
Carved Pumpkin
Squeezed Lemonade
Cracked Pistachio
Salty Ocean
Wilted Violet

After I got the colors just the way I wanted I splattered the paper with water to give it a distressed look and then I die cut the entire saying out of the rainbow background and then again out of a black panel measuring 5 1/4" x 4".  I then took a standard white A2 card base and put adhesive all over the front before laying down the black panel.  Next I laid the rainbow colored sentiment back into the open spots on the black panel and fit them in like a jigsaw puzzle.  They fit perfectly in the openings and it didn't add any bulk to the card.  I saved the little black bits to place back in the openings in the letters with holes in them.  Putting the black bits back in gives it a very uniform look.


To finish the card off I added some paintbrushes that I also cut out of the rainbow background that I made and I added some glittery hearts to the bottom.  I splattered the whole front with some white paint to give it an artsy fun appearance.  The Crystal Katana tool was very helpful in helping me replace the words in their holes and also to place the tiny hearts down at the bottom.


For my second card I used the word "Hello" from the Hello My Crafty Friend Die and cut it out 5 different times in a rainbow of glittered paper.  I layered a white banner on to a kraft card base to really make the repeated "Hellos" stand out.  To finish the card I stamped a sentiment from the Everyday Brush Strokes stamp set onto some kraft card stock and heat embossed it with white powder.  I popped the sentiment up with foam tape and the card was done.  This was a super quick card to put together but I think it looks fabulous because of all the glittery goodness in a rainbow of colors.  This is just one example of how you can use any of the words on their own from the Hello My Crafty Friend Die

Thanks for joining me today, I hope you'll share some creativity with one of your crafty friends!  This versatile die makes it super easy to do!
Don't forget to play along each month with the Kat Scrappiness challenge for your chance to win a $25 gift card to the KS online store.  This month's challenge is Envelope Art!  The Giraffe Envelope Art stamp set and The Owl Envelope Art stamp make dressing up your envelopes so much fun!
If you enter code Lisa10 at checkout you can receive 10% off of your order!
Have a great day everyone!
I already am!
๐ŸŽจLisa ๐ŸŽจ

Friday, April 27, 2018

MFT Sketch and SSS Wednesday Challenges


I haven't stayed up late crafting in such a long time but tonight I decided I just didn't want to go to sleep so I stumbled upon the MFT Wednesday Sketch Challenge #382 and I decided to play along.  It just so happens that this week is an Anything Goes challenge over at Simon Says Stamp Wednesday's challenge and they are using MFT products.  It was a perfect match up and I got to use an older stamp set from MFT called Polynesian Paradise which I love.  The stamp set lends itself to bright tropical colors and beautiful flowers.  I started out by stamping and coloring that cute pineapple with some Zig markers and I thought it would look cute coming out of one of the cups from the Hot Cocoa Cups die set.  The mug was so plain so I dressed it up with the flower cluster from the stamp set.  I used the Stitched Mini Scallop Square for the polka dot background behind the cup to match the sketch.  Finally I cut a tag from the Tag Builder Blueprints 4 and trimmed the 
circular opening off of it and stamped the sentiment on it.  
The patterned paper is from the MFT Dots and Stripes Sorbet paper pack.
Ok it's 3:30 am so it's probably time for bed now.
Thanks for stopping by!
Have a great morning, I already am!
๐ŸŒบ๐ŸŒผ๐ŸŒธ
Lisa

Thursday, April 26, 2018

Papertrey Ink MIM and SSS Wednesday Challenge


One fun card, two fun challenges.  I made this card for this weeks Make it Monday challenge over at Papertrey Ink and the Simon Says Stamp Wednesday challenge is Anything Goes so I'm entering it into both.  Betsy Veldman made a card for MIM with spot color word die cuts.  I used the Wonderful Words Baby die cut over the Doodlie Do stamp set.  This was a fun technique but I feel like it's hard to make out the word baby.  I stamped a sentiment from the Baby Button Bits stamp set on a stitched fishtail banner from Kat Scrappiness that I cut from some Bitty Big aqua mist paper.  
Here is a close up of the die cut "baby" word that I copic colored in pink and aqua. 


That's all for today!  Thanks for stopping by!
I hope you get some crafty time in today!
Enjoy your day, I already am!
๐Ÿ‘ถ๐ŸผLisa ๐Ÿ‘ถ๐Ÿผ

Tuesday, April 24, 2018

CAS(E) This Sketch #268

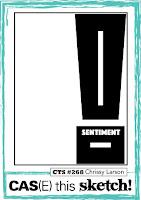
Quick post today to share my card for the CAS(E) this sketch challenge #268.  I love following these sketches because it speeds the creativity process along.  Simple card using basic crayola watercolors, a Kat Scrappiness wonky rectangle die and a beautiful Papertrey Ink sentiment, finished off with some Pretty Pink Posh clear sequins.
Have a great day everyone!
I already am!
๐ŸŒˆLisa ๐ŸŒˆ


Friday, April 20, 2018

Simon Says: Sparkle And Shine


I'm not sure if my craft table will ever recover from all this glitter......but I'm ok with it!  Love love love sparkle and shine!  SSS knows this about us paper crafters so this week's challenge was a TON of FUN!!  I finally got my SSS stitched butterflies in the mail so I promptly glittered them up to pop on my card.  The inspiration for this card actually came from a pretty notepad I bought at TJ Maxx recently.  I fell in love with the colors and the shine.  I was going to copy the pretty glittered heart on it but I opted for the beautiful butterflies instead.  Here is the notepad followed by my card.

I made the heart panel by stamping some hearts from the Essentials by Ellen stamp set Fancy Thanks in versamark ink.  I heat embossed them and inked the entire panel with Picked Raspberry and Spiced Marmalade distress inks.  
I matted the heart panel on some glitter paper and heat embossed the butterflies with glittered embossing powder after inking them with Picked Raspberry and Spiced Marmalade distress inks as well to match the panel.  The gorgeous doily is from the Greeting Farm which I die cut from glitter paper like the background.  I needed a happy birthday card so this sentiment from SSS Furry Cat and Box was the perfect size for the circle.  So much sparkly goodness on this card I can hardly stand it!
Here is a close up of those sparkly butterflies.

Of course pictures never do justice to sparkle and shine.
Thanks for stopping by and have a great Friday!
I already am!
๐Ÿ’–Lisa ๐Ÿ’–


Wednesday, April 18, 2018

Papertrey MIM #319: GRAFFITI WORD ART


Lexi Daly has created some fun graffiti art on a card this week for Papertrey Ink's MIM and has challenged us to do the same.  I love thinking outside the box with my stamps and dies.  It took me 2 days to think about this challenge and I decided to make it a little more realistic by putting it on a brick wall background.  I also added a drop shadow appearance that you see in a lot of graffiti to give it dimension.  I really love the look of that shadow with word art!  I used the Block Alphabet from Papertrey Ink for my letters and the sentiment is from a stamp set by Lil' Inker called Rainbows and Clouds sentiments. The stars in the letters are from a new Pinkfresh Studio stamp set called Magical Unicorn.  I really like how this card turned out and it was so much fun to try something new.
Thanks for stopping by today and enjoy the rest of your week!
I'm already enjoying mine!
๐ŸŽจLisa ๐ŸŽจ


Sunday, April 15, 2018

CAS(E) this Sketch #267


Fun card to share today for CTS 267.  I've been playing with my PTI roses a lot lately and they were the perfect focal point for this sketch.
Thanks for dropping by!
Enjoy your day, I already am!
๐ŸŒนLisa ๐ŸŒน

Saturday, April 14, 2018

Simon Says : Add Some Texture (Take 2)


I am loving this week's Wednesday challenge at Simon Says Stamp to add texture so much that I made a second card.  Instagram is filled with all things Springy and Butterfly related now and I just had to jump on the bandwagon.  Since I am waiting on my butterfly dies from the SSS Fluttering By collection I thought I would take out 2 of my older butterfly dies from 
SSS called Devonshire and Paulina. The 2 smaller butterflies are SU punches.
So much inspiration on this card but mostly from Melissa Phillips at Lilybean Paperie.  She has a way of making every card look magical!  On a recent card for the SSS blog hop she sponged her butterflies with distress ink, sprayed with water and splattered white paint on top.  
LOVE THOSE RESULTS!

I didn't glue the wings down so they could fly off the page.  
I layered those beautiful butterflies on top of the Papertrey Ink Shapeshifters Oval 1 die and I used the Aqua Mist Bitty Big paper as a background.  Since I know my mom will love this card I finished it off with a Happy Mother's Day sentiment from PTI's Butterfly Blooms stamp set.  I heat embossed it with white powder onto a strip of Aqua Mist Bitty Big paper and popped it up on foam tape.  All that was left was to add some sparkly clear sequins from Pretty Pink Posh and my card was done.
Thanks so much for stopping by today to take a look!  
I hope you all are enjoying your Saturday, I know I am!
๐Ÿฆ‹Lisa ๐Ÿฆ‹


Thursday, April 12, 2018

Simon Says: Add Some Texture

SSS Wednesday Challenge Add Some Texture

I love this week's challenge to add some texture to your project.  I knew I wanted to use a woodgrain embossing folder on the main card but the treasure map on the front wound up having it's own texture.  I didn't realize how much until I showed my son this card and he actually wanted to feel the map, he said it looked like leather.  That's when I knew it was the perfect project for this week's challenge.  I just love the little DeNami chickie stamps and their Pirate Chickie was just meant for this treasure map!  I used the Distressed Edges Rectangle dies from Kat Scrappiness for the map and I inked the edges with Tim Holtz Ground Espresso Distress Ink after I sprayed it with water and crumpled it up a few times.  

I used the SSS "Circle Friends" stamp set for the fun stitching lines and the Stitched Alpha Dies from Craftin Desert Divas for my "X" marks the spot embellishments.  The sentiment "Ahoy Matey" came from the Papertrey Ink stamp set "Out to Sea" and the banner and circle seal dies are from the 
Spellbinders "Hipster 1" dies.  

I actually made a list of how many companies products I used on this card just for fun and it came to 11.  I really enjoyed making this card and it turned out just like I wanted which is rare.  Sometimes the card ideas in my head don't actually make it to the card itself.  See you next week for another 
SSS Wednesday challenge!
Thanks for stopping by today.  
Have a great day, I already am!
☠️Lisa ☠️

PAPERTREY INK MIM #318: SIMPLE STITCHED STEMS


PTI MIM #318 Simple Stitched Stems

Another Monday, another PTI Make it Monday and this week I have to say that Michelle definitely had me step outside of my comfort zone.  The challenge was to stitch stems on a card and I've never tried it before.  After ripping the cardstock on my first attempt I tried again with a smaller needle and had success.  Maybe if I practiced more I could get less space between the stitches.  I do like how it turned out in the end and it was fun to try a new technique.  I was inspired by Laurie Schmidlin and the pocket card she made recently.  I used one of the lacy Edgers dies on the front of the pocket.  I fell in love with the style and I couldn't wait to try it.  

I used the Farmers Market florals for the flowers on the stems and The Sweet Life stamps for the large rose on the front pocket.  I watched Lizzie Jones Make it Monday challenge recently and it reminded me how much I LOVE the Sweet Life stamp set.  So much inspiration from PTI and their design team! 
I finished it off with a sentiment from the Butterfly Blooms stamp set and matted it on some Aqua Mist card stock.  Thanks for stopping by today!  Can't wait for next week's MIM, I'm enjoying this weekly inspiration!
Have a great day, I already am!
๐ŸŒนLisa ๐ŸŒน


Lots of Envelopes

๐Ÿ’ŒHAPPY MAIL๐Ÿ’Œ
I don't know about you but that sentence brings a smile to my face whenever I hear it, not to mention when I see it in my mailbox and at my front door!
Today I'm over on the Kat Scrappiness blog with some fun envelopes to give your snail mail an upgrade!

The April Card Challenge over at Kat Scrappiness is Envelope Art and there are 2 new stamp sets that make it easy to add some PIZZAZZ to your envelopes!  Giraffe Envelope Art and Owl Envelope Art. Here are 2 examples of how you can use the Giraffe stamp set to take your
envelopes from drab to fab!

On the first envelope I stamped the Giraffe with some Memento Tuxedo Black ink so I could color him with copic markers and then cut him out so he could sit at the bottom corner and then I added some fun leaves around him. The stamp set also comes with 2 cute stamps that say "to" and "from" in a fun font.  I thought it would be fun to stamp them and highlight them with Lawn Fawn Cilantro ink using the rectangle shape from the Swatches stamp set.  To finish the envelope off I stamped the cheeky sentiment "It has been so long" diagonally near the giraffe's head.  For the second envelope I stamped the entire Giraffe with his sign and colored him in and then added some fun leaves around the border of the envelope.  The sign is the perfect space to add your recipients name and address. The "to" and "from" stamps look cute in their respective places on the envelope as well.  HAPPY MAIL for KAT!!

The next envelope I have to show you is a mini envelope that is meant for hand delivery as opposed to sending in the mail.  It has a super fun shaker element on the front and uses the star stamp from the Swatches stamp set again and some dreamy Sent from Heaven sequin mix.  I stamped the star with some Golden Glitz Pigment ink by Delicata for a sparkly look.  This envelope will be a keepsake that your lucky recipient won't stop shaking!
The last 3 envelopes I decorated using the Swatches stamp set one more time.  This stamp set is so versatile with its basic shapes and the sky is the limit with what you can create after you've swatched your inks and markers with it.  For the top envelope I stamped only half of the circle stamp in a rainbow of Lawn Fawn inks to give the look of a fun scalloped border along the bottom edge.  I highlighted the "to" and "from" stamps with that same circle in red and blue ink.  The "happy mail" sentiment from the Giraffe Envelope Art set was the perfect addition to repeat 
along the scalloped border.
For the bottom two envelopes in the picture I combined the Swatches stamp set with the Everyday Brush Strokes set for fun side border stamped in Distress Oxide inks.
I love the chalky appearance the Oxide Inks give and I love the look on kraft paper!
I hope that I have inspired you to have some fun with your envelopes today and dress them up with your stamp sets!  It is our responsibility to add some fun to the mailbox for our hard working post men and women!  Not to mention distracting your recipient from those nasty bills and junk mail!
Thanks for joining me today!  All supplies will be linked down below and don't forget to use code: Lisa10 to receive 10% off your purchase at checkout in the Kat Scrappiness shop! 
Have a great day everyone!  I already am!
๐Ÿ’ŒLisa๐Ÿ’Œ
Kat Scrappiness Supplies Used:

Thursday, April 5, 2018

CAS(E) this Sketch #266


It's not very often I get almost an entire day to stamp and play but today was one of those days!  I've had the Tiny Dancers stamp set from Sunny Studios for quite some time now and haven't been able to get it inky.  I'm happy to say that today was THAT day!  Those ballerinas are so STINKIN' cute!!! When I saw the sketch this week at CAS(E) this sketch I knew that the tiny dancers would be perfect!
Here is the sketch and the card:

Oh I am in love with those cute little ballerinas!  I probably love them so much because I wasn't allowed to be one growing up.  Yup, I was the only little ballerina who was thrown out of ballet class.  We can't all be graceful ๐Ÿ˜ฌ.... oh well.  I'll settle for coloring them now and putting them on cute cards!  I love how the little pink tutus look against the black and white polka dot paper and I love this week's sketch!
Thanks so much for stopping by today!
Enjoy your day, I already am!
๐Ÿ’ƒLisa ๐Ÿ’ƒ

Happy 9th Birthday Simon Says Stamp

๐ŸŽ Happy 9th Birthday Simon Says Stamp!๐ŸŽ‚
The Wednesday challenge at Simon Says Stamp is a Happy Birthday theme for their 9th birthday!  

In celebration I took out my SSS birthday stamps and my Gina K Wreath Builder
 stencil again and got to work!  
Thank you Gina K!  I have had so much fun with my Wreath Builder stencils and I have been looking at my stamp sets in a new way.  I love flower wreaths but I have been enjoying finding other stamps that would look good in a wreath pattern.  Today I took out my SSS set called Birthday Balloons and those cute little balloons were just the perfect size for the wreath stencil!  I also had fun looking through my ink pads for the perfect rainbow colors!  I backed the balloon panel on black cardstock because I always love the look of rainbow colors against a black background.  The sentiment is from an older SSS stamp set called Square Sayings.  I just love how this card came out!  

Thanks so much for stopping by today!
I hope you get some crafty time in today and have a great day!
I already am!
๐ŸŽˆLisa ๐ŸŽˆ

Got Coffee?

Hi crafty friends, today I'm on the Kat Scrappiness blog to share a cup of coffee with you.  If you've already had your morning cup, pour another and relax.  This month Kat has come out with an awesome new Layered Coffee Cup Die and I'm in love!  I'm a big fan of all coffee themed projects.  I'm not a huge coffee drinker but since I work night shift at the hospital I do find myself reaching for it at 3 and 4 in the morning to stay awake.  If the truth be told I just enjoy a little coffee in my half and half.... heh heh heh.
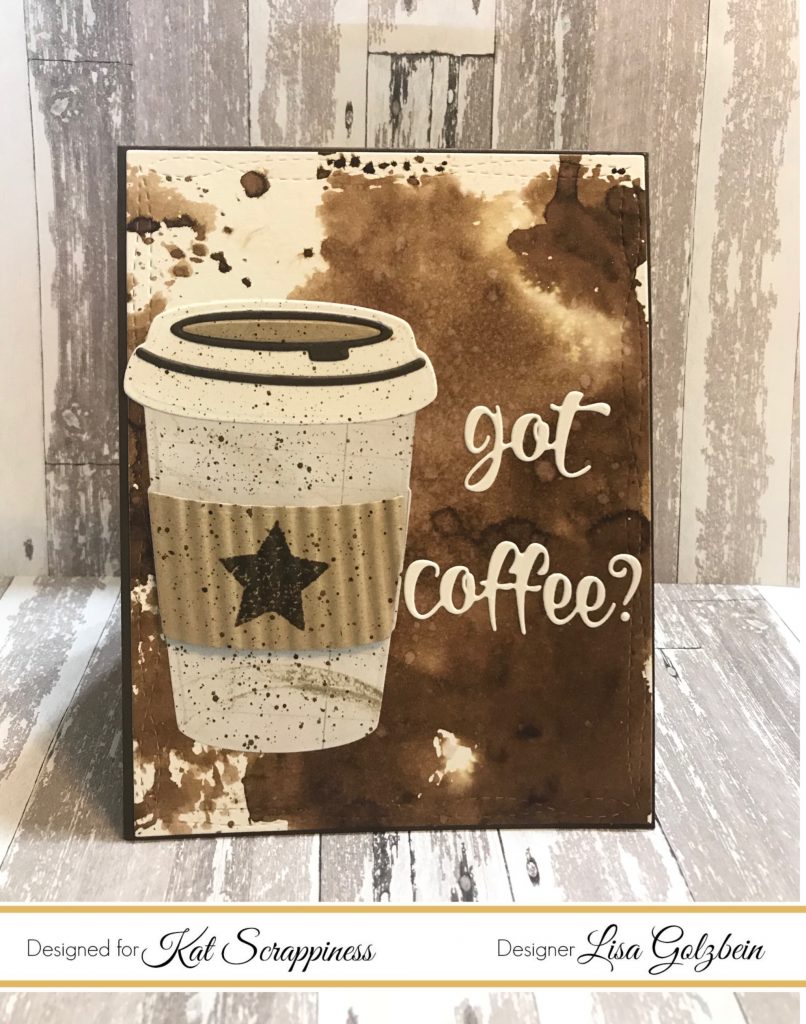
Ok enough coffee talk, on to the card.  I wanted this card to have a "coffee stained" background so of course I reached for my Ground Espresso colored Distress Ink pad and  I "smooshed" (technical crafty term) some ink onto a piece of acetate and then sprayed it with water.  When the ink was moving around I placed the acetate onto a piece of watercolor paper and the results were gorgeous!  I then assembled my coffee cup out of various colors of card stock and patterned paper.
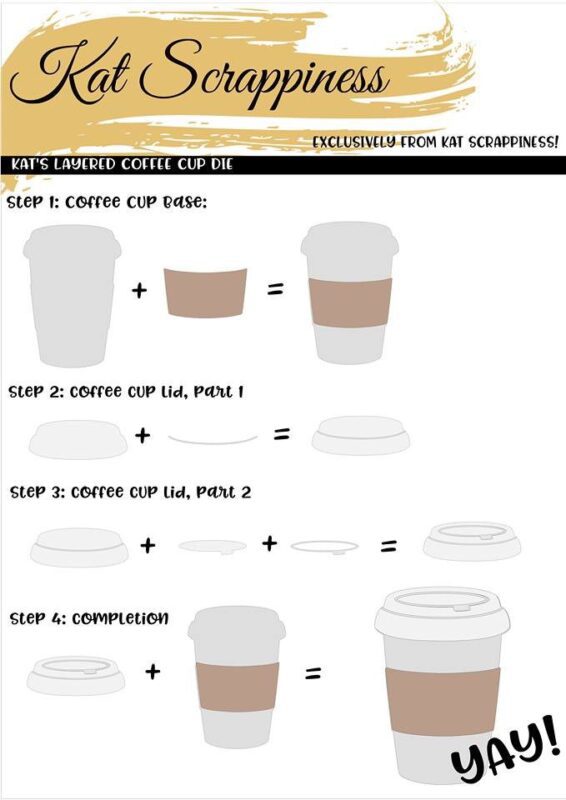
Here is a very handy instruction sheet to show you how to assemble the pieces from the die.
For the coffee cozy section of the die I used kraft cardstock and I stamped a star from the new Kat Scrappiness Swatches stamp set.  After that I ran the cozy through my paper crimper to give it a realistic look with some dimension and I added it to the cup with some foam tape.  When the coffee cup was fully assembled I added some paint splatter with the Ground Espresso color to the whole cup.  I just love the added interest paint splatter gives to any project!
For my sentiment I used the new Kat Scrappiness "Got Coffee?" die and added it to the side of the card.  This sentiment is awesome and uses a fun whimsical font that is perfect for any coffee themed card.
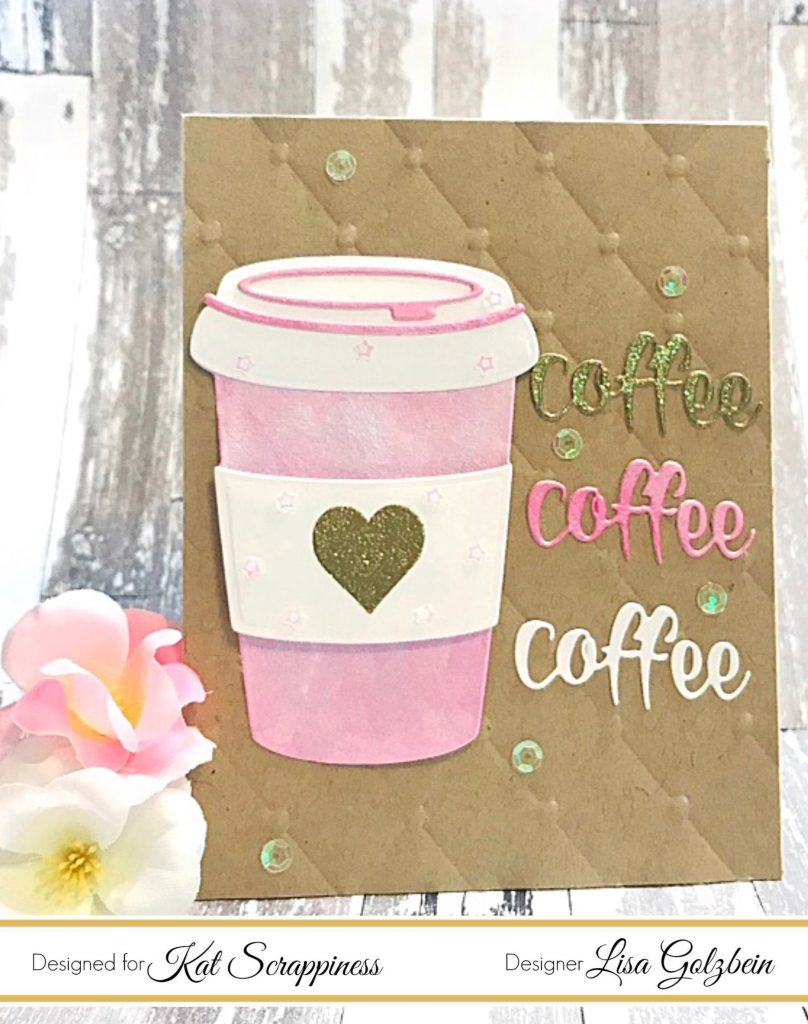
For this next card I used just the word "coffee" and cut it out 3 times in different colors for a fun look.  I painted the coffee cup with a pink pearlescent color from the Kuretake Gansai Pearl colors watercolor set and I added a heart to the cozy from the "Swatches" stamp set and heat embossed it with Ranger Gold powder.  I placed it on a diamond embossed background and added some fun
Kat Scrappiness Barbie sequins for a feminine touch.
Such a different look with the same die!
If you added the sentiment "Wanna" above this die, it would make a cute card for a friend inviting them to get together over coffee reading "Wanna Get Coffee?"
This coffee cup die makes it easy to create an eye catching card in no time!
Make sure to stay tuned this month to the blog to see what my talented fellow design team members have come up with for this die and all of the other new release stamps and dies!  You'll be glad you did!
That's all for today, I am glad you stopped by and I hope you have a great day crafty friends!
I already am!
☕Lisa☕
Supplies used on Coffee cards:
Be sure to use code: Lisa10 to get 10% off of your purchase at checkout!
Layered Coffee Cup Die
Got Coffee Word Die
Swatches Stamp Set
Barbie Sequin Mix
Ground Espresso Distress Ink
Kuretake Gansai Pearl Watercolors
Ranger Gold Embossing Powder

Wednesday, April 4, 2018

Gina K Wreath Builder and DeNami ❤️

My long awaited Gina K Wreath builder set came the other day and I've been working so I haven't had a chance to play with it but tonight I got to have at it!  SO MUCH FUN! If you don't own the wreath builder set yet I highly recommend it!  When I pictured little stamps to use with it I pictured my adorable little DeNami Chickie and the Heart Flower stamps and boy did they work perfectly!  This card came together so quickly and I can't wait to make more wreath cards.  I decided to enter it in this week's Simon Says Stamp Wednesday challenge since it's an anything goes week.
Thanks for stopping by and have a great day!
I already am!
๐ŸฅLisa ๐Ÿฅ