Showing posts with label got coffee. Show all posts

Monday, September 10, 2018

Coffee Monster Cards


HAVE YOU SEEN THE MONSTERS?

I just recently found them myself!
These cuties are part of an adorable stamp set by 
Gerda Steiner called Coffee Monster.  I had seen these cuties around Facebook and Instagram and I knew I had to have them!
I just bought them at Kat Scrappiness along with 
some other crafty goodies!
I was so inspired by these adorable monsters that I made the 3 cards shown above to share with you!
To begin with I stamped all the cuties out on 
Bristol Smooth card stock with 
Gina K Amalgam Ink so that I could color them with 
whatever type of marker I wanted.
Since my Zig markers give me the best blended results I used them for the coloring.
I cut out a bunch of them at once with my Brother Scan n Cut and laid them all out on my desk. There is definitely no lack of mojo when all of those cute monsters are staring back at you.  
The ideas for the cards came pretty easily.


For my first card I took some True Black Bitty Big paper from Papertrey Ink and cut it down with one of the Kat Scrappiness 
Stitched Scalloped Border dies. I backed the polka dot paper with some craft foam so that it would have some dimension and I added the first monster to the bottom.  I used my craft knife to cut away one of his hands from his body so that he could hold his itty bitty coffee cup under it... so cute!
The sentiment from the Coffee Monster set was stamped at the bottom of the card with Orange Zest ink from Papertrey Ink. For a little bit of extra color and interest I added a few drops of 
Nuvo Crystal Drops in blue. I've always loved the look of vibrant colors against a black polka dot background.
Card #1 done!


For my second card I started with some Kraft card stock from Papertrey Ink.  My favorite kraft card stock hands down for color and quality! To give the background some texture and dimension I ran the paper through my vagabond with my 
We R Memory Keepers Next Level Quilted embossing folder.
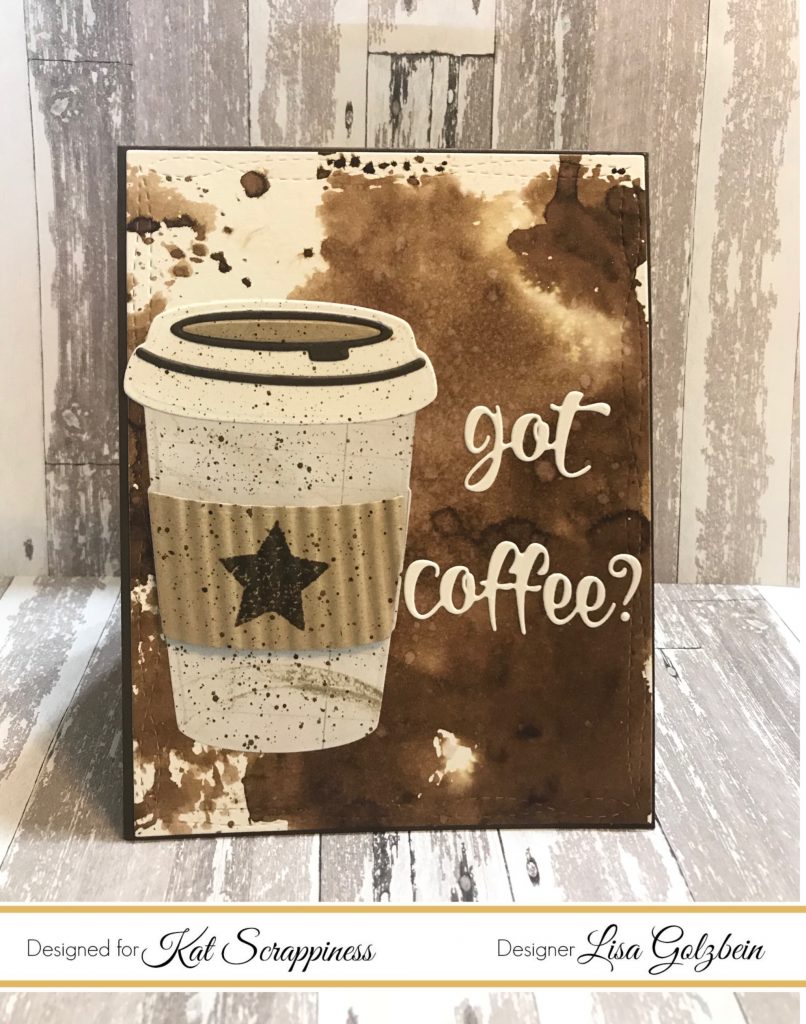
For my focal point I used the Kat Scrappiness 
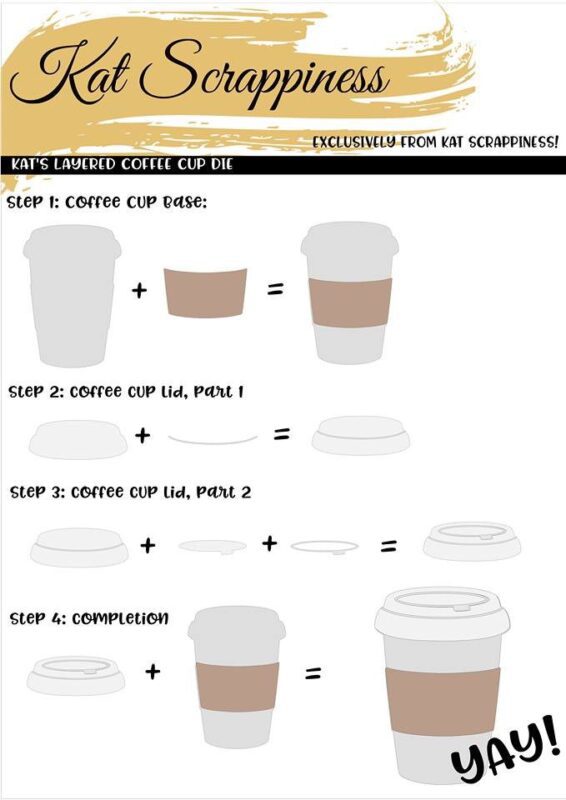
Layered Coffee Cup Die  and popped monster #2 up on the koozie.  I added an itty bitty coffee cup from the stamp set to his hand as well. The Layered Coffee Cup Die is such a great size to take center stage on any card! You can check out this video on my YouTube channel to see instructions on how to assemble the bits and pieces of this coffee cup. For my sentiment I die cut the Kat Scrappiness Got Coffee word die from some PTI Dark Chocolate card stock and added it to the top and bottom corners of the card.
Card #2 done!


For my third and final card I started with some Aqua Mist card stock from PTI for my card base. The card base was given some extra interest with the help of the Cover Up Grid stamp set by PTI. I used a tone on tone effect and used Aqua Mist ink to stamp the grid. Next I took some PTI Kraft card stock and stamped out my own background using the coffee cup from the Coffee Monster stamp set and the largest coffee bean and heart from the Kat Scrappiness Let's Get Caffeinated stamp set. I used PTI's Cocoa Bean ink for all the little background images. The kraft panel was then cut with one of the dies from the Kat Scrappiness Stitched Scalloped Rectangle Dies.  Those are definitely my go to dies for many of the panels on my cards.  
I love the scalloped edges!
All that was left was to add my sad monster to the front with foam tape and stamp my sentiment from the Coffee Monster set
 underneath him in Versafine Onyx Black Ink
That is definitely my favorite black ink for 
crisp black sentiment stamping!
Card #3 done!

I hope you enjoyed these 3 monster cards I've shared today.  Many of the products I used are available in the Kat Scrappiness shop and if you use my code Lisa10 you can save 10% on your order. I will list and link those products below.

Thanks for stopping by and have a great day!
I already am!
☕️ Lisa ☕️

Products Used on Card:
(available at Kat Scrappiness)


Wednesday, May 30, 2018

Mini Treat Bags

Hello again crafty friends!  I'm back today on the Kat Scrappiness blog to bring you another cute project!  I made 3 adorable mini treat bags using the Stitched Heart Tag die and I decorated them with the Stitched Flag dies and the Double Stitched Circle dies.  I have a video for you today to show how I assembled the bags and it's super easy to follow.  I have to thank my fellow Kat Scrappiness design team member Maria Russell for the fabulous idea to make the bag.  She did a video a while back showing the process and I remade the bags using some current stamps and dies.  

This is the bag I assembled in my video and I used a sentiment from the Punny Snacks stamp set.  
The pretty patterned paper is from the Lawn Fawn paper pack, Gotta Have Gingham .  I started with 2 die cut panels from the larger die in the Stitch Heart Tag dies. I then cut a coordinating piece of paper to 11 7/8" x 2" to attach the 2 die cut panels together.  Next you will score your paper on the 11 7/8" side at 4" and 7 7/8" and then you will score the paper 1/4" in from both sides on the 2" side.


After you score your strip fold on all the score lines and make 
4 snips where the score lines meet each other.


The next step is to place some strong double sided adhesive along the middle sections to 
adhere the 2 heart tags.

Next you want to apply some additional double sided tape to the remaining scored flaps and assemble the box accordingly.


The video will show the assembly process step by step.  The only thing left to do is decorate the front of the box and fill it with pretty tissue paper and treats!
I die cut several Stitched Flag dies from some more gingham paper and arranged them around one of the Double Stitched Circle dies.  I stamped a sentiment from the Punny Snacks stamp set on to a scalloped circle and adhered it to the circle on some foam tape.  
I made the same box with some different patterned paper but essentially followed the same steps.

I also created the same bag a third time for the Coffee Lovers Bloghop that Kat Scrappiness is a super sponsor for.  I used the Layered Coffee Cup die and the "Got Coffee" sentiment die for the front of the bag and I finished it off with a sentiment from the Technique Tuesday stamp set "Sassy Coffee"
I stamped the sentiment on to a Stitched Flag die and finished off the front panel with some paint splatters of Ground Espresso distress ink.

These treat bags are super fun to make and they are very quick and easy to assemble.  They would make great party favors for a kids party or even elegant favors for a wedding or anniversary party.  
Here is a link to the YouTube video showing how to assemble these cute bags.


Thanks for joining me today!  All supplies used are linked below.  
I hope you'll give this technique a try!
Don't forget to use code Lisa10 at KatScrappiness.com to receive 10% off your order at checkout.
Have a great day, I already am!
🍬Lisa 🍬


Friday, May 25, 2018

Spring & Summer Coffee Lovers Bloghop


Hello Crafty Coffee Lovers!
Kat Scrappiness is hopping along today as a super sponsor with the 
The best part about this hop is that you don't have to love coffee to participate!  You just have to love sharing in all of the crafty coffee fun!  I personally do love a good cup of coffee especially at work and I am definitely an iced coffee lover!  If you use coupon code ILOVECOFFEE between 5/25 and 6/1 you will receive 10% off your order in the Kat Scrappiness shop.
Also Kat is giving away two $25 gift cards to the store and a flash prize of a Layered Coffee Cup Die and a "got coffee" sentiment die.


Kat Scrappiness released two awesome coffee themed dies recently and they are so much fun to create with.  The first is a layered coffee cup die and the second is a "got coffee" sentiment die.
Here are the pictures of the two dies:
,

I had fun with these 2 dies and I created 1 gift bag and 3 cards with them.  
The first project is the mini gift bag that I assembled using the 
Kat Scrappiness Stitched Heart Tags Die.  Thank you to Maria Russell for making a video showing how to make a mini gift bag from these dies.  I decorated the front of the card using the 2 coffee dies 
and splattered the aqua heart tag with some Ground Espresso Distress Ink.  The stamped sentiment is from Technique Tuesday's Sassy Coffee stamp set and it is stamped onto a Stitched Flag Die that is new in the KS shop this month.

The next 2 cards feature the Layered Coffee Cup Die again with some fun colorful effects!  The first card below with the pink cup was made using a pearlescent pink watercolor from the Kuretake Gansai Tambi pearl color set.  It really stands out against the embossed background.  I stamped a heart from the Swatches stamp set and heat embossed it in gold on the white cozy. I die cut the "coffee" word from the "got coffee" sentiment 3 times in 3 different colors to repeat down the side of the card.  I finished off the card with some sparkly sequins from Kat's shop.
The second card has a distressed coffee stained background that I achieved by smooshing some Ground Espresso ink onto a piece of acetate and then spraying with water.  I then smooshed the acetate against the cream colored paper to give the distressed coffee colored look.  I love that effect!  I stamped the star from the Swatches stamp set onto the cozy and then sent it through the paper crimper to give it a realistic look.  Same die but two very different looks!


The last card I want to share with you is perfect for the Spring/Summer theme.  It features a very colorful tropical setting with the cutest little Denami hula chickie on the front! I decorated the cup and the cozy with some flowers from My Favorite Things and the grass die is from Lawn Fawn.  The super cute clouds are from Paper Smooches and the bright sun is from My Creative Time. I love how bright and cheery this card turned out and the Kat Scrappiness Layered Coffee Cup Die is the perfect large focal point!

Thanks again for hopping along with Kat Scrappiness today in the Spring and Summer Coffee Lovers Bloghop.  Make sure to check out all of the fun projects from all of the other talented designers today!  Don't forget to use code ILOVECOFFEE to save 10% in the Kat Scrappiness shop from 
5/25-6/1.  There is a very large selection of all things crafty in Kat's shop!
Have a fabulous day!
I already am!
☕️Lisa ☕️


Thursday, April 5, 2018

Got Coffee?

Hi crafty friends, today I'm on the Kat Scrappiness blog to share a cup of coffee with you.  If you've already had your morning cup, pour another and relax.  This month Kat has come out with an awesome new Layered Coffee Cup Die and I'm in love!  I'm a big fan of all coffee themed projects.  I'm not a huge coffee drinker but since I work night shift at the hospital I do find myself reaching for it at 3 and 4 in the morning to stay awake.  If the truth be told I just enjoy a little coffee in my half and half.... heh heh heh.
Ok enough coffee talk, on to the card.  I wanted this card to have a "coffee stained" background so of course I reached for my Ground Espresso colored Distress Ink pad and  I "smooshed" (technical crafty term) some ink onto a piece of acetate and then sprayed it with water.  When the ink was moving around I placed the acetate onto a piece of watercolor paper and the results were gorgeous!  I then assembled my coffee cup out of various colors of card stock and patterned paper.
Here is a very handy instruction sheet to show you how to assemble the pieces from the die.
For the coffee cozy section of the die I used kraft cardstock and I stamped a star from the new Kat Scrappiness Swatches stamp set.  After that I ran the cozy through my paper crimper to give it a realistic look with some dimension and I added it to the cup with some foam tape.  When the coffee cup was fully assembled I added some paint splatter with the Ground Espresso color to the whole cup.  I just love the added interest paint splatter gives to any project!
For my sentiment I used the new Kat Scrappiness "Got Coffee?" die and added it to the side of the card.  This sentiment is awesome and uses a fun whimsical font that is perfect for any coffee themed card.
For this next card I used just the word "coffee" and cut it out 3 times in different colors for a fun look.  I painted the coffee cup with a pink pearlescent color from the Kuretake Gansai Pearl colors watercolor set and I added a heart to the cozy from the "Swatches" stamp set and heat embossed it with Ranger Gold powder.  I placed it on a diamond embossed background and added some fun
Kat Scrappiness Barbie sequins for a feminine touch.
Such a different look with the same die!
If you added the sentiment "Wanna" above this die, it would make a cute card for a friend inviting them to get together over coffee reading "Wanna Get Coffee?"
This coffee cup die makes it easy to create an eye catching card in no time!
Make sure to stay tuned this month to the blog to see what my talented fellow design team members have come up with for this die and all of the other new release stamps and dies!  You'll be glad you did!
That's all for today, I am glad you stopped by and I hope you have a great day crafty friends!
I already am!
☕Lisa☕
Supplies used on Coffee cards:
Be sure to use code: Lisa10 to get 10% off of your purchase at checkout!
Layered Coffee Cup Die
Got Coffee Word Die
Swatches Stamp Set
Barbie Sequin Mix
Ground Espresso Distress Ink
Kuretake Gansai Pearl Watercolors
Ranger Gold Embossing Powder