Tuesday, March 31, 2020

The Rabbit Hole Designs April Inspiration Hop - Day 2


Welcome back to my blog for the second day of the New Product Release for April 2020 over at The Rabbit Hole Designs and the theme for the next 2 days is OLD SCHOOL TATTOOS!

I hope you enjoyed all the amazing inspiration yesterday from the design team, we have so much more in store for you today and tomorrow! Today we are showcasing one more stamp set and one stencil.  They are the:

Old School Tattoo - Anchor
and the
Dotted Flower Stencil


If I'm being honest I have to say that the anchor stamp is my favorite stamp of this release! This anchor is way cooler than most because it has the heart and flower in it and the cool rope intertwined around it.  I just love everything about it! My first card uses the anchor and I did a bit of masking on my card.


I started by stamping the anchor on some masking paper and fussy cutting it out.  I then stamped the anchor again on the middle of the front panel of my card and placed the mask over it. Once the mask was down I took my wave stencil and laid it over top of the panel.  I used 3 different color distress inks over the stencil and when I was finished stenciling I peeled the stencil and the mask off for the big reveal. Here is a quick video of the reveal:


It's like magic, I love watching what is left behind when the mask is removed. The next step is to color the anchor with my Copic markers.  I have to admit it is a little nerve wracking to color directly on the already stenciled panel.  I always need to convince myself that I can start over if necessary, but who wants to do that? 
 πŸ˜‚ πŸ˜‚ πŸ˜‚ 
Once the coloring was done, it was just a matter of stamping the sentiments on the card.  The "love" stamp is from the Love You More stamp set from a previous release. Instead of going on a scavenger hunt for a stamp that said "is" I decided to write it in.  I figure it's just 2 letters, how bad could it be? LOL! The "forever" stamp is from the anchor set and I just love that funky font!
I really love how this card turned out and I'm happy with the coloring as well.  I have done a lot of Copic color practicing over the years and it's just finally starting to click.  I'm not the best colorer out there but I'm happy with my progress up until now.


For my second card I used the Dotted Flower Stencil and I did some foiling with it.


Since I have a laser printer I like to do my foiling with the toner ink.  I started by placing the Dotted Flower Stencil over my card panel and inking it up in jet black ink.  It doesn't matter what type of ink you use because you're just going to photocopy it in the laser printer.
I placed the inked panel in my scanner on top of the printer and I printed the image on card stock. Then I placed some rainbow decofoil from Therm-O-Web over the printed image and ran it through my Minc. The results are breathtaking and the reveal is just as good as the masking results.


All that was left to do was to cut the panel down and mat it on to black card stock. I added a Happy Birthday sentiment and my card was done! The Dotted Flower Stencil is going to be one of my favorite stencils, I can already tell!


I hope you have enjoyed my cards today! For more inspiration please visit the other design team member's blogs to see what they have made using the new products as well!


Lisa


GIVEAWAYS:
To celebrate the next three days of release, The Rabbit Hole Designs is giving away two gift certificates; one to a lucky Instagram Follower and one to a lucky Fan Page follower. Winner will be chosen at random from the comments left on the INSTAGRAM post, and tagging friends, and also from commenting on the Fan Page post. So make sure to head on over to INSTAGRAM and look for the giveaway post @therabbitholedesignsllc and look for the post at The Rabbit Hole Designs Fan Page by 11:59 p.m. PST 04-03-2020. Winner will be announced on The Rabbit Hole Designs blog 04-03-2020.

Thank you so much for stopping by my blog today!

For more inspiration, updates, and news make sure to check out these places ...


Have a great day, I already am!
⚓️Lisa ⚓️

Love You More Than Coffee


Hello crafty peeps! Today I have another caffeine inspired card for the Coffee Loving Cardmakers blog and it's a real cutie! Who can resist a hamster in a coffee cup?


Oh my gosh, isn't that just the cutest little hamster? I used the Hammie Coffee and Tea stamp set from Your Next Stamp and the sentiment is from an older Hero Arts stamp set.

I started with a piece of smooth card stock and stamped a script background in emboss resist ink then sprinkled white embossing powder over top and heated it up until it was smooth and melted.
I then took 3 different distress oxide inks and did some ink blending over the embossed words.  
I love the look of the embossing showing through the ink blending! I love the 3 colors together, they blend so well.  I used Twisted Citron, Cracked Pistachio and Mermaid Lagoon.
My little Hamster was colored with Copic markers and then I cut him out with my Scan n Cut.
I used the largest Postage Stamp Edge die from Kat Scrappiness and made a frame out of it by placing the second largest Embossed Edge Rectangle die inside of it before I cut it out. That gave me the perfect frame.  I adhered the kraft frame to the front of the card and placed my hamster and sentiment inside the frame on foam tape.

I love the pretty ink blending mixed with that Oh So Cute Hamster!
Thanks for stopping by today, stay safe and stay home everyone!


Enjoy your day, I already am!
🐹  Lisa  🐹 

Monday, March 30, 2020

The Rabbit Hole Designs April Inspiration Hop - Day 1

Welcome to my blog! Today is the start of the New Product Release for April 2020 over at The Rabbit Hole Designs and the theme for the next 3 days is OLD SCHOOL TATTOOS!

This is going to be a fun release with 4 new stamp sets and 2 new stencils!
Today the design team will be focusing on the:

Old School Tattoo - Horseshoe stamp set


These stamp sets were so much fun to create with because there were so many ways you could go with colors and themes.  I got a very "Ed Hardy" design feel from them and I used lots of colors and metal textures with them. 

For my first card I used the Old School Tattoo - Dice and Diamond stamp set and after I colored the image with my Copic markers I cut it out with a circle die and matted it with a larger black circle to enhance the colors.  I then took some silver foil card stock and an embossing folder that looked like faux metal to make the background for the card.  For the sentiment I used the work Lucky from the stamp set and heat embossed it in white on some black paper.
These stamp sets have a real edgy look and feel to them and really made me think outside the box.


For my second card I use the Old School Tattoo - Horseshoe stamp set.  I went a little more feminine with this card and used some bright colors.  I used a masking technique with this card that I have been loving lately! I used to be intimidated to do masking directly on to the card front because it meant coloring right on the final card and that was scary for me.  Over time I have gotten a little more confident with my Copic coloring and now I love coloring directly on my cards.  I started by stamping the horseshoe directly on to my card front with some Copic friendly black ink. Next I stamped the horseshoe on to some masking paper and cut it out by hand.  I adhered the mask directly over the horseshoe image and taped the Drop It stencil down to my card front over the masked image.  I used 4 different Distress Oxide inks over the stencil blending as I went.  When I pulled off the mask I was left with an uncolored horseshoe nestled perfectly in between the stenciled background.  The next step was to color the horseshoe with my Copic markers and add the sentiments with some black ink. I couldn't resist adding some fun rhinestones for some extra shine.


Make sure to visit the Design Team blogs for more inspiration and card samples!
Here is the hop list:


GIVEAWAYS:
To celebrate the next three days of release, The Rabbit Hole Designs is giving away two gift certificates; one to a lucky Instagram Follower and one to a lucky Fan Page follower. Winner will be chosen at random from the comments left on the INSTAGRAM post, and tagging friends, and also from commenting on the Fan Page post. So make sure to head on over to INSTAGRAM and look for the giveaway post @therabbitholedesignsllc and look for the post at The Rabbit Hole Designs Fan Page by 11:59 p.m. PST 04-03-2020. Winner will be announced on The Rabbit Hole Designs blog 04-03-2020.


Thank you so much for stopping by my blog today!

For more inspiration, updates, and news make sure to check out these places ...


Have a great day, I already am!
🎲 Lisa 🐴 

BREATHE


If this is your first time visiting my blog than welcome and if you've been here before then welcome back.  Today I am up on the i-crafter blog with a very peaceful card for you. 
Since the world has gone a little bit crazy lately I think we all just need to remember the basics like breathing! Consider this your daily reminder to just b-r-e-a-t-h-e!

Here is my card recipe:

I started with a piece of smooth card stock and stamped a script background in emboss resist ink then sprinkled white embossing powder over top and heated it up until it was smooth and melted.
I then took a few different distress oxide inks and did some ink blending over the embossed words. 
I just love the look of the ink fading out towards the center. 
Next I cut out the letters B-R-E-A-T-H-E in some gold foil card stock from the 
Haley Outline Alphabet dies. I also used the same gold foil to cut out 3 flowers from the 
Flower Burst dies and arrange them around the letters.
I love the beautiful simplicity of this card, it has a very soothing feel to it and reminds me of the beach. The ink blending is my favorite part.

Thank you so much for joining me today!

i-crafter is having a BRAND NEW never before seen release on April 1st! You don't want to miss it so make sure to come back to the i-crafter blog and shop on the 1st!
The design team has been hard at work making some fabulous new projects for you using all of the new products!

Have a great day, I already am!
🌸 Lisa  🌸

Sunday, March 29, 2020

You feel like home to me...


Hello and welcome to my blog! Today I am up on The Rabbit Hole Designs blog with this
Beautiful Disaster.


That is the name of the stamp set I used to make this card. I just love the whimsical feel of this image. Everything from the messy hair to the shirt hanging off her shoulder. It just gives you a laid back easy kind of feeling and we all need that right about now! The sentiment is from another Rabbit Hole set called Love You More.  Isn't that just the sweetest sentiment you've ever seen! I think we all have a new appreciation of home right now.... It's our safe space and we are surrounded by our loved ones during this time of social distancing.  I know we have spent a lot more time together just in family meals alone! The background of my card was made with the
Diamond Flower Stencil and two different color oxide inks.

I am very happy with how this card came out.  It has a nice easy feel with some cool colors and I don't even hate my Copic coloring.
πŸ˜‚

Thank you so much for stopping by my blog today!

For more inspiration, updates, and news make sure to check out these places ...


Have a great day, I already am!
☕️Lisa ☕️

Saturday, March 21, 2020

You are Ear-resistable!


Hello everyone and welcome to my blog!
Today is my day on The Rabbit Hole Designs blog and I've made a heart shaped card using the recently released stamp set All Ears.  I started by coloring my bunnies with Copic markers in different shades of brown with a couple of pink bunnies thrown in for fun. I colored the background in a pale blue/green and fussy cut those cute bunnies out.  Next I used the Diamond Flower stencil and a blending brush to make a pale pink pattern that I then cut out with a large heart shape.  I cut out a larger heart shape to mat the stenciled panel on in a light blue/green color.  I added foam tape to the back of the bunnies and popped them up on the stenciled heart.
For a little bit of added interest I added some fun white dots around the larger heart. All that was left was to stamp the sentiment from the All Ears stamp set and my card was done!

Thank you so much for stopping by my blog today!

For more inspiration, updates, and news make sure to check out these places ...


Have a great day, I already am!
🐰 Lisa  🐰

Tuesday, March 17, 2020

Take life one sip at a time!


Welcome to my blog everyone! Today is my turn over on The Coffee Loving Cardmaker's Blog.
WOW life is pretty crazy right now and I think we all need a little break from the madness! It's the perfect time for some coffee, tea, hot chocolate or whatever beverage calms your nerves! I know I could use a little down time and a little less media coverage.

Today's card is to remind us all to take life one sip at a time because that's all we can do.....
Am I right?


I used the Circles and Stars stencil from The Rabbit Hole Designs on my card base and I went with a light pink calming color to match my coffee cup.  I just love the Kat Scrappiness Layered Coffee Cup die for my to go coffee cup cards! I prettied it up with some pink striped patterned paper and then for some extra fun I glued on some Coffee Bean sprinkles from Kat Scrappiness as well!
The sentiment at the bottom is from The Rabbit Hole Designs Perfectly Blended stamp set.

Just a quick and easy card today to remind us all to breathe and take life one sip at a time!

Thanks for stopping by today and have a great day!
I already am!

🌸Lisa 🌸

Monday, March 16, 2020

Amazing Friend


Hello and welcome to my blog! Today I am up on the i-Crafter blog with this rainbow inspired friend card.  The March release showcased the Haley Alphabet Outline Dies and the Flower Bursts Dies and I used them both on this card. For the sentiment I used the Amaze Me Stamp Set that was released back in January.

Card Recipe

For my card I started out with a piece of kraft card stock that measured 5" x 3 3/4" and I lined up the letters F-R-I-E-N-D from the Haley Alphabet Outline Dies across the center and sent it through my die-cut machine.  I kept all the pieces that fell out so I could fill in the centers of the R and the D.
I cut the letters out a second time in white so I could give each letter an outline, it really made them pop.  I did some rainbow ink blending with my Distress Oxide inks for the panel behind the word FRIEND.  I wanted the rainbow colors to peek through the die cut letters. Before I adhered the rainbow panel, I ran through the kraft panel through my Vagabond with a polka dot embossing folder to give it some extra texture.  I adhered the rainbow panel behind the kraft panel and then adhered both panels to a 4" x 5 1/4" black panel.  The whole piece was then placed on a white card base.
I added some rainbow color jewels around the letters as well.  


For the rainbow flower at the top of the card I used the Flower Bursts Dies from the March release and I did some rainbow coloring on the base of the flower. I then cut the top layer out of white to place over the flower to match the style of the letters.  I placed a white jewel in the center of the flower for some extra added shine.


All that was left was to add the sentiment and I chose one from the Amaze Me Stamp Set released in January. I stamped it in emboss resist ink and sprinkled white embossing powder over it then heated it until it was shiny and melted.  I matted the sentiment on white and then black so it would stand out better.

I guess you could say I went a little rainbow crazy on this card! I do love my rainbows!
Thank you so much for joining me today and I hope you enjoyed my card!

i-crafter is having a BRAND NEW never before seen release on April 1st! You don't want to miss it so make sure to come back to the i-crafter blog and shop on the 1st!

Have a great day, I already am!
🌸 Lisa  🌸

Paper Sweeties March 2020 New Release Rewind


Welcome back to the New Release Rewind Party over at Paper Sweeties
This month the new stamp and die set is called Sorry and Sorry Sweet Cuts.
They are now available for purchase over in the Paper Sweeties shop.
Here is a look at both:


The tag I made today uses the  For You Sweet Cuts tag with the new Sorry stamps and 
Sorry Sweet Cuts matching dies.  That cute little band-aid looks so cute stamped on kraft paper and patterned paper, you can add a heart to the middle or sad faces. There are so many possibilities!

For today's post I also made a card using the new stamps and dies.


This colorful card also uses the new stamp set and dies but is a "Sorry" I missed your birthday card and I used the cute little cupcake stamp from the set. I chose some bright Doodlebug patterned paper and I love how it stands out against the kraft card stock.

Thanks for joining me today for our New Release Rewind Party. Today you can hop along with the design team for more inspiration using the new Sorry stamps and dies. Here's the lineup:


Maria Patrick

Have a great day, I already am!
πŸ’“Lisa πŸ’“

Sunday, March 15, 2020

Paper Sweeties March 2020 New Release Party!


Welcome back to the New Release Party over at Paper Sweeties
This month the new stamp and die set is called Sorry and Sorry Sweet Cuts.
They are now available for purchase over in the Paper Sweeties shop.
Here is a look at both:


I made a happy rainbow tag today to cheer someone up! The For You Sweet Cuts Tag is the perfect size and shape tag for all occasions and it has a really nice stitched edge. The new Sorry stamp set and matching die is perfect for someone who is ill, just been in an accident or having surgery. The matching die cuts out the word Sorry in such a pretty scripty font and looks good in any color!


Thanks for joining me today for our New Release Party. Make sure to check back tomorrow for the New Release Rewind! Today you can hop along with the design team for more inspiration using the new Sorry stamps and dies. Here's the lineup:


Maria Patrick

Have a great day, I already am!
πŸ’“Lisa πŸ’“

Saturday, March 14, 2020

Paper Sweeties March 2020 New Release Sneak Peeks!


Welcome back to another New Release Sneak Peek from Paper Sweeties
This month the new stamp and die set is called Sorry and Sorry Sweet Cuts.
They will be available for purchase tomorrow over in the Paper Sweeties shop.
Here is a look at both:


I love the scripty "sorry" word in this set with matching die and that little band-aid is just so cute! This set is perfect for get well cards, sorry for your loss cards and so much more! I decided to go with a pastel color palette for my card today and do some pretty ink blending on the rectangle insert from the Sweet Cuts Rectangle Scallop Frame. The little heart die cut from the Sorry set was the perfect addition to the little band-aid.

Thanks for joining me today for our New Release Sneak Peek. Make sure to check back tomorrow for the New Release Party! Today you can hop along with the design team for more inspiration using the new Sorry stamps and dies. Here's the lineup:


Maria Patrick

Have a great day, I already am!
πŸ’“Lisa πŸ’“

Sunday, March 8, 2020

Paper Smooches March Challenge


Hello and thanks for joining me today on the old blog!
Today I came across the Paper Smooches Anything Goes March challenge and I have this fun card 
using the Rainbow Sherbert Cardstock Die Cuts.

I was lucky enough to attend Creativation this year and had the pleasure of meeting the one and 
only Kim Mraz (Miss Paper Smooches) herself and she's a real sweetheart as you may have guessed.
She gifted me an awesome pack of Paper Smooches die cuts and they are adorable!
I used the I Love You die cut with 2 different size hearts and I popped them up on a heart embossed
background for my card.  
I blinged it up a bit with some white jewels and adhered it to a pink card base.
Easy Peasy and OH SO CUTE πŸ˜‰ 
I am entering this card in the Paper Smooches Anything Goes March Challenge.


Thanks for stopping by!
Have a great day, I already am!
❤️Lisa ❤️ 

Friday, March 6, 2020

Birds of a Feather


Hello and thanks for joining me today! I am up on The Rabbit Hole Designs blog today with a fun card featuring the cute stack of owls from the recently released OWL-Right stamp set!
This crazy bunch of owls make me smile every time I see them! I combined them with the 
Circles and Stars stencil in the background for a fun and colorful card.
Here are the supplies I used:


I started with a white card base and I stenciled a solid rectangle shape in Twisted Citron Distress Oxide ink.  Then I took the Circles and Stars stencil and layered it over my rectangle and sponged over it in Tumbled Glass Distress Oxide Ink. I just love the ways the stars look against the solid rectangle. The cutie patootie owls from the OWL-Right stamp set were colored with Copic markers and some of you might notice The Rabbit Hole signature colors in their wings.
I popped those silly birds up on some foam tape and stamped a sentiment from the same stamp set at the top.  I adhered it all to a purple card base to match the colors and my card was done.
What a fun colorful card to make and those owls are sure to make you smile!

So glad you could join me today!

For more inspiration, updates, and news make sure to check out these places ...


Have a great day, I already am!
πŸ¦‰Lisa πŸ¦‰  

Tuesday, March 3, 2020

My Coffee Trick


Hello there and thanks for stopping by! I am up on the The Coffee Loving Cardmaker's blog today and I have an awesome card to share with you featuring the cutest little coffee chicks you've ever seen! I used a stamp set from Sweet Sentiment. My talented crafty friend Jammie Clark is the artist behind Sweet Sentiment and she is a master colorist! The stamp set I used to make this card is called Coffee Planner Set. Although it has lots of planner related stamps, these adorable coffee girls look great on a card as well!


I just know that all you coffee lovers out there will especially appreciate that stamp with the girl IN the coffee cup.  I know I sure got a kick out of that one! The stencil pattern in the background is also from Jammie's shop and is called the Mandala Stencil. It was the perfect background for these adorable coffee girls! Here is one more pic with the supplies:


I also added some pretty matching jewels from Kat Scrappiness. There are tons of jewels, sequins and shaker bits in the Kat Scrappiness shop, you really should check them out! 
On this card I used the:


I hope you enjoyed my fun card today and that you will give my friend Jammie a visit! This stamp set is perfect for any coffee lover and the sentiments are hilarious! 

Have a great day, I already am!
☕️Lisa ☕️ 

Sunday, March 1, 2020

i-Crafter March Blog Hop


Good morning and thanks for joining me today! As you can see from that beautiful logo, it's time for another blog hop for i-Crafter!  Today the design team is showing off their projects using the March release! There are 4 die sets and 1 stamp set being released and here they are:


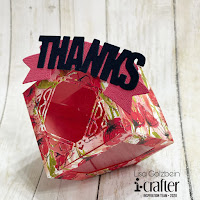
I have 2 projects today and the first one uses the Geometric Favor Box Dies and some beautiful patterned paper from Stampin Up!


This little favor box is adorable and it comes with dies to cut out fancy windows on the sides of the box that peek inside.  They can hold candy, jewelry or any small gift. The neat thing is that it has a triangular base that allows it to sit up and show off all sides of the box. 
I created the banner from the banner and word dies in the Pop-Up Wiper Insert dies from last month.
Take a look at all the dies that come with the Geometric Favor Box Dies! There are 10 in all and depending on the papers you choose to create your box, you can achieve many different looks.


The next project I have for you is a card that I made using the Haley Outline Dies and the
Flower Burst Dies. I also used the leaves from the Floral Garden dies in between the flowers.


The flowers from the Flower Burst Dies are so elegant and they are able to be popped up away from the center for a very elegant look.  I die cut them from vellum paper and made their centers from gold foil cardstock.  I placed them on a gray background to they would really stand out. The letters in the word THANKS are from the Haley Outline Dies and although I didn't use the outlines for this card, they do add a nice extra touch to the letters when used. 
Here is a look at these 2 die sets:


The March release has so many fun dies and there are so many options for designing fun and elegant cards, favor boxes and so much more! The talented design team has some amazing projects to share with you and here is the blog hop for this month so you can check them all out and leave them some love! 


What is your favorite product of the March release? For a chance to win a prize, you can comment on all the blogs. Please make sure you comment on all the blogs for a chance to win some free i-crafter products. You can comment until 11:59 pm on March 14th, 2020. The winner will be announced on the i-crafter blog on March 15th, 2020.

Thank you for stopping by today and now you can shop i-Crafter at
Simon Says Stamp as well as the i-Crafter online shop!
For more inspiration, updates and news you can check out the i-Crafter

Have a great day, I already am!
🌺Lisa 🌺