Showing posts with label Lisa's ICU. Show all posts

Tuesday, October 19, 2021

Coffee Cuties


Hello Coffee Loving friends! I'm over on the Coffee Loving Cardmker's blog today with a super cute caffeinated card! I was waiting for the recent Sugar Pea Designs release like a little kid waiting for a new toy! It was so hard to wait to get my hands on the super cute coffee dies they just released!
The new set has the cutest coffee cups, coffee pot and adorable little arms, legs and faces to go with all of them. I fell in love when I saw them and couldn't wait to get my hot little hands on them. 
Here is my card for today and it just might be my favorite coffee card of all time!


Oh I could not love this trio of coffee cuties anymore if I tried! Sugar Pea Designs has really outdone themselves this time in my opinion!

For the base of my card I did some light stenciling with the Cool Beans stencil in some light grey ink. I then got to work putting together the coffee cups and coffee pot from the Coffee Cuties Sugarcuts dies. The little faces and arms and legs just give them such life and character! The little eyeglasses just put me over the edge with their cuteness!!!


Once I had assembled all the pieces for the cups and pot I popped them up with foam tape on my coffee bean background. I also included a sentiment from the Brew-tiful Sentiments stamps on the bottom of the card in black ink. 


I am in love with those little eyeglasses but I think the little pink cheeks really hikes up the cuteness factor!! And I'm in love with those cute little arms and legs, they make the cups look like they are dancing don't they!


Thanks so much for joining me today! 
I hope you enjoyed my little caffeinated cuties as much as I did!

Have an awesome day, I already am!

🤎 Lisa ☕️

Tuesday, September 21, 2021

Freshly Ground Heaven


Hello and welcome back to my blog! Today I am sharing another caffeinated card over on the
Coffee Loving Cardmaker's Blog in my I.C.U. (Intensive COFFEE Unit)

My card today features a fun and whimsical coffee cup from the 
Catherine Pooler Mug Shots stamp set and I used the matching dies to cut out the pretty little cup.


I colored up the cup with my Copic markers and I doodled some white polka dots on to the heart. I just love white polka dots on a pink heart! Actually my 2 favorite colors are pink and teal and I incorporated both of them on this card. 

I started with a white A2 card base and glued a black layer on to the base to build the rest of my card. Next I measured a piece of white card stock to 5 1/4" x 4" so it was just slightly smaller than the black layer. I used the Hero Arts Script Bold Prints background stamp to stamp a partial image along the left side of my white layer. To do this I tore a scrap piece of paper in a wonky pattern to mask off the white card stock leaving a random pattern when I stamped the script print. I really love how that came out!


I wanted there to be steam coming out of the cup so I took the steam image from the Mug Shots stamp set and stamped it directly on to my white layer. I popped my coffee cup up on foam tape right over the steam and I stamped my sentiment directly under my cup. I used the Darcie's Milk and Cookies stamp set for my sweet sentiment. To finish off my card I added some sweet little black hearts from the 


I really love how this card turned out, it's got a clean, bold and graphic look that I'm quite fond of!

Thanks for stopping by my ICU today, I love sharing coffee with my friends!

Have a great day, I already am!
💖 ☕️   Lisa   ☕️ 💖

Tuesday, August 24, 2021

Hug in a Mug With Recycling


Hello Coffee Lovers!

I'm back again today in my *ICU (Intensive Coffee Unit) with another caffeinated creation 

for the Coffee Loving Cardmaker's blog.


For today's card I used a new stamp set and coordinating die from LDRS Creative.  

The stamp set is called Cozy Cuppa stamp set and I cut out the cup and whipped cream with the 
Cozy Cuppa coordinating dies.

I began by stamping the cup outline with Versamark ink onto vellum paper and heat embossing with white powder. I stamped the sentiment onto the cup with brown ink and the cute little heart with pink ink. I heat embossed the sentiment and heart with clear embossing powder so they would shine. The next step was to cut the cup out one more time from teal paper to back the vellum. It muted the color of the teal and gave the vellum some stability and allowed me to apply foam tape to the back without being able to see it.

Next I worked on the whipped cream on top of the cup. I stamped the whipped cream image onto white paper with kraft colored ink and applied a generous amount of snow paint. I heated it up with my heat gun so it would puff up to give the appearance of whipped cream. I applied several layers and heated after each one. I think I need a new snow pen because mine keeps coming out with lots of bubbles but it did the trick in a pinch.


For the background under the cup I did some recycling. You might recognize the patterned paper under the cup if you've ever placed an order with Honey Bee Stamps. Their stamps and dies come wrapped in this super cute kraft paper and I've always wanted to include it in one of my projects. I just love the look of white on kraft. I used a scalloped rectangle die from Neat and Tangled to cut it out. I just love how it looks under the mug!

Here's one more look at my card with the supplies used.


Thanks so much for stopping by today! I hope you were inspired by my card and to do some recycling with leftover packaging you might have in your craft room.

Have a great day, I already am!

☕️  Lisa  ☕️ 

Tuesday, April 20, 2021

Hello Anya!


Hello and welcome back to my blog! It's my day again up on the Coffee Loving Cardmaker's blog and I have another caffeinated creation to share with you!

Today's card has a short story behind it. During the recent Coffee Lover's Hop I spied an adorable card that I fell in love with by a fellow card maker named Suzanne. She posted her card on Instagram and the minute I saw it I knew I had to have the adorable stamp that she used. 
Here is a link to Suzanne's sweet card.

Not only did I fall in love with Suzanne's card but I ordered the stamp and picked her card as my designer pick at the end of the hop! The adorable stamp is called Coffee Cup Anya and it is from the Greeting Farm. It's an older stamp but I was lucky enough to find it at Simon Says Stamp.
Here is my card with sweet Anya popping out of her coffee cup!


This was a pretty easy card to put together. I stamped and colored Anya with Copic markers and used the Stitched Rectangle Dies from Kat Scrappiness to cut out a few different size panels to matt her and my patterned paper onto. The pretty plaid paper is from the Doodlebug Made With Love patterned paper pack.
I finished off my card with some pretty Glacier Sequins by Lucy.


I love being inspired by other card makers. It's always fun to find a new stamp to play with and this little coffee girl was a nice addition to my collection!

Thanks for stopping by today and make sure to spend some time browsing your favorite crafty friends social media to get some inspiration and leave some love!

Have a great day, I already am!
☕️  Lisa  ☕️ 


Tuesday, February 23, 2021

Coffee With a Quokka!


Hello and welcome to my blog, it's my day to bring you some caffeinated craftiness over on the 
Coffee Loving Cardmaker's Blog in my own personal ICU (Intensive Coffee Unit)!

Today I have a bright, fun and cheerful card to share with you featuring one of the cutest little animals you've ever seen! If you've never heard of a Quokka then you're in for a real treat!

The Quokka has been nicknamed the world's happiest animal!
They are marsupials and just like a kangaroo, they can carry their baby Joeys in their pouch.
You can find these adorable little chipmunk lookalikes in Australia on Rottnest Island!


They are said to be so friendly that you could even take a selfie with them!

Kat Scrappiness has 3 different stamp sets featuring the adorable Quokka!

and the newest addition is 

My card today features a few fun products from Super Sponsor Kat Scrappiness!


I started out with a mini slimline card base and I stenciled some clouds on to the largest die from the
Mini Slimline Scalloped Edge Die using the Cloud Stencil from My Favorite Things and some Speckled Egg Distress Oxide Ink.

One of my favorite new KS products is the After The Rain Die and it features that chunky happy rainbow you see on the coffee cup. I cut out all the colors of the rainbow that I wanted and glued them together. Once I had them glued together I used the Layered Coffee Cup Die to cut out the rainbow in the shape of the coffee cup. It was the perfect size to fit on the front of the coffee cup!

The best part of the new Everyday Quokka stamp set is all of the accessories that it comes with and as luck would have it there is a cute little coffee cup in the set.


I love how the cute little Quokka is holding his mini coffee cup sitting on top of the oversized coffee cup!
To finish the card off and give it some extra shine, I added some pretty Sparkling Clear Droplets.


The sentiment comes from an adorable stamp set by Darcie Heater called You Mocha Me Crazy!

Thanks for stopping by today to have Coffee With a Quokka! I would love to encounter one of these cuties in real life one day, how about you?

Have a great day, I already am!

 🐿☕️  Lisa  ☕️ 🐿 
Tuesday, January 12, 2021

Sprinkled with Happiness


This is my first post for 2021 for the Coffee Loving Cardmakers so Happy New Year and welcome to my blog! Today I have a fun card for you using my favorite color cardstock. I just love using kraft cardstock and today I did some fun stenciling with a large polka dot stencil!

Here is my caffeinated card for today:


For this card I used a slimline card base using Papertrey Ink Raspberry Fizz Cardstock cut to 8 1/2" x 7" and scored at 3 1/2". The next layer was cut using the largest die in the 
Kat Scrappiness Fancy Stitched Scalloped Slimline Dies out of Papertrey Ink Kraft Cardstock.

Now it was time to have fun with stencils. I used the Kraft Cardstock one more time to cut a smaller panel than the slimline one and I took the Trinity Stamps Lots of Dots Slimline Stencil and some Picked Raspberry Distress Oxide ink and blended some fun dots with my blender brush. It came out so perfect, it reminded me of patterned paper.


The cute coffee mug is from the MFT Stamps LLD Hot Cocoa Cups Die-Namics and the sweet little donut is from the My Creative Time We're Better Together set (now retired). I added some sparkly Stickles to the heart on the mug and the donut sprinkles.


The sentiment from the My Creative Time We're Better Together set was stamped onto a kraft panel cut using the smallest die from the Kat Scrappiness Stitched Rectangle Dies and popped up on foam tape over a piece of Raspberry Fizz card stock to match the card base.


For the finishing touch I added some beautiful Kat Scrappiness Sparkling Clear Jewels around my card for some pretty bling and shine!

I just love the color combination on this card and the cute little mug and donut! I hope you enjoyed my card today and I hope your day is Sprinkled with Happiness! 

May 2021 bring you lots of Happiness as well!

Have a great day, I already am!
☕️  Lisa  🍩

Tuesday, October 13, 2020

Pumpkin Spice Latte K-Cup Holder


I am up on the Coffee Loving Cardmaker's blog today and I have a special project to share with you!
Although I live in Florida and we won't feel cooler weather here for quite some time, it doesn't change the fact that Fall is here and that means Pumpkin Spice Latte season is here as well!

For today's project I thought it would be fun to create a custom made K-cup holder with a PSL theme!


I followed a very easy YouTube tutorial that you can find by clicking on this link:

Here are the basic scoring measurements and the rest of the assembly is super easy!

The holder itself only uses one piece of 8 1/2 x 11" piece of card stock.
With the 8 1/2" side up, score at 2" and 6 1/2"
With the 11" side up, score at 4", 6 1/4", 8 1/4" and 10 1/2"
Cut 2 pieces of patterned paper in sizes 2" x 4 1/4" and 1 3/4" x 4 1/4"

After assembly you can decorate your holder any way you want.  It's super easy and fun!
I cheated on mine because I didn't have any PSL coffee in the house, I printed the graphic off of the internet for the Starbucks PSL K-cup, cut it out and stuck it on my Vanilla flavored K-cups.


Since the holidays are coming up this holder is a quick, easy and inexpensive treat that can be mass produced! It would be perfect for teachers, mail carriers, nail techs, or anyone who deserves a little treat for all they do! The best part is that it can be decorated for any occasion and it is universally sized to fit all K-cups. 


For my holder I used some patterned paper from my stash and some clipart for the sentiment on top.
The coffee cup die is an old Top Dog Die that I love and the sentiment on the bottom is from an older Reverse Confetti stamp set.


This was a lot of fun to make and I hope that you'll give it a try! I know you'll be amazed at how truly easy it is to make one yourself! If you want a 4 cup holder you can make 2 of these and glue them back to back to each other! The video even shows you how to cut a handle into the top!

Thanks so much for joining me today!
Have a great day, I already am!
☕️ Lisa  🎃 

Tuesday, September 1, 2020

Living La Vida Mocha!


Good morning fellow caffeine addicts! 
I am up on The Coffee Loving Cardmakers blog today and I have a 
quick and simple card to share with you!

The Caffeinated line of critters at The Rabbit Hole Designs have so much character they just speak for themselves and don't require a lot of fanfare.
Today I created a clean and simple card using the Caffeinated Bee. The bee is definitely my favorite caffeinated critter of all of them! If you haven't checked out The Rabbit Hole Designs yet, it might be time for a visit!


Here's the quick and easy recipe for my card:

1) Cut out a panel of Bristol Smooth card stock using the largest die from the Stitched Rectangle Zig Zag dies from Kat Scrappiness and sponge on a circle of Peacock Feathers Distress Oxide ink in a loose circle near the bottom right of the card.

2) Run panel through a beehive style embossing folder for some added texture

3) Add embossed panel to a teal colored card base. I chose one to match the Peacock Feathers ink.

4) Stamp the Caffeinated Bee using Memento Tuxedo Black Ink on to some Copic friendly paper and color using Copic markers. Stamp your sentiment under the bee.  I used a sentiment from The Rabbit Hole Designs Perfectly Blended stamp set.

5) Cut bee and sentiment out using a die from the Kat Scrappiness Zig Zag Circle Dies and pop it up on foam tape on your embossed panel.

That's it, easy peasy lemon squeezy!
Sometimes I love making a quick and easy card that packs a lot of punch!
Here's one more pic with the supplies used.


Thanks so much for joining me today!
Have a great day, I already am!

 ☕️ Lisa  🐝 

Tuesday, August 18, 2020

Got Coffee?


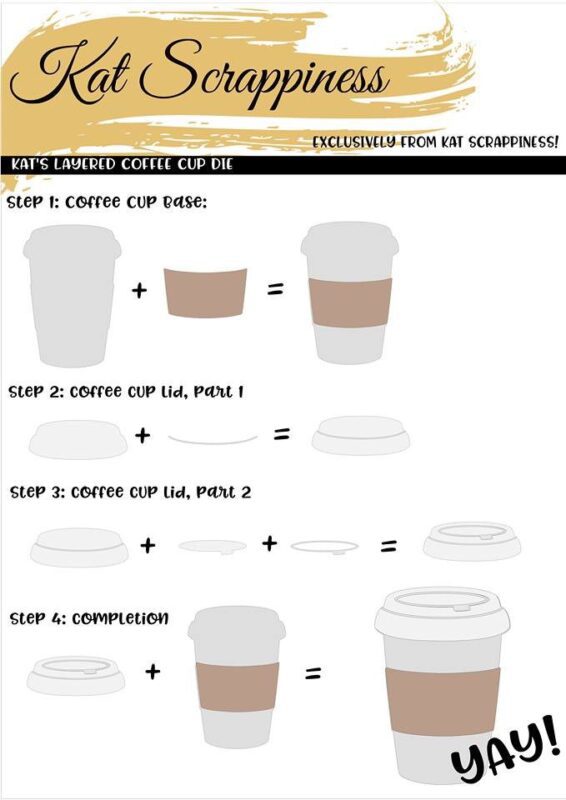
Hi crafty friends, today I'm on the Coffee Loving Cardmaker's Blog to share 2 cups of coffee with you.  If you've already had your morning cup, pour another and relax.  Kat Scrappiness has an awesome die called the Layered Coffee Cup Die and it's just the right size to take center stage on any card!  


For today's post I have 2 cards. I wanted the first card to have a "coffee stained" background so of course I reached for my Ground Espresso colored Distress Ink pad and  I "smooshed" (technical crafty term) some ink onto a piece of acetate and then sprayed it with water.  When the ink was moving around I placed the acetate onto a piece of watercolor paper and the results were gorgeous!  I then assembled my coffee cup out of various colors of card stock and patterned paper.


Here is a very handy instruction sheet to show you how to assemble the pieces from the die.


For the koozie section of the die I used kraft cardstock and I stamped a star from the Kat Scrappiness Swatches stamp set.  After that I ran the koozie through my paper crimper to give it a realistic look with some dimension and I added it to the cup with some foam tape.  When the coffee cup was fully assembled I added some paint splatter with the Ground Espresso color to the whole cup.  I just love the added interest paint splatter gives to any project!
For my sentiment I used the Kat Scrappiness "Got Coffee?" die and added it to the side of the card.  This sentiment is awesome and uses a fun whimsical font that is perfect for any coffee themed card.


For my next card I used just the word "coffee" and cut it out 3 times in different colors for a fun look.  I painted the coffee cup with a pink pearlescent color from the Kuretake Gansai Pearls colors watercolor set and I added a heart to the cozy from the "Swatches" stamp set and heat embossed it with Ranger Gold powder.  I placed it on a diamond embossed background and added some fun
Kat Scrappiness Barbie sequins for a feminine touch.
Such a different look with the same die!


If you added the sentiment "Wanna" above this die, it would make a cute card for a friend inviting them to get together over coffee reading "Wanna Get Coffee?"
This coffee cup die makes it easy to create an eye catching card in no time!

That's all for today, I am glad you stopped by! 
Have a great day, I already am!
☕Lisa☕

Disclaimer: My blog uses affiliate links 
whenever possible at no additional cost 
to you. I only promote products I actually 
use and love and think other crafters might 
enjoy as well!

Tuesday, July 7, 2020

Coffee Makes Everything Ok!


Welcome to my blog! Today I have another caffeinated card for 

For my card today I used the brand new Coffee Time background die that just came out from 


This new background die is really cool because it cuts out lots of little coffee beans that could be used for a coffee themed shaker card. I added a sentiment from the Hot Coffee stamp set from 
CAS-ual Fridays. I use this stamp set a lot because it has the funniest, snarkiest coffee sentiments around! I stamped the sentiment on to some teal paper to match the background die and I matted it on to a piece of kraft card stock that I cut out with the Stitched Postage Stamp die from Kat Scrappiness.

For some extra added fun I added a some seam binding from Paper Sweeties and an old button from my Papertrey Ink stash.

I love how this card came out, the background die has so much character it doesn't need much else to complete the card.

Thanks for stopping by my blog today.
Have a great day, I already am!
☕️  Lisa  ☕️ 

Tuesday, June 23, 2020

Wild About You & Coffee


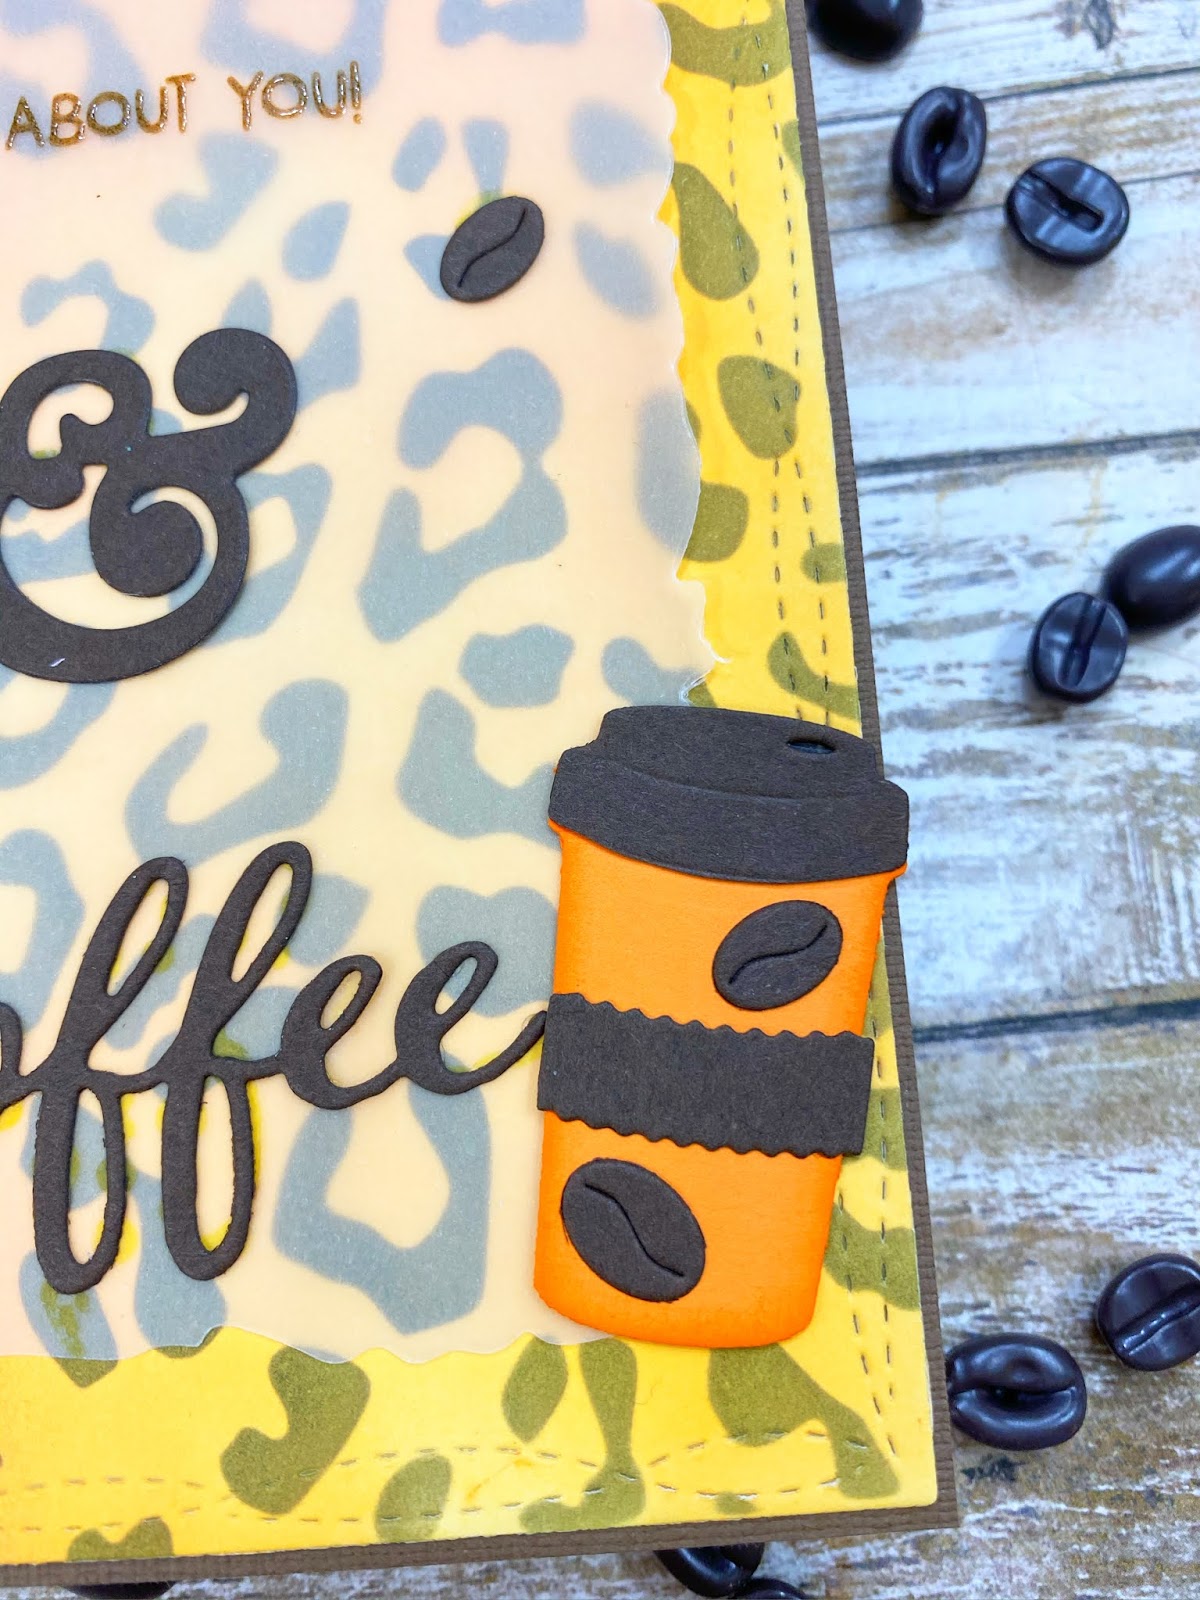
Hello and welcome to my blog! I am up on the Coffee Loving Cardmaker's blog today with a brand new card but I'm not wild about it! Let's face it, we can't love every card we make but that just comes with the territory right? The funny thing about the cards that I don't like is they seem to be very popular which always makes me think, I have no idea what people like......... or the age old story of "different strokes for different folks". 


 For the base of my card I used a leopard pattern stencil by Kindred Stamps and cut it out with the Kat Scrappiness Wonky Wavy Rectangles.
I saw the stencil used by my friend Justin on a card and I knew I had to have it! I had recently tried to make my own leopard stencil on my scan n cut by failed. I love a good diy but even I know when to throw in the towel! 
😂 😂 😂 😂 😂 😂 
I absolutely loved how the background came out and I wanted to turn it into a wild themed coffee card.  That's where it all went wrong. I just couldn't get all of the elements to play nicely together on the card. I used a Distressed Edge Rectangle die and cut out some vellum so I could mute the background and add some elements. The cute little coffee cup is from Spellbinders but I tried many different color combos before I came up with the orange and brown and I wasn't thrilled with that combo either.  I tried a brown cup, a gold cup, a floral cup....... NOTHING WAS WORKING!
You've had those card making sessions........ right? Lie to me and tell me you have!
😩😩😩😩😩😩😩


I stamped the sentiment from the Hello Bluebird stamp set Jungle Littles in brown ink and heat embossed it with clear embossing powder.  In hindsight I should have stamped it in white ink on brown paper to make it pop more. The large ampersand die is from an older Clearly Besotted Monogram stamp and die set and the pretty Coffee die is from a Sugar Pea Designs coffee die set.
I just love decorating with those cute Kat Scrappiness Coffee Beans, they are so much fun! 


Oh well there is my whole story and I'm sticking to it! It's not the worst card I've ever made but it certainly isn't my favorite. Oh well, you win some you lose some! At best I enjoyed using that awesome new stencil and I will be using it again very very soon!

Thanks for joining me today and you have a great day!
I already am!
🐆  Lisa  🐆

Tuesday, May 26, 2020

Good Morning Spring


Hello and welcome to Lisa's ICU! I am up on the Coffee Loving Cardmaker's blog today and this week is a very special week for us caffeinated cardmakers! The Spring/Summer Coffee Lovers Hop is going on until May 29th! There are over 70 sponsors for this hop offering up amazing prizes and offering discounts and sales in their shops! It's a ton of caffeinated fun for everyone involved! You can click on this link to go the main page of the hop for all the details and to link up your projects!


My card for today is full of flowers and watercolor! I recently won a gift certificate to 
Polka Dot Orchard and lucky for me they are one of the Super Sponsors of the Coffee Lover's Hop.
I used my GC to purchase the Good Morning Spring digital stamp. This stamp has the most beautiful flower on a to go coffee cup with some sweet sentiments to match.  


I printed the coffee cup image on watercolor paper and colored it with my Karin markers. I cut it out with my scan n cut and placed it on to a watercolored background. I sent the background through the printer to add my sentiment and it looks so good against the blue! I finished off my card with some Clear Droplets from Kat Scrappiness (another Coffee Lovers Hop Super Sponsor).


I am so happy with the way this card came out! The flower is so bright and pretty!

Thank you so much for stopping by today and I hope you'll check out the Coffee Lover's Hop if you haven't already! You have until the 29th to link up as many caffeinated projects as you want! 
I'm enjoying creating all of my caffeinated goodness this week!
Have a great day, I already am!
🌸 🌺 Lisa  🌸 🌺 

Tuesday, May 12, 2020

Coffee Break


Hello and welcome to Lisa's ICU! It's my day on the Coffee Loving Cardmakers blog and I have a real treat for you! Trinity stamps recently released the most adorable little tea themed bunny stamp! It's called Dirtea Bunny and the scruffy bunny in the set is holding a mini mug that can be stamped with the most adorable sentiments. The matching die is called the Dirtea Bunny die set and it actually cuts out the bunny's hands so he can hold the mug. 
Here is a picture of the stamp set and matching die:


Isn't he just the cutest!!  I started out by die cutting a mug shaped card using the Trinity 
Coffee Mug Card die set in cream colored card stock. I wanted to decorate the mug so I used the Coffee Bean Background Stencil from Trinity and some Gathered Twigs Distress Oxide Ink over top.  I just love the look of the two toned beans! The stencil comes with two 6x6 stencils and each stencil has one half of the bean. I used Gathered Twigs on both stencils but with a lighter hand on half the bean to give each bean a two tone look.


The sweet little "coffee break" sentiment under the cup came from the awesome 
Honey Bee stamp set titled Perfect Blend.  
That stamp set has any sentiment you can think of that is coffee related.
What a fun card to make! Here's a closer look at that sweet little "Dirtea Bunny":


I really love the cute little feature that the die cuts out just the arms.
Thank you so much for joining me today!
Have a great day, I already am!
🐰 Lisa 🐰