Showing posts with label Spellbinders. Show all posts

Tuesday, November 2, 2021

Witches Brew


Welcome back to my blog and another post for the Coffee Loving Cardmaker's blog!


I hope everyone had a Happy Halloween doing whatever it is you do on Halloween! I wanted to share one more belated coffee themed Halloween card before we move on to the rest of the holidays!
This is a shaker card that I made using some fun dies from Lawn Fawn and Spellbinders!


I used the Lawn Fawn Stitched Mug Frame for my mug and filled it with a fun shaker mix from Trinity stamps. The fabulous witches legs are from the Let's Be Frank dies from Spellbinders. I really love how they have spaces to fill in the socks and shoes with different pops of color!

The purple stars in the background are from an older Echo Park stencil and I printed out the sentiment using a word processing program where I could mix and match different fun fonts.

This was a fun card to make and the last of the Halloween cards until next year.

Thanks for joining me today, have a great day!
I already am!

Lisa

Tuesday, June 23, 2020

Wild About You & Coffee


Hello and welcome to my blog! I am up on the Coffee Loving Cardmaker's blog today with a brand new card but I'm not wild about it! Let's face it, we can't love every card we make but that just comes with the territory right? The funny thing about the cards that I don't like is they seem to be very popular which always makes me think, I have no idea what people like......... or the age old story of "different strokes for different folks". 


 For the base of my card I used a leopard pattern stencil by Kindred Stamps and cut it out with the Kat Scrappiness Wonky Wavy Rectangles.
I saw the stencil used by my friend Justin on a card and I knew I had to have it! I had recently tried to make my own leopard stencil on my scan n cut by failed. I love a good diy but even I know when to throw in the towel! 
😂 😂 😂 😂 😂 😂 
I absolutely loved how the background came out and I wanted to turn it into a wild themed coffee card.  That's where it all went wrong. I just couldn't get all of the elements to play nicely together on the card. I used a Distressed Edge Rectangle die and cut out some vellum so I could mute the background and add some elements. The cute little coffee cup is from Spellbinders but I tried many different color combos before I came up with the orange and brown and I wasn't thrilled with that combo either.  I tried a brown cup, a gold cup, a floral cup....... NOTHING WAS WORKING!
You've had those card making sessions........ right? Lie to me and tell me you have!
😩😩😩😩😩😩😩


I stamped the sentiment from the Hello Bluebird stamp set Jungle Littles in brown ink and heat embossed it with clear embossing powder.  In hindsight I should have stamped it in white ink on brown paper to make it pop more. The large ampersand die is from an older Clearly Besotted Monogram stamp and die set and the pretty Coffee die is from a Sugar Pea Designs coffee die set.
I just love decorating with those cute Kat Scrappiness Coffee Beans, they are so much fun! 


Oh well there is my whole story and I'm sticking to it! It's not the worst card I've ever made but it certainly isn't my favorite. Oh well, you win some you lose some! At best I enjoyed using that awesome new stencil and I will be using it again very very soon!

Thanks for joining me today and you have a great day!
I already am!
🐆  Lisa  🐆

Tuesday, January 21, 2020

I Drink Coffee For Your Protection


Good morning Coffee Loving Crafty Peeps!
I just spent the most amazing weekend in Phoenix, Arizona for Creativation!
I had the privilege of meeting a lot of crafty friends in person and 3 of those people were Coffee Loving Cardmaker Designers that you all know and love! It was so nice meeting 
and

It was a nice long weekend full of all things crafty with some of the sweetest people you'll ever meet!
I am up on The Coffee Loving Cardmakers blog today and I have a humorous card with a fun coffee bean background.

I die cut a piece of white cardstock using the largest die from the Kat Scrappiness Distressed Edge Rectangle Nesting Dies and then sponged some light brown ink over a Gina Marie Coffee Bean Stencil. The sentiment on that adorable coffee cup is from CAS-ual Fridays Hot Coffee stamp set and the cup is cut from their Coffee Cup Fri-Dies. I also thought it would be fun to add some laughing emojis to the card so I broke out an older set of Spellbinder dies that I had and created a few fun faces!


This card sums up my Creativation experience so well! There was a lot of laughs and a lot of vanilla lattes! I hope this card gave you a chuckle as well!

Thank you so much for joining me today.
Have a great day, I already am!
😆 Lisa ☕️


Tuesday, December 10, 2019

A Cup of Joy


Welcome back to my blog and my "ICU"
Today I am over on The Coffee Loving Cardmaker's blog
with a Cup of Holiday Joy!
Here in Florida we don't really get the frigid cold that they experience
up North but we do get our share of "chilly" days and that's when
you see everyone in boots with a red Starbucks cup in hand!


My caffeinated inspiration for today's card comes from 
all of the festive to go coffee cups we see at this time of year.
Here is a picture of a to go coffee cup I saw at Target recently
and I wanted to recreate that same look on a card.


I began with a red card base and layered the 2 largest dies from the 

For my coffee cup I chose my favorite die,
the Kat Scrappiness Layered Coffee Cup Die and I cut it from red foil cardstock.
The lid was cut from some beautiful white glitter cardstock.
I find it easiest to apply the accents on the coffee cup lid with the
Xyron Sticker Maker. Since the lid was cut from glitter cardstock
I knew the sticker maker would really help to stick my pieces in place.

To decorate the front of the cup like the Target cup I used 
the gorgeous Simon Says Stamp Lea Snowflake Die cut from the same
glitter cardstock as the lid of the cup. I just love the shimmer from that paper!


Once I had the coffee cup all decorated it was time to add some festive
holly to the card.  I used the Kat Scrappiness Holly Leaves and Berry Dies
to add a pop of green to my card and I cut them out using foil cardstock
to match the cup. I just love these holly leaves and berry dies 
because they come in a variety of different sizes.


All that was left to do was to add a sentiment.
I knew it had to be small one because the cup and holly took up so much
room on the front of the card.
I found the perfect small circular die in my stash in the 
Spellbinders Hipster 1 Dies and I cut it out of red foil and heat embossed


I really love how festive this card came out and I hope it brings
some early holiday joy into your day!

Have a wonderful day, I already am!
❄️Lisa ❄️

Tuesday, October 8, 2019

Miss You a Latte


Welcome back to my blog crafty friends.
It's my day on the Coffee Loving Cardmaker's blog again today and I have
another card for you full of caffeinated inspiration.
Today I'm using a small coffee cup die on my card from the 
Hipster 1 dies from Spellbinders.
I just adore those little coffee cup dies with the mini koozies!


The polka dot patterned paper as well as the striped paper are old patterns 
from Papertrey Ink that I just adore!
I used the largest die from the Wonky Wavy Stitched Rectangle dies
from Kat Scrappiness to cut out the polka dot paper and then I inked the edges.

The light teal color is so soft and pretty.
The sentiment is from 2 different sets.
The stamped "Miss You A" part is from the Perfect Blend stamp set from 
Honey Bee stamps. The "latte" die cut is from the Sugar Pea Designs Coffee Words
die set.  I used Lawn Fawn Rose Gold embossing powder on some card stock and then 
cut the word latte out of that.  I also cut some very tiny hearts out of the rose gold
paper as well for the coffee cups.
I really like the soft color palette on this card!

Thanks so much for stopping by my blog today, I just 
love creating my coffee themed cards for the 
Coffee Loving Cardmakers and I'll be back again real soon
with some more caffeine inspired creations!

Have a great day! I already am!
☕️💗 Lisa  💗 ☕️

Thursday, February 7, 2019

Coffee Loving Cardmakers Guest Designer

Hello Crafty Coffee Loving Fans!
I am so excited to announce that I will be a guest designer for the
month of February on the Coffee Loving Cardmakers Blog!

Go ahead and grab your cup of coffee or warm beverage of choice,
I'd love to share my card with you today!


This card involves a technique that I 
am addicted to lately. It's not a new technique by any means but I have
been experimenting with it lately using different color combinations.
I have been using distress inks to do ink blending on my backgrounds.
The 3 colors I used on this card are: 
and
I just love how only 3 colors look like so 
many more when they blend together!
I recently saw a card that had some floral stamps that were
heat embossed with white powder over the ink blended background.
I fell in love with that look and re-created it on this card.
Here are the steps I took to make this card:

Step 1: To begin with I took some Bristol smooth card stock and I blended Broken China,
Fossilized Amber and Picked Raspberry with a Ranger Mini Blending Tool.
 Once I liked the look of the blended colors I dried my background
with my heat tool so that I could do some embossing on top of it.


Step 2: Next I took some floral stamps from two older Papertrey Ink stamp sets
(Delightful Dahlia and In Bloom) and I placed them all over the lower
half of my background.  To prep the surface I used my anti-static tool and I used my Tim Holtz stamping platform to position the stamps where I wanted them.
I stamped them with Fresh Snow ink from Papertrey Ink and sprinkled
WOW Opaque Bright White  powder all over them.
I hit the powder with my heat gun and let the magic take place!


Step 3: Once the background was inked, stamped and embossed I took the largest
die from the Kat Scrappiness Wonky Wavy Stitched Rectangle Dies and cut out a panel.
From that panel I cut out yet another panel from the center using the largest die from
the Spellbinders Labels Four dies. (Save the piece that you die cut!)


Step 4: The next step was to make the shaker portion of the card.
I adhered a piece of acetate to the back side of the panel
with the missing die cut shape and then
I placed foam tape all over the border of that panel
to enclose my shaker bits.


Step 5: Now it's time to use the negative shape we die cut using the
Spellbinders die. We'll adhere that shape to front panel of the base of an
A2 sized card. I used a pink card base.


Step 6: This step is optional but I love the extra special touch it gives to a shaker card.
(I took a few colorful sequins and glued them to the background
with the Crystal Katana tool so they would
remain visible even when the card was "shaking".)
After I glued them down I sprinkled the rest of my mix all over the die cut panel.
You could use whatever mix you want, but here is the sequin mix I made:
Sequins by Kat Scrappiness - Neon Barbie
Sequins by Cartwright - Pale Pink, Light Ocean Blue Green
(Yes I went overboard but what can I say........ I LOVE shaker cards!)
You can now adhere the top panel over your lovely shaker extravaganzapalooza!
......is that even a word??🤷🏼‍♀️


Step 7: Ok now that the background and shaker are complete we can work on
decorating the front of the card. I chose that darling bear from the
Ellen Hutson - All Inside stamp set and I watercolored him with my Zig markers.
I also took the coffee cup from the Paper Sweeties - Coffee Planner Stamps
and Copic colored it to put in his furry little hands. I popped him up
on foam tape and boy did he look cute!


Step 8: YOU MADE IT TO THE LAST STEP 😂
It's sentiment time!
In the All Inside stamp set there was a sentiment that read
"sometimes you just have to make your own"
and I thought why not finish that sentiment off with........ you guessed it
COFFEE!
I heat embossed the sentiment with WOW Metallic Silver Sparkle embossing powder
on to a Stitched Sentiment Strip Die from Kat Scrappiness and inked the
edges with Picked Raspberry distress ink.
For the COFFEE word I used the  Got Coffee Sentiment Die from Kat Scrappiness.
I took a leftover piece from the ink blended background from step 1 and die
cut the word coffee from it to give it a colorful twist!


PHEW!
This card was a labor of love and I certainly loved making it!
I hope I made the directions easy to follow!
I really love how the card came out and I hope you'll
give it a try. So many fun techniques on one card!


Thanks so much for joining me today!
Make sure to check out the Coffee Loving Cardmakers Blog
for your daily dose of caffeinated inspiration!
You can also find them on Facebook and Instagram!
Have a great day, I already am!
☕️Lisa ☕️


Friday, October 19, 2018

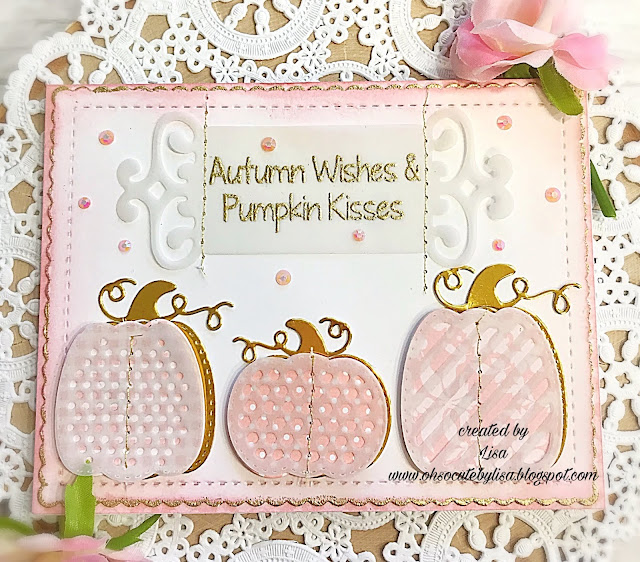
Pink Pumpkins

The Card Concept Challenge blog is celebrating their 100th challenge!
That is quite an accomplishment so Congrats are in order!
When I saw the inspiration photo I knew I had to play along!
One of my favorite color combinations is pink and gold and I love the shabby chic 
vintage style of design! Here is the gorgeous inspiration photo for this challenge.


I am in love with all the elements of this picture! I find white pumpkins to be so 
elegant and the pink and gold combination is so pretty together!
Here is the card I've created for this challenge based on this photo.
My style is shabby chic vintage.


I layered my pumpkins with a gold base then patterned paper and then a vellum top layer. I love the layered look and I decided to machine stitch them together with gold thread.  Vellum is so hard to adhere with adhesive and I love the handmade look of the machine stitching. I also gold heat embossed the sentiment and machine stitched the vellum tag down as well.
For a sparkly finishing touch I added some pink jewels.
All products linked below.
Thanks for stopping by!
Enjoy some crafty time today, I already have!
💖Lisa 💖

Products Used:

Embossing Powder : WOW Gold Embossing Powder 
Stamp Set (sentiment) : Paper Sweeties Happy Fall Y'all


Wednesday, July 11, 2018

Happy Little Stampers ATC July Challenge


Hello everyone!
I am super excited to be joining the Happy Little Stampers ATC challenge team.  Thank you Kylie for this great opportunity!  Every month Happy Little Stampers has an ATC challenge and the theme for July is Coffee!  For anyone who isn't familiar with ATC cards, they are mini works of art that measure 2.5" x 3.5" and are traded around the world. Usually they are numbered and signed on the back by the artist.  There is certainly no lack of coffee themed art these days and it is so much fun to create!  For my project I created 4 ATC's with some awesome faux coffee stained backgrounds.  
Here are the 4 cards I made for this challenge.


I used 2 different coffee cup dies, 1 from Spellbinders and 1 from Cas-ual Fridays and the sentiment stamps are from Technique Tuesday and Cas-ual Fridays.
Here are closeups of the individual cards.


I hope you'll play along this month and enter the ATC challenge at Happy Little Stampers!

Winner for this challenge will receive a $20 coupon to spend at the shop! 
IF YOU USE STAMPS BY HAPPY LITTLE STAMPERS AND YOU ARE OUR RANDOM WINNER, YOUR PRIZE WILL BE DOUBLED!

Have a great day, I already am!
☕️Lisa ☕️


Thursday, April 12, 2018

Simon Says: Add Some Texture

SSS Wednesday Challenge Add Some Texture

I love this week's challenge to add some texture to your project.  I knew I wanted to use a woodgrain embossing folder on the main card but the treasure map on the front wound up having it's own texture.  I didn't realize how much until I showed my son this card and he actually wanted to feel the map, he said it looked like leather.  That's when I knew it was the perfect project for this week's challenge.  I just love the little DeNami chickie stamps and their Pirate Chickie was just meant for this treasure map!  I used the Distressed Edges Rectangle dies from Kat Scrappiness for the map and I inked the edges with Tim Holtz Ground Espresso Distress Ink after I sprayed it with water and crumpled it up a few times.  

I used the SSS "Circle Friends" stamp set for the fun stitching lines and the Stitched Alpha Dies from Craftin Desert Divas for my "X" marks the spot embellishments.  The sentiment "Ahoy Matey" came from the Papertrey Ink stamp set "Out to Sea" and the banner and circle seal dies are from the 
Spellbinders "Hipster 1" dies.  

I actually made a list of how many companies products I used on this card just for fun and it came to 11.  I really enjoyed making this card and it turned out just like I wanted which is rare.  Sometimes the card ideas in my head don't actually make it to the card itself.  See you next week for another 
SSS Wednesday challenge!
Thanks for stopping by today.  
Have a great day, I already am!
☠️Lisa ☠️