Showing posts with label Kat Scrappiness Sequins. Show all posts

Tuesday, June 23, 2020

Wild About You & Coffee


Hello and welcome to my blog! I am up on the Coffee Loving Cardmaker's blog today with a brand new card but I'm not wild about it! Let's face it, we can't love every card we make but that just comes with the territory right? The funny thing about the cards that I don't like is they seem to be very popular which always makes me think, I have no idea what people like......... or the age old story of "different strokes for different folks". 


 For the base of my card I used a leopard pattern stencil by Kindred Stamps and cut it out with the Kat Scrappiness Wonky Wavy Rectangles.
I saw the stencil used by my friend Justin on a card and I knew I had to have it! I had recently tried to make my own leopard stencil on my scan n cut by failed. I love a good diy but even I know when to throw in the towel! 
πŸ˜‚ πŸ˜‚ πŸ˜‚ πŸ˜‚ πŸ˜‚ πŸ˜‚ 
I absolutely loved how the background came out and I wanted to turn it into a wild themed coffee card.  That's where it all went wrong. I just couldn't get all of the elements to play nicely together on the card. I used a Distressed Edge Rectangle die and cut out some vellum so I could mute the background and add some elements. The cute little coffee cup is from Spellbinders but I tried many different color combos before I came up with the orange and brown and I wasn't thrilled with that combo either.  I tried a brown cup, a gold cup, a floral cup....... NOTHING WAS WORKING!
You've had those card making sessions........ right? Lie to me and tell me you have!
😩😩😩😩😩😩😩


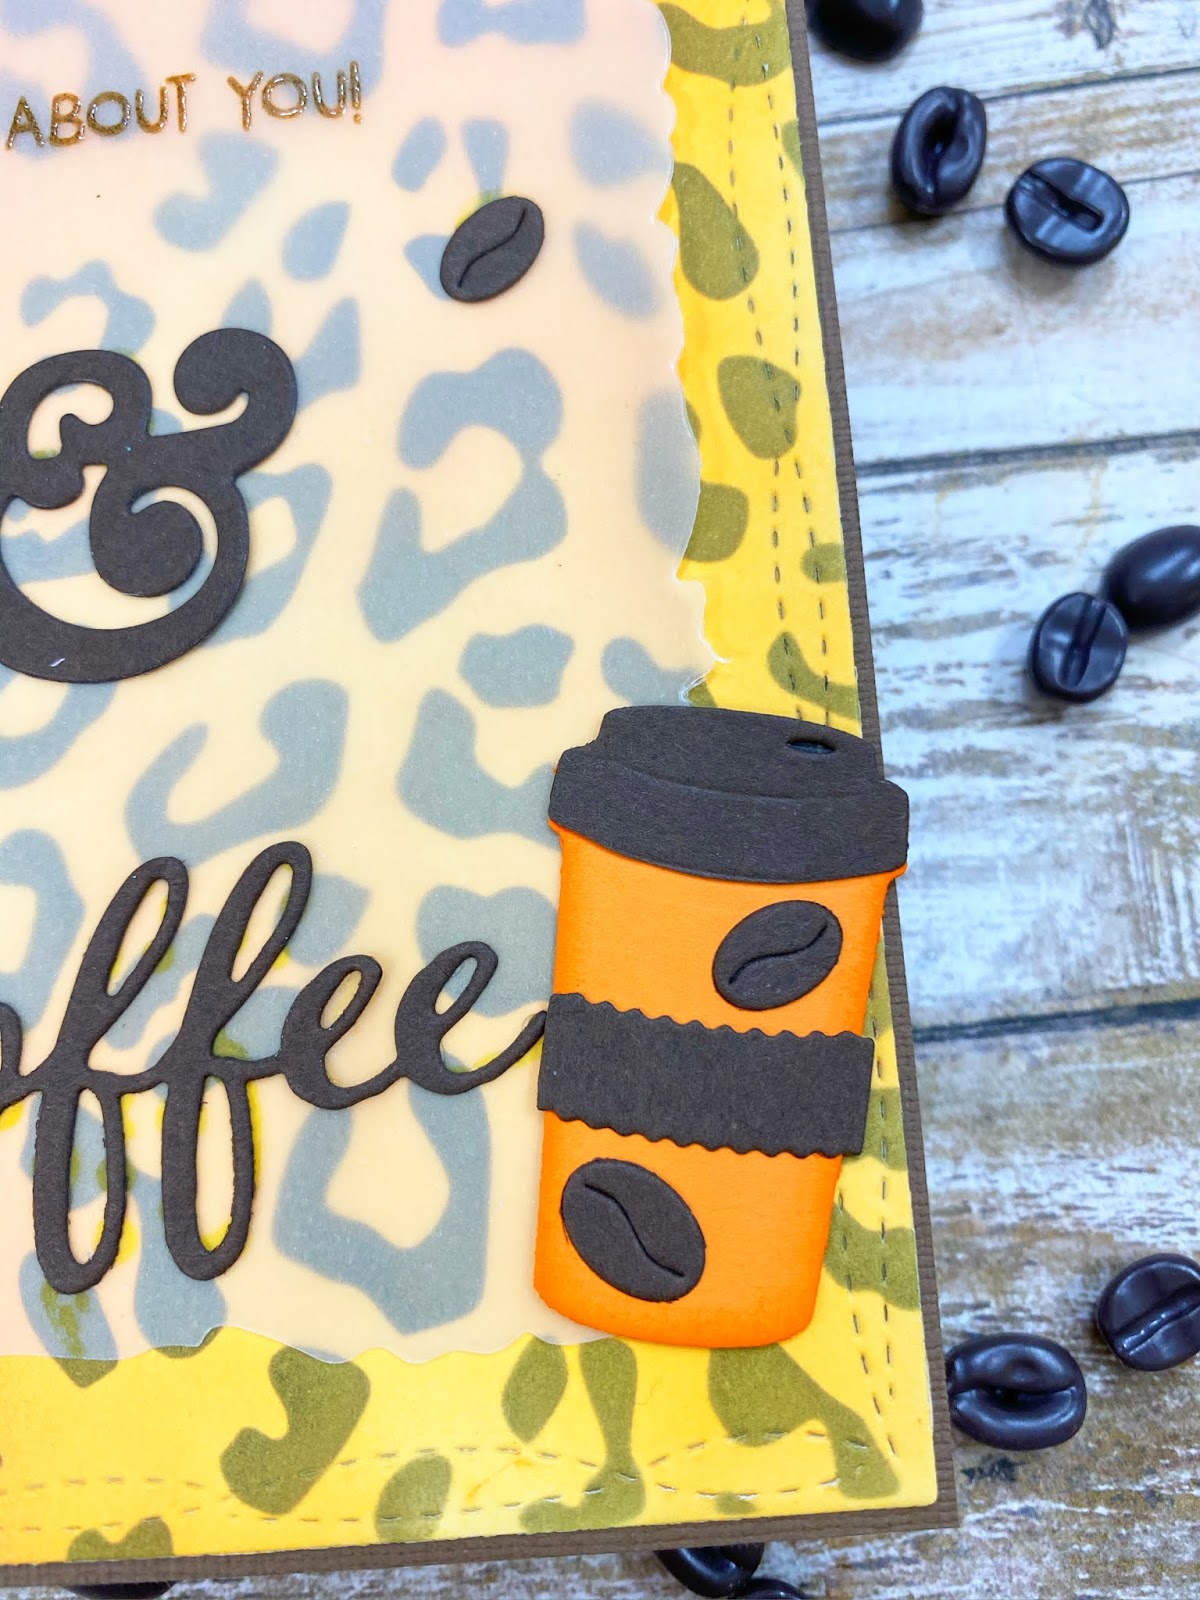
I stamped the sentiment from the Hello Bluebird stamp set Jungle Littles in brown ink and heat embossed it with clear embossing powder.  In hindsight I should have stamped it in white ink on brown paper to make it pop more. The large ampersand die is from an older Clearly Besotted Monogram stamp and die set and the pretty Coffee die is from a Sugar Pea Designs coffee die set.
I just love decorating with those cute Kat Scrappiness Coffee Beans, they are so much fun! 


Oh well there is my whole story and I'm sticking to it! It's not the worst card I've ever made but it certainly isn't my favorite. Oh well, you win some you lose some! At best I enjoyed using that awesome new stencil and I will be using it again very very soon!

Thanks for joining me today and you have a great day!
I already am!
πŸ†  Lisa  πŸ†

Sunday, November 3, 2019

Coffee Lovers Blog Hop Day 3


Welcome to day 3 of the Fall/Winter 2019 Coffee Lovers Blog Hop!
I am having so much fun making coffee themed cards for the hop.
I have a whole basket full of coffee themed stamps and dies and the 
possibilities are endless!

2 of the Super Sponsors for this hop are 
and 

Today I decided to use the stamp set called Latte Happy Vibes
from Your Next Stamp. The first time I saw that fun coffee cup and donut
on that skateboard I knew I had to have them! They are having so 
much fun and I couldn't wait to get them on to a card!

I colored them up with my Copic markers and used the 
matching dies to cut them out.
Next I took the largest die from the Kat Scrappiness Zig Zag Rectangle dies
and cut out a panel using the Your Next Stamp Crazy For Coffee 
patterned paper pack.  That coffee bean pattern was perfect for this card!
I used a smaller die from the Zig Zag Rectangle dies to cut a piece of kraft
paper and pop my image up on and also
stamp my sentiment from the Latte Happy Vibes set as well.
I tilted that panel diagonally to match the fun motion of the skateboard.

Last but not least I decorated the front panel with some 
Kat Scrappiness Teal Jewels!

Thank so much for stopping by today
and enjoy the rest of the hop!
I'll be back tomorrow with a card for 

Have a great day, I already am!
☕️Lisa 🍩


**Affiliate links are used occasionally
at no additional cost to you. These
are products that I may have been sent
or ones that I purchased on my own.
Either way, they are products that I 
use frequently and LOVE!


Friday, July 5, 2019

Seahorse Love


Good morning crafty friends!
I'm up on the Kat Scrappiness blog today and I have a quick and easy shaker
card to share with you using the adorable seahorse's from the 
I created the frame for the card with the Kat Scrappiness 
Stitched Scalloped Heart Dies and I backed the window with some
Lawn Fawn Acetate Sheets. The pretty patterned paper in the background 
The stamped sentiment behind the window is from the Lawn Fawn Wavy Sayings
To finish off my card I used some sweet 3mm Mirrored Clear Hollow Hearts 
and Teal Jewels to fill my shaker heart with.


All of these fun products are available in the Kat Scrappiness store 
for 10% off when you use code LISA10!
Thanks for joining me today and have a great day!
I already am!
❤️Lisa ❤️ 


Saturday, March 30, 2019

Easter Shaker Notecards


Hello crafty friends and welcome to my blog!
I'm up on the Kat Scrappiness blog today and I have a fun trio of shaker notecards
to share with you using the newly released Easter edition of the 
Crafter's Essentials dies. This is a fun set that features several different dies
perfect for Easter and Spring themed cards!
Here is a picture of all the dies that come with this set:


I used the bunny, chick and cracked egg to make 3 adorable shaker notecards.
were the perfect accessories for these cards!


The first card was made using the bunny die from the set.
I cut a card base out of card stock measuring 4" x 8 " and scored it at 4".
I used a piece of patterned paper from the Hoppy Easter paper pack
cut to 4" x 4" to cover the card base.
I then took a piece of white card stock and cut out a panel 
with the second largest Square Zig Zag die
I placed the bunny die in the center of that Zig Zag square 
and ran it through my Vagabond.
That left the negative shape of the bunny in the panel which I then 
backed with acetate to form my shaker window.
To make the foam tape curve around the back of the bunny 
I snipped small lines half way into the tape so that it would bend
easily and not warp the paper.
For the bunny shaker I used 3 different sequin mixes:

It's so much fun to see the mix of sequins and confetti shaking around.
For the sentiment I stamped on a Stitched Flag Die and used the same
patterned paper to back it with a larger Flag die.
I also decorated the flag with a few stars from the shaker mix.


Next up is the chick card.  The basic assembly of the card is just 
like the bunny card except I used different patterned paper and sequins.
The patterned paper is also from the Doodlebug Hoppy Easter paper pack
and the sequin mix is called Chicken or the Egg?
I just love the little yellow chick that's included in this mix! 
I tucked one of them behind the sentiment flag.


The last card I have to share with you is the cracked egg card.  
Again the basic assembly is as explained in the bunny card above.
The patterned paper for this card is from the Doodlebug Simply Spring paper pack
and the sequin mix is called Easter Egg Parade!
The tiny die cut Easter eggs in this mix are just too cute!


These cards were so much fun to make! You can really get creative with the
patterned papers and different sequin mixes, there's so many fun combinations!

All of the linked products can be found at Kat Scrappiness.
If you'd like to do some fun crafty shopping for any of the above linked
products or any other supplies, make sure to use my code Lisa10 at
checkout for 10% off of your order!

Thanks for stopping by today and have a great day,
I already am!
🐣 Lisa 🐣


Tuesday, March 26, 2019

Eggsploding Sweetness


KaDoodle Bug does it again! 
I am just in love with this adorable chickie dressed as a 
bunny with some yummy chocolate goodies for Easter!
This CUTE chickie is part of a file called 
Eggsploding Sweetness on the KaDoodle Bug Designs website.
There are 2 other images included with the file that are just as cute!

Here's how I made this card:

* First I printed out that cute chickie and cut him out with an 

* The next step was to build my card base. I adhered a piece
of yellow gingham paper from Papertrey Ink directly to the card base.
I then cut a piece of yellow card stock down to 3 3/4" x 5" and ran
it through a polkadot embossing folder and adhered it to the gingham panel.

* I took the oval panel with my chickie and popped it up on foam tape
and stuck it to the center of the card. I added some sequins from 2

* For the sentiment I used a Happy Easter stamp from a set called 
 To mat the sentiment I used a technique that I love.
I turned the stamp on to it's back side and stamped 
the solid image in brown ink. I ran it through my 
scan n cut and increased the outline twice.
I replaced the stamped image with brown paper 
and let the machine cut out a perfect mat for my sentiment.

* Lastly I tied a bow in pink twine around the top of the card
to bring out the pink in the bunny ears.

I am in love with how this card turned out! The yellow is so soft
and the image is just darling! Here is a picture with all the supplies used.


If you are interested in any of the supplies from Kat Scrappiness
you can save 10% on your order by using code Lisa10 at checkout.
All supplies are linked in the post above.

Thank you so much for stopping by today!

Have a great day,  I already am!
🐣Lisa 🐣


Thursday, March 14, 2019

Crabby Beach Shaker

Good morning and welcome to my blog!
Today I'm up on the The Rabbit Hole Designs blog with my
second guest designer project for March.
 I had a lot of fun creating a beachy card for you with some
actual Florida sand and one very tired crab!


For my card I used the newly released Caffeinated Crab stamp.
How cute is he with that coffee cup in one hand and a doughnut in the other!
Here are the steps to create this card:

  1. First I stamped my crab in black ink and colored him in with my Zig markers, then cut him out with my Scan n Cut machine and put him aside.
  2. For my background I took a piece of smooth card stock and blended 3 colors of Distress Oxide inks over the Water Ripples stencil from La-La Land Crafts. Broken China, Stormy Sky and Tumbled Glass.
  3. Once the background was complete I took the largest Kat Scrappiness Wonky Wavy Stitched Rectangle die and the next size smaller to cut out a panel and a frame at the same time. I adhered acetate to the frame portion and built it up the edges with foam tape.
  4. Next step was to skip work and spend the day at the beachπŸ–☀️⛵️⚓️Well how else was I going to collect sand for my shaker card???  
  5. Pour authentic Jupiter beach sand and some beautiful Frozen II sequin mix on to base of card.  I also glued some sequins to the top of the base so they would stay in view when the shaker was shaking!πŸ˜‚ (Kat Scrappiness literally has hundreds of sequins and mixes to choose from!)                                                                                                                                                                       
                                                                                                                                                             
  6. Cover base with shaker guts in place with prepared acetate backed frame.
  7. Last step was to send that tired crab to the beach for some much needed R & R! I added a sand castle for him to sleep in and a beach ball so he could play with his friends!                                                                                                                                                                                                 
                                                                                                                                                              
  8. Oh yeah one more thing....... shake card for all family members to see and hear until they're annoyed and tell you to go away.🀦🏼‍♀️πŸ™…πŸΌ‍♂️πŸ™…πŸΌ‍♀️🀦🏼‍♂️

I'm super happy with my little beachy card and I hope you'll
try out a shaker card with some fun elements too!
Tell your boss Lisa said it's ok to skip work and go to the beach!

If you are interested in any of the supplies that I linked to in
the Kat Scrappiness store you can use code LISA10 to save 10%
on your entire order anytime!

Thanks so much for joining me today!
Make sure you check out all of the 
new release stamps in The Rabbit Hole shop that are available now!

For more inspiration, updates, and news make sure to check out these links.

Have a great day, I already am!

πŸ¦€Lisa πŸ¦€


Wednesday, March 6, 2019

If Friends Were Flowers I'd Pick You

Hello crafty friends!
 I want to share a cute card that I made using an adorable 
image from KaDoodle Bug Designs with some beautiful spring colors!


This adorable bear is part of a trio of images called 
Busy Bee Bears and is available for download at KaDoodle Bug Designs.
They seriously have some of the cutest critters for any occasion!
I knew this sweet bear needed a flower filled frame with some
pretty pastel colors!

My friend MaryAnn over at Paper Dreamz has already done the 
legwork for me and put together this wonderful combo 
of Distress Oxides for the perfect Spring palette!

and

I blended all 5 of those colors on to some Bristol Smooth card stock
and then I cut out the panel with the Outline Floral Frame
from Simon Says Stamp. It is breathtaking how gorgeous
that frame looks in those colors!

I stamped the sentiment from the Whimsical Flowers 
stamp set also from Simon Says Stamp on to the base of the
card. Next I die cut the word "you" (also SSS) in pink glitter paper 
and glued it under the sentiment.

After I adhered the frame down with liquid adhesive
I placed the bear image on the card with foam tape.

Now the fun part! I took some Kat Scrappiness
jewels in 3 different colors and glued them all over the 
card for some beautiful sparkle and shine!
Here they are:
and


This card is like a breath of fresh air and I adore the pastel colors!

Thanks so much for stopping by today!
I love sharing my cards with you and I hope I've 
inspired you to create your own pastel Spring themed card!

If you are interested in any of the supplies that I linked to in
the Kat Scrappiness store you can use code LISA10 to save 10%
on your entire order anytime!

Have a great day, I already am!
🐻Lisa 🐻