Welcome to theWOW! Embossing Powder &Kat Scrappiness Blog Hop! Today is day TWO of inspiration for you using Kat Scrappiness Stamps, Dies, and Embellishments and WOW! Embossing Powders. And of course there are amazing PRIZES!
My first card for the hop features 3 Kat Scrappiness dies and 2 different
WOW Embossing Powders.
WOW! Embossing Powders is giving away a $25 Gift Certificate to either their UK or USA Store andKat Scrappiness is giving away a $25 Gift Certificate to their store. All you need to do to win is COMMENT. The more blogs you comment on the more chances you have to win! The winners will be chosen at RANDOM from ANY of the blogs on the two day hop.
Hello hello hello! I am so excited because I am up on the Kat Scrappiness blog today with a really fun card I made for my daughter's friend's birthday. I love to take out a bunch of different Kat Scrappiness dies and use them in new and creative ways. Today I decided to make my own stencils with the Nested Layering Heart Dies. I needed to have a heart shaped stencil to do some ink blending in and I didn't have anything like that.
I started by taking the 3 smallest dies in the Nested Layering Heart Dies and cut them out of some 6x6 stencil sheets from The Crafters Workshop. I just love blank stencil sheets because you can create any stencil you want with dies that you already own. How's that for getting double duty out of your supplies!
I just love using my Distress Oxide Inks to do ink blending and I thought it would look really neat to do some ink blending over an embossed background.
I took a piece of Bristol Smooth card stock and stamped the Unity Faithful Letter background stamp in Versamark embossing ink and sprinkled Brutus Monroe Alabaster embossing powder over the panel. I then heated it until the powder was smooth and melted.
Next it was time to put my stencil to work. I placed my handmade heart stencil all over the panel in different positions even overlapping in certain spots and used 2 different color inks on each heart to get some beautiful blends. I had so much fun making a random pattern using my favorite colors. I was sort of going for a rainbow effect as much as possible. I just love the look of the text being highlighted over the heart shapes.
I'll be honest, the ink blending looked way better than I thought it would. I was very happy with how it turned out! Once I liked the layout of the hearts, I used the largest die in the Stitched Scalloped Rectangle dies to cut out the panel and give it a finished edge. I used a bright piece of pink card stock to matte the panel on so it would really stand out.
For the sentiment I wanted a bold black die cut for the front and the Hooray w/ Shadow die was the perfect choice. I used a piece of vellum paper to back the black die cut and it looked great against the bright rainbow colors. The two smaller sentiments are from the Taylored Expressions Simple Strips - Birthday stamp set. I just love the look of white embossing on black paper!
I love how they let the color show through behind them!
I love how this card turned out and I love how with a little creativity and imagination you can create anything you want. You just have to think outside the box sometimes!
Here's another picture with all of the fun Kat Scrappiness products I used on my card:
Thank you so much for joining me today, I'm so glad you stopped by to check out my latest card and I hope you'll check out all the fun stamps and dies over at Kat Scrappiness!
Don't forget to follow
Kat Scrappiness on all
social media platforms to be alerted to new releases, sales and giveaways!
Disclaimer: My blog uses affiliate links whenever possible at no additional cost to you. I only promote products I actually use and love and think other crafters might enjoy as well!
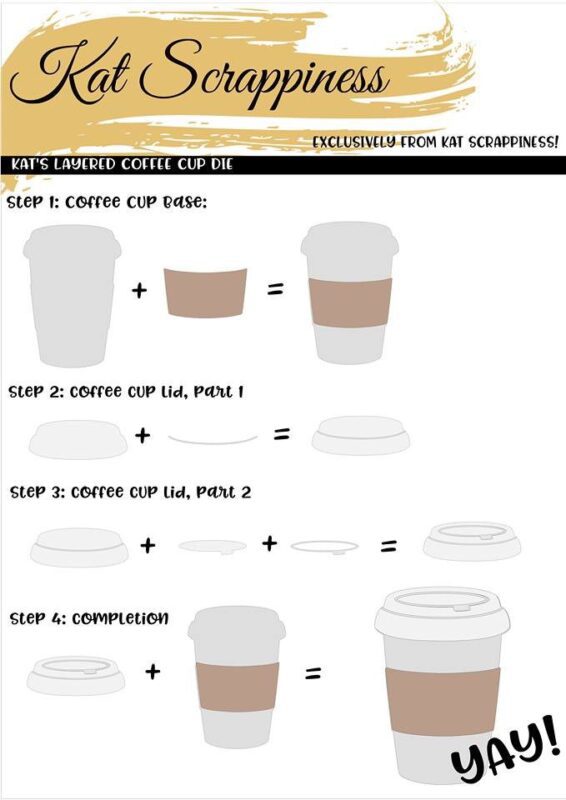
Hi crafty friends, today I'm on the Coffee Loving Cardmaker's Blog to share 2 cups of coffee with you. If you've already had your morning cup, pour another and relax. Kat Scrappiness has an awesome die called the Layered Coffee Cup Die and it's just the right size to take center stage on any card!
For today's post I have 2 cards. I wanted the first card to have a "coffee stained" background so of course I reached for my Ground Espresso colored Distress Ink pad and I "smooshed" (technical crafty term) some ink onto a piece of acetate and then sprayed it with water. When the ink was moving around I placed the acetate onto a piece of watercolor paper and the results were gorgeous! I then assembled my coffee cup out of various colors of card stock and patterned paper.
Here is a very handy instruction sheet to show you how to assemble the pieces from the die.
For the koozie section of the die I used kraft cardstock and I stamped a star from the Kat Scrappiness Swatches stamp set. After that I ran the koozie through my paper crimper to give it a realistic look with some dimension and I added it to the cup with some foam tape. When the coffee cup was fully assembled I added some paint splatter with the Ground Espresso color to the whole cup. I just love the added interest paint splatter gives to any project!
For my sentiment I used the Kat Scrappiness "Got Coffee?" die and added it to the side of the card. This sentiment is awesome and uses a fun whimsical font that is perfect for any coffee themed card.
For my next card I used just the word "coffee" and cut it out 3 times in different colors for a fun look. I painted the coffee cup with a pink pearlescent color from the Kuretake Gansai Pearls colors watercolor set and I added a heart to the cozy from the "Swatches" stamp set and heat embossed it with Ranger Gold powder. I placed it on a diamond embossed background and added some fun
If you added the sentiment "Wanna" above this die, it would make a cute card for a friend inviting them to get together over coffee reading "Wanna Get Coffee?"
This coffee cup die makes it easy to create an eye catching card in no time!
That's all for today, I am glad you stopped by!
Have a great day, I already am!
☕Lisa☕
Disclaimer: My blog uses affiliate links whenever possible at no additional cost to you. I only promote products I actually use and love and think other crafters might enjoy as well!
Today is the Paper Sweeties August Release Day #2! Today is the New Release Party! Paper Sweeties is also celebrating their 8th birthday this month so make sure to join in all of the fun by stopping by the blog everyday for sales, inspiration and chances to win!
Today I'm showcasing the new "Berry" Sweet Mini Stamp Set and the "Sweet Wishes" Mini Stamp Set along with products from the 3rd Quarter Sweet Kit!
Today is the Paper Sweeties August Release Day #1! Paper Sweeties is also celebrating their 8th birthday this month so make sure to join in all of the fun by stopping by the blog everyday for sales, inspiration and chances to win!
Today I'm showcasing the new "Berry" Sweet Mini Stamp Set and the "Sweet Wishes" Mini Stamp Set along with products from the 3rd Quarter Sweet Kit!
Hello and welcome to my blog! Today I have a fun card to share with you using some various Kat Scrappiness dies to make this beautiful one layer card.
All the credit goes to a video I saw recently by Cathy Zielske where she did this technique and I wanted to recreate it with some KS dies today.
Have you ever used masking paper? If not you really should give it a try! It's a lot of fun and you can get some really cool effects with it. Essentially it masks off a part of your paper so you can make a design within a certain shape. Another use is to mask off stamped images so you can ink blend a background around them and maintain a one layer card.
For today's card I will be masking off my card panel using a heart shape opening so that my design will have a heart shape when I pull up the masking paper.
Next I cut out a piece of masking paper that was just slightly larger than my panel and then I cut a heart out of the center of it using one of the hearts from the Layering Hearts die set. Once the heart was cut from the center of the masking paper I laid the paper over the card stock panel so I could start my stamping.
I chose a simple stamp that resembled a flower and I used 3 different distress oxide inks to stamp the flowers in the heart making sure to overlap the edges of the heart and fill it up completely. Once I stamped all of the flowers in all of the colors, I went back over each of them and did some basic ink blending in the same exact colors.
Once the stamping and ink blending were done it was time for the big reveal!
I made a very short video to show you how it looked when I pulled the masking paper off.
I could watch that video over and over again, it's so satisfying!
Once the heart was revealed it was time to decorate the rest of the card. I used the Friendship Greetings stamp set for the sentiment. In the center of the heart I stamped the "You are Beautiful" sentiment with black ink and I stamped the second sentiment on black card stock and embossed it with WOW white embossing powder and popped it up on foam tape under the main sentiment.
And of course I cannot leave well enough alone and I just have to add jewels to all my cards!
The Sparkling Clear Jewels are hands down my favorite jewels and I use them on almost every card.
Here is one more look at my card with all of the Kat Scrappiness dies and stamps pictured.
I really had fun making this card and if you haven't tried masking paper on your cards I highly recommend it. There are multiple videos on YouTube showing the various techniques you can do.
Thank you so much for joining me today, I'm so glad you stopped by to check out my latest card and I hope you'll check out all the fun stamps and dies over at Kat Scrappiness!
Don't forget to follow
Kat Scrappiness on all
social media platforms to be alerted to new releases, sales and giveaways!
Disclaimer: My blog uses affiliate links whenever possible at no additional cost to you. I only promote products I actually use and love and think other crafters might enjoy as well!
I'm excited to share a shaker card with you today that I made for my post on the Kat Scrappiness blog! I used quite a few products from the Kat Scrappiness store to make this fun card.
Wok On Stamp Set. I decided to use one image from each set for my card. The next step was to cut the front panel of the card using the Stitched Scalloped Collage Frame Die which served as the perfect shaker window. It's great because it makes 3 windows that you can put different shaker bits in. I backed that frame with a piece of acetate from the A2 Acetate Sheets and then built the back of it up with foam tape.
Now it was time to prepare the base of the card. I used the Stitched Scalloped Rectangle Dies and I cut out a piece of pink polka dot paper for my background. Before I adhered that panel to the base of my A2 sized card I stamped 2 sentiments in black ink from the You Guac My World and
Wok On Stamp Sets in the space that will be the largest window opening. I embossed it with clear embossing powder to give it a shiny appearance.
Now the fun part! Adding the sprinkles to the card! The technique that I use is to put my sprinkles on the base of the card and place the frame with the foam tape over those sprinkles. This way I can see the sprinkles and the base of the card and I can place the window down in the exact center of that base panel.
I chose 3 different embellishments for my shaker windows. I used the Avocado Sprinkles and the Sushi Sprinkles for the two smaller windows and I used the 3mm Mirrored Clear Solid Stars for the largest window with the sentiment. The last thing to do was adhere the two little avocado and sushi images to the front of the card. Here's a closeup of those fun sprinkles:
This was a fun card to make and it always amazes me how many products you can use on one card. Kat Scrappiness has so many awesome stamps dies and embellishments in the store, you can find EVERYTHING you need and so much more!
Here is one more look at my card with all the supplies shown:
Take a look at this card in action, it's so much fun to watch in slow motion!
I just love watching them shake in slow motion!
Thank you so much for joining me today, I'm so glad you stopped by to check out my latest card and I hope you'll check out all the fun shaker bits in the store and make your own card.
Don't forget to follow
Kat Scrappiness on all
social media platforms to be alerted to new releases, sales and giveaways!
Disclaimer: My blog uses affiliate links whenever possible at no additional cost to you. I only promote products I actually use and love and think other crafters might enjoy as well!