Monday, July 27, 2020

Snowflake Wishes and a Goodbye


Hello everyone and welcome to my blog, I'm glad you're here!
I have some news to share with you today. This will be my last post for the i-crafter design team. I have had the pleasure of watching this company grow since the beginning and I wish them continued success in the future!

For today's card I have used the i-crafter Flip Card - Snowflake die and some fun patterned paper.
This die is meant to make an interactive card but I chose to make a flat card. This snowflake is so pretty it is perfect on it's own. Once I cut the snowflake piece out I adhered it down to a cream card base.  I cut out the Warm Wishes sentiment in some pink glitter foam and adhered it to the bottom of the card.  I added some beautiful sequins from Unity Stamps to finish the card off. 


Thanks for joining me today for my last i-crafter post!

Have a great day, I already am!
❄️ Lisa ❄️ 

Sunday, July 26, 2020

Happy Mail


WHO DOESN'T LOVE HAPPY MAIL?!
I KNOW I DO!
💌 💌 💌 💌 💌 💌 💌 💌 💌 💌 💌


If you landed on my blog today, you probably enjoy papercrafts or cardmaking and  
I have a fun card to share with you today! 
It's my turn on the Kat Scrappiness blog today and I've created a fun shaker card that was inspired by 
a new embellishment in the Kat Scrappiness online craft store!

Take a look at these adorable little Happy Mail Sprinkles!


From the minute I got my hands on these little cuties I knew I wanted to make a card that had a mailbox on it with a shaker window for these little envelopes and here it is!


I just love how this card came out and it was super easy to create!

Since I don't own a specific mailbox die I figured out a way to make my own mailbox and I'm going to show you how I did it today!


For my mailbox I started with the Pretty Pink Posh Stitched Duo 3 Tag Die. The top part of it is shaped like the top of a mailbox so I took the smallest die in the Kat Scrappiness Double Stitched Square Dies and cut out a notch in the bottom of the tag die.

The remaining shape looked just like a mailbox. 

I then took the smallest die from the Double Stitched Square Dies again and cut a window out of the lower part of the tag so I could create a shaker window. 

Once I had the window cut out I took a sheet of Kat Scrappiness A2 Acetate Sheets  and cut out a small enough piece to cover the back side of that small square window. 


To make the half circle on top of the mailbox I used the smallest die from the Double Stitched Circle Dies and cut it in half creating a half circle where I could stamp my sentiment from the Simon Says Stamp Envelops Sentiments Stamp Set. I added one envelope and one heart from the Happy Mail Sprinkles and the Red Heart Sprinkles on either side of the sentiment. 

Here is a picture collage tutorial step by step of how I created the mailbox with the shaker window and half circle for my sentiment.


I used foam tape to build up the area around the window so it would hold my shaker bits.

The next step was to prepare the base of my card to adhere the shaker mailbox to.  The Stitched Postage Stamp Edge Rectangle Nesting Dies are the perfect dies to create fun background panels for your cards.  I used the largest die from that set, cut out some white cardstock and did some fun stenciling using the Taylored Expressions Puppy Love stencil! I just love how the cute little red hearts looked all over the background.

Once the background was ready I tied some red and white twine around the top and adhered it to a blue card base to match my mailbox.

Next I sprinkled some of the Happy Mail Sprinkles and the Red Heart Sprinkles into the middle of the stenciled panel. I then removed the backing from all the foam tape behind the mailbox and centered the window over the cute sprinkles. I actually angled the mailbox just because I thought it gave it a fun random look.


I loved the little envelopes SO much I added a bunch more of them around the card in between the stenciled hearts.

It was a lot of fun to make my own mailbox. Just because you don't have a specific die sometimes doesn't mean you can't shop your die collection and make something unique!


Thank you so much for joining me on my blog today! I hope you'll check out all of the great crafty products over at Kat Scrappiness! There are literally hundreds of embellishments to create the most unique and fun shaker cards like mine! There are sequins, sprinkles, jewels, coffee beans and so much more!

That's all for today, don't forget to follow 
social media platforms to be alerted to new releases, sales and giveaways!


Have a great day, I already am!
💌  Lisa  💌

Glimmer Trees and a Goodbye


Hello everyone and welcome to my blog, I'm glad you're here!
I have some news to share with you today. This will be my last post for The Rabbit Hole Designs design team. I have had the pleasure of watching this company grow since the beginning and I wish them continued success in the future!

For my last post on The Rabbit Hole Designs blog I have a Christmas card using the brand new Slice of Christmas stencil and the previously released Love You More - Christmas Frost stamp set and Candy Twist stencil.

I just love the whimsical trees in the stencil and I thought that they should be the main focus on my card. For the background I wanted a soft and pretty pattern so I took some Spun Sugar Distress Oxide Ink and the brand new Cotton Tail Blending Brushes and applied the ink over the Candy Twist stencil. I used a very light hand to give the background a soft patterned look.  The next step was to place the Slice of Christmas stencil over the background and apply some Nuvo Glacier Paste in Golden Era over the middle tree and Sea Sprite glacier paste over the two outside trees. I just love the elegant and shimmery look it gave to the trees.


For the sentiment I made a smaller piece of the stenciled background and heat embossed the sentiment from the Love You More - Christmas Frost stamp set in gold. I placed the sentiment panel and the background panel on to some pretty patterned paper to make them stand out. The scalloped panel on the card base was cut using the largest Stitched Scalloped Rectangle die from Kat Scrappiness.  

I wanted a little extra sparkle on my card so I added in some pretty sequins from the Cinderella Collection from Unity Stamps.

Thanks for joining me today for my last Rabbit Hole post!

You can also find The Rabbit Hole products at Simon Says Stamp!

For more inspiration, updates and news, make sure to check out these places...


Thanks for stopping by today.

Have a great day, I already am!

🎄 Lisa  🎄 

Disclaimer: My blog uses affiliate links 
whenever possible at no additional cost 
to you. I only promote products I actually 
use and love and think other crafters might 
enjoy as well!

Tuesday, July 21, 2020

Join Me for a Cuppa


Hello and welcome to my *ICU! Today I am up on the Coffee Loving Cardmaker's Blog with a brand new caffeinated card! I recently bought the adorable Stacked Mugs die from Taylored Expressions and wanted to use it for one of my coffee cards. I love that it has the ability to give a layered look with different colored paper behind he cups.


I used the Scalloped Notecard die from Taylored Expressions for the base of my card and some pretty Aqua Mist card stock from Papertrey Ink.  Next I took the Splash stencil from Taylored Expressions and some Mermaid Lagoon Distress Oxide Ink and stenciled that fun pattern all over my notecard.  For some extra highlights I added some white gel pen accents to each splash mark.  I love how it gives a little bit of movement and shine to my card.

To cut out the cups I used some scrap paper from my scrap drawers. The best part about small dies is that you can use up scraps in your stash! I picked out 3 bright colors and glued them behind my cups. The cups were popped up on foam tape over the stenciled background. The sentiment is from the Paper Sweeties Coffee, yes please stamp set

To finish the card off I used some Sparkling Clear Jewels from Kat Scrappiness, my favorite!

I love how this mini card turned out, here is a pic with all of the supplies shown.


Thanks for stopping by and have a great day!
I already am!
☕️  Lisa ☕️ 

Thursday, July 16, 2020

Paper Sweeties July 2020 Look Back Inspiration - Day 3


This month Paper Sweeties is having a Look Back Inspiration! The DT will be using some of their favorite Paper Sweeties stamps, dies and embellishments to create projects with a Summer theme.

I have 2 cards to share with you today from a previous release but I absolutely LOVE them and they couldn't be more perfect for the summer theme this month!


I am in love with the whimsical style of both cards and the little sea creatures could not be more adorable! I also really LOVE the colors on both cards.  Here are links to the stamp sets and dies I used to create these 2 cards.


I hope you've enjoyed the Paper Sweeties July 2020 Look Back Inspiration!

Make sure to hop along to all of the other DT's blogs to see some inspiration for the July 2020 Look Back Inspiration!

Maria Patrick

Thanks for stopping by my blog today for some Paper Sweeties Inspiration!
Have a great day, I already am!
🐙 Lisa  🐙 

Wednesday, July 15, 2020

Paper Sweeties July 2020 Look Back Inspiration - Day2


This month Paper Sweeties is having a Look Back Inspiration! The DT will be using some of their favorite Paper Sweeties stamps, dies and embellishments to create projects with a Summer theme.

Today I have a very summery card to share with you using the Hugs and Kisses stamp set.  Isn't that bicycle adorable! I just love the little hearts in the spokes of the tires.  There is also a sweet little basket of flowers in the stamp set to place on the front or back of the bike.
The "hello sunshine" sentiment and the sunglasses are from the Aloha stamp set and they are the perfect addition to this card.  The bright and colorful Doodlebug paper is the perfect background for this summery card!


Make sure to hop along to all of the other DT's blogs to see some inspiration for the July 2020 Look Back Inspiration!

Maria Patrick


Make sure you come back tomorrow for the third day of the Paper Sweeties
July 2020 Look Back Inspiration!

Thanks so much for stopping by today!
Have a great day, I already am!
🚲 Lisa 🚲  

Tuesday, July 14, 2020

Paper Sweeties July 2020 Look Back Inspiration - Day1


This month Paper Sweeties is having a Look Back Inspiration! The DT will be using some of their favorite Paper Sweeties stamps, dies and embellishments to create projects with a Summer theme.

Today I have a very summery tag to share with you using 4 fun Paper Sweeties products!

I started by choosing a bright summery piece of patterned paper and I used the For You Tag  sweet cut die to cut out my base. I stamped 2 different summer themed sentiments from the Aloha stamp set along the side of the tag. Next I stamped sweet Emma with Copic friendly ink and colored her up with my Copic markers.  I stamped the cute little summery outfit from the Aloha stamp set on to some bright flowery patterned paper and I fussy cut the pants and hat out of that and I stamped the shirt on to some pretty green paper and cut that out as well.  I also stamped the flip flops on to her feet to complete the outfit! For some extra fun I added a Cotton Candy Sequin on to Emma's belt.


Make sure to hop along to all of the other DT's blogs to see some inspiration for the July 2020 Look Back Inspiration!

Maria Patrick


Make sure you come back tomorrow for the second day of the Paper Sweeties
July 2020 Look Back Inspiration!

Thanks so much for stopping by today!
Have a great day, I already am!
🌴 Lisa 🌴 

Monday, July 13, 2020

Rustic Happy Holidays


Hello and welcome to my blog! Today I am up on the i-crafter blog with a holiday card using the recently released Holiday Wiper Insert die set.  I just love the fun font of the Happy Holidays die and the big bold holly leaves and berries! I thought they would look great against a rustic background and cut from glitter foam to really make them pop!

I started by die cutting a base panel from kraft cardstock using the Wonky Wavy Rectangle dies from Kat Scrappiness. I stamped a script word background stamp and then inked the edges with some distress ink. I wanted the Happy Holidays sentiment and holly leaves and berries to really stand out against the background so I used red and green glitter foam to cut them out.


I really love the rustic look of this card and I think these dies will be used quite a bit for this upcoming holiday season!

Thanks for stopping by today.
Have a great day, I already am!

🎄 Lisa  🎄

Sunday, July 12, 2020

Vitamin Sea


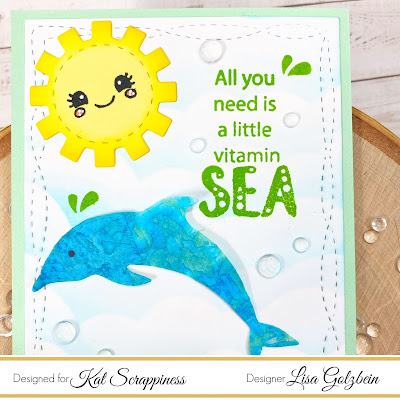
Thanks so much for stopping by my blog today, I am up on the Kat Scrappiness blog as well and I am featuring a slimline card using the brand new Wonky Stitched Nesting Slimline Dies. The new release over at Kat Scrappiness brought with it quite a few new slimline dies to really dress up your slimline cards! These new dies include the Stitched Slimline Wave Die that is the perfect size for a slimline cards and lets you add waves to your cards with a fun stitched edge.

Here is the card recipe:

1. I started with some Lawn Fawn Vellum and swiped 2 different colors of Distress Oxide Ink across the paper in no real pattern. I used Cracked Pistachio and Mermaid Lagoon. I splattered some water over the paper and blotted it off with a paper towel to give it the look of water.

2. After the panel was dry I die cut 2 dolphins using the Kat Scrappiness Dolphin Dies. I also wanted the waves to be cut from the same panel so I used the Wonky Stitched Nesting Slimline Dies and the Stitched Slimline Wave Die to cut out 3 panels that would fit the slimline panel from side to side and also have the stitched edging like the rest of the card. As you can see in this picture I also cut out the top panel of the slimline card in white card stock using the Wonky Stitched Nesting Slimline Dies


3. Once the vellum pieces were cut it was time to prepare the large white panel. I decided to do some stenciling and give the background some clouds.  I used the MFT Cloud Stencil and a Ranger Blending Foam to stencil on some clouds with Peacock Blue Atelier Ink. I just love the look of those big puffy clouds. I love to do all of my ink blending on my Tonic Glass Media Mat because it makes cleaning up so easy!


4. Once the clouds were done I added the sentiment from the Sofishticated Stamp Set using my Misti Stamping Tool and some Goddess Green Atelier Ink. After I adhered the dolphins to the panel using Scor Tape I stamped some water splashes from the Lawn Fawn Hello Baby stamp set using the Goddess Green Atelier Ink again to match the sentiment. I also included a cute little sun die cut from My Creative Time with a fun face in it using the Fresh Faces stamp set from Jaded Blossom. 


5. It was time to put everything together so I adhered my 3 vellum wave panels to the bottom of the  white panel using Scor Tape at the bottom of the waves so they would look 3-D on the card. 
The whole panel was adhered using Nuvo Deluxe Adhesive to a piece of Heffy Doodle Hint of Mint card stock measuring 8.5" x 3.5". For some extra watery fun I added a bunch of Kat Scrappiness Sparkling Clear Droplets. They also look great around cards in photographs (added bonus)!


Here is one more look at the whole card.  I really enjoyed putting this card together!


Thank you so much for stopping by today!
Make sure you head over to Kat Scrappiness today and check out all of the amazing new slimline dies they have. The possibilities are endless and there are so many fun stamps and dies to go along with them, not to mention all of the embellishments there as well!

That's all for today, don't forget to follow 
Kat Scrappiness on all
social media platforms to be alerted to new releases, sales and giveaways!


Have a great day, I already am!
🐬  Lisa  🐬 


Disclaimer: My blog uses affiliate links 
whenever possible at no additional cost 
to you. I only promote products I actually 
use and love and think other crafters might 
enjoy as well!

Saturday, July 11, 2020

Santa Tag


Welcome to my blog! Today I have a Christmas tag that I created using the new stamp set released by The Rabbit Hole Designs called Kringle. I started off by die cutting the largest tag from the Kat Scrappiness Stitched Scalloped Nesting Dies in white card stock.
For the background of the tag I used the Candy Twist Stencil and some Nuvo Glacier Paste in Golden Era. While the Nuvo paste was drying it was time to prepare Mr. Kringle for the tag.
I stamped the image in Memento Tuxedo black ink and colored him in with my Copic Markers.
My Scan n Cut did a great job of cutting him out and for some extra added fun I added some fun white puff to his hat and hems with a snow pen. 
(It's hard to see in the pic but in real life it's a fun effect!)


Once the tag was completely dry I die cut HO HO HO from red glitter paper and adhered it down the right side leaving room on the left for Old Saint Nick. He got popped up on foam tape and the only thing left to do was to add ribbon and bakers twine to the top of the tag.

Rabbit Hole products used on this tag:


I just love how this tag turned out and how much fun it was to make!

You can also find The Rabbit Hole products at Simon Says Stamp!
For more inspiration, updates, and news make sure to check out these places ...
Thanks for stopping by today.
Have a great day, I already am!
🎅🏻 Lisa 🎅🏻

Tuesday, July 7, 2020

Coffee Makes Everything Ok!


Welcome to my blog! Today I have another caffeinated card for 

For my card today I used the brand new Coffee Time background die that just came out from 


This new background die is really cool because it cuts out lots of little coffee beans that could be used for a coffee themed shaker card. I added a sentiment from the Hot Coffee stamp set from 
CAS-ual Fridays. I use this stamp set a lot because it has the funniest, snarkiest coffee sentiments around! I stamped the sentiment on to some teal paper to match the background die and I matted it on to a piece of kraft card stock that I cut out with the Stitched Postage Stamp die from Kat Scrappiness.

For some extra added fun I added a some seam binding from Paper Sweeties and an old button from my Papertrey Ink stash.

I love how this card came out, the background die has so much character it doesn't need much else to complete the card.

Thanks for stopping by my blog today.
Have a great day, I already am!
☕️  Lisa  ☕️ 

Sunday, July 5, 2020

My Hero Cityscape Card


Hi there and welcome to my blog!
I am up on the Kat Scrappiness blog today with a card using one of the brand new Slimline Dies just released this weekend! For my card I used the Cityscape Slimline Layered Dies. Now as you may have noticed my card is not a slimline card but that is the beauty of this particular die.  You can cut it down to make a standard A2 sized card very easily!


To start with I took the MFT Radiating Rays Stencil and did some stenciling on the background of my card.  I used 2 different colors of Distress Oxide inks, Fossilized Amber and
Squeezed Lemonade. Once I had the background done I adhered the bottom layer of the 
Cityscape Slimline Layered Dies in yellow and the top layer in black.  Since there are lots of tiny holes in the top layer the yellow paper makes it appear that the lights are illuminated in all of the buildings.


Now that the base of the card was prepped I started on my little super hero. I stamped the little guy from the Heffy Doodle Super Dudes in Memento Tuxedo black ink and colored him with my Copic Markers.  I get all of my Copic Markers from Dick Blick Art Supplies.  They have the best prices around and buy Ciao markers whenever possible.  They work the same and are cheaper than the Sketch markers. Once I had him colored I popped him up on my card with foam tape. The "my hero" die cut was cut from black paper using the My Hero Heffy Cuts.
For some extra highlights I used the Sakura Gelly Roll Pen Classic Size 10 to highlight all of the images and words. This particular gel pen is the best one I've ever used and I think it makes such bold lines because it is the #10 size.
For a final touch I added some very appropriate Kat Scrappiness Superhero Sprinkles to my card!

I really hope you enjoyed my card today, I certainly enjoyed creating it!


Make sure to check out the Kat Scrappiness online store to see all of the
new releases in the shop today!
What is a holiday weekend without a sale?
Check out this Star Spangled Sale going on today through July 6th!


Don't forget to follow Kat Scrappiness on all
social media platforms to be alerted to new releases, sales and giveaways!


Thank you so much for stopping by my blog today!
Have a wonderful day, I already am!

🦸‍♂️ Lisa 🦸‍♂️  

Disclaimer: My blog uses affiliate links 
whenever possible at no additional cost to you.
I only promote products I actually use and think 
other crafters would like as well!