Showing posts with label Slimline Dies. Show all posts

Tuesday, June 1, 2021

Coffee With My Dad!

Hello Coffee Lovers!
I'm up on the Coffee Loving Cardmaker's Blog today and since Father's Day is coming up this month, I thought it would be fun to make a caffeinated card for my dad! 

We love to go to Starbucks together for some coffee and a chat. His favorite hot drink was always an Americano with Breve Foam but recently he changed his order. On our last visit I noticed a drink on the menu that looked delicious called a Shaken Iced Espresso and I was right..... it was DELISH! My dad was inspired to try a cold drink like mine for a change so he ordered a Caramel Ribbon Crunch Frappuccino and he was immediately hooked! It's nice to hang out having our favorite caffeinated beverages and talk about life!

The new release at Super Sponsor Kat Scrappiness has the perfect Father's Day die and it is perfect for a slimline sized card!


for this slimline card.


The base layer of the card was cut out of some patterned paper using the largest die from the
Zig Zag Nesting Slimline Dies and I added some Mocha Pearl Mix for some extra embellishments because why not?

Here is one more look at the card with all of the supplies I used.


I hope my dad likes his card, I certainly enjoyed making it and I look forward to our next Starbucks visit so we can sip and chat!

Have a great day, I already am!
☕️  Lisa  ☕️ 


Friday, March 19, 2021

Kat Scrappiness 2021 Spring/Summer Coffee Lovers Blog Hop


Calling all caffeine addicts! It's time for the 
Spring/Summer 2021 Coffee Lovers Blog Hop put on by the Coffee Loving Cardmakers!


Kat Scrappiness is a Super Sponsor for the Coffee Lovers Hop again and the design team is hopping along today with some caffeinated inspiration for you!

EVERYTHING is 15% off from NOV 19-26TH, !!! use coupon code: 
“COFFEEHOP2021” for 15% off your order).

Since Kat Scrappiness is a super sponsor, they will be giving away a $25.00 gift card to the store, PLUS a flash prize which is a surprise package of Kat Scrappiness products!


I made a slimline card for today and I think it turned out adorable!
Ok well the truth is that the Quokka is super adorable and that definitely helped!


I used 4 different Kat Scrappiness products on my card:


The base of my card was cut out of some pretty patterned paper using the largest
 Zig Zag Nesting Slimline Die and I matted it on to a coral panel.

I thought it would be fun to spell out the word coffee using the Condensed Lowercase Alpha Dies and use the adorable Quokka as the letter "o".

One of the cute accessories that comes with the Everyday Quokka stamp set is that adorable little coffee cup in his hands. I cut around the outside of his hands so that he could hold his cute little coffee cup.


I printed the sub-sentiment out from my computer and matted it on the same color card stock as the base.

I finished off my card with some Sparkling Clear Jewels to make it shine!


Here's one more look at my caffeinated creation:


Thanks so much for stopping by my blog today and hopping along with Kat Scrappiness over at the Coffee Lover's Hop!

Make sure to check out Kat Scrappiness for all of your crafty needs, they have a WIDE assortment of slimline supplies, embellishments and stamps! Not to mention over 100 coffee themed products!
☕️ ☕️ ☕️ 

Have a great day, I already am!
Lisa 

Friday, March 5, 2021

Bunny Slimline Card


I am up on the Kat Scrappiness blog today with an adorable slimline card featuring the 
Slimline Filmstrip Border Die and the adorable Build a Bunny Stamp set with matching dies.

I started out by blending Squeezed Lemonade, Worn Lipstick, Picked Raspberry and Seedless Preserves Distress Oxides onto a slimline base. I used one of the dies from the Slimline Filmstrip Border Die and cut it out with black card stock. I layered the filmstrip border over some patterned paper and layered them both over the ink blended panel.

For my adorable bunnies I used the same 4 Distress Inks as mentioned above and after blending them on to card stock I cut out 4 bunnies (1 in each color). Their cute little faces were stamped using the Build a Bunny stamp set. I tucked them into the 4 windows on alternating sides and my cute card was done.

I just love all of the slimline products over at Kat Scrappiness! My favorites are the mini slimline dies, especially the scalloped edge die!

You can check out all the amazing stamps, dies and embellishments at Kat Scrappiness and save money while you shop! There is a Spring Sale starting today through March 14th.
See banner below for all the details and coupon code!


Thanks so much for stopping by today!

Have a great day, I already am!

🐰  Lisa  🐰 

Thursday, November 12, 2020

Kat Scrappiness Holiday CARDAPALOOZA!


Welcome to my blog! Today I have a lot to share with you!
The November release at Kat Scrappiness is amazing and I want to share all of the projects I made using the brand new dies and sprinkles!

I'm going to start with my favorite dies from the release! They are called the 

Christmas Shaker Ornament Dies and there are 3 different shapes included in this set. They make the cutest little shakers and I made 4 cards with them but then I took it a step further and created some felt ornaments with them as well. I made most of them with the sewing machine (with my mom's help) and one of them I hand stitched with floss thread. Here are the cards and felt ornaments I created using the fabulous die set. 


I will list all linked products used on each project directly under their pictures!


Christmas Shaker Ornament Dies
Condensed Lowercase Alphabet Dies
Sugarplum Fairies Sequin Mix
Sugar Plum Fairies Slimline Paper Pad


Christmas Shaker Ornament Dies
Happy Holidays Brush Script Word Die
White Jewels


🎅🏻🎅🏻🎅🏻🎅🏻🎅🏻🎅🏻🎅🏻🎅🏻🎅🏻🎅🏻🎅🏻🎅🏻🎅🏻🎅🏻🎅🏻🎅🏻🎅🏻🎅🏻🎅🏻


Next up from the new release is this gorgeous 
It's perfect for holiday cards or any occasion where a bow would be appropriate! 
I have a holiday card and a birthday card to share with you using this new die!


🎅🏻🎅🏻🎅🏻🎅🏻🎅🏻🎅🏻🎅🏻🎅🏻🎅🏻🎅🏻🎅🏻🎅🏻🎅🏻🎅🏻🎅🏻🎅🏻🎅🏻🎅🏻🎅🏻

The next die I want to share with you today is another Slimline Die called the 
Forest For The Trees Slimline Die and it features a wonderful forest that you can use year round depending on how you decorate it! It also comes with 3 different size mini leaves to decorate your trees with depending on the season!


Here is my card using the Forest For The Trees Slimline Die and it features a Winter Wonderland scene using dies from the Crafter's Essentials Winter Dies.


🎅🏻🎅🏻🎅🏻🎅🏻🎅🏻🎅🏻🎅🏻🎅🏻🎅🏻🎅🏻🎅🏻🎅🏻🎅🏻🎅🏻🎅🏻🎅🏻🎅🏻🎅🏻🎅🏻


And last but certainly not least I have one more shaker card to share with you that features an older Kat Scrappiness die that is just perfect for all of your holiday cards!


What an elegant die and it's so easy to create a shaker card using the multiple layers that come with it. You can make separate shaker sections or make one big shaker like I did.  I decided to make a holiday card in some non-traditional colors. This card is pretty simple to let the tree and sequins take center stage.


🎅🏻🎅🏻🎅🏻🎅🏻🎅🏻🎅🏻🎅🏻🎅🏻🎅🏻🎅🏻🎅🏻🎅🏻🎅🏻🎅🏻🎅🏻🎅🏻🎅🏻🎅🏻🎅🏻


Thank you so much for joining me for my Kat Scrappiness Holiday Cardapalooza! I hope I gave you some new and fresh ideas for your holiday cards! Make sure to check out 
Kat Scrappiness for all of your holiday card making needs! 

Don't forget to follow 
Kat Scrappiness on all
social media platforms to be alerted to new releases, sales and giveaways!


Thanks for stopping by and enjoy your day, I already am!
🎅🏻 🎄  Lisa  🎄 🎅🏻

Saturday, September 26, 2020

Slimline Dies Two Ways


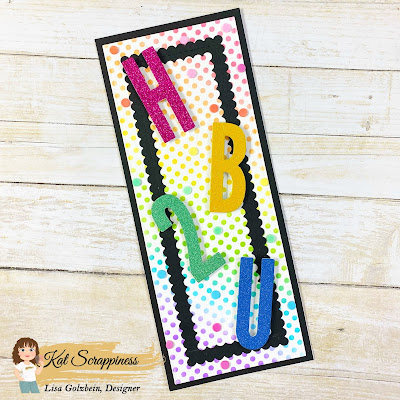
Welcome to my blog! Today I have 2 cards for you using some of the newest Slimline Dies from Kat Scrappiness. I used the same Stitched Scalloped Nesting Slimline Dies on both cards yet they have 2 very different looks to them!

---------------------------------------------------------------

Let's start with the card that uses the Stitched Scalloped Nesting Slimline Dies in the traditional way that you are used to seeing it.


For this card I cut a piece of Bristol Smooth card stock using the largest die from the 
Embossed Edge Nesting Slimline Dies and did some rainbow ink blending with a polka dot stencil.
The black scalloped inner frame was made using the second and third largest dies from the Stitched Scalloped Nesting Slimline Dies. I nested them inside each other and sent them through my die cut machine together together at the same time and the result was that cool scalloped black frame that I adhered to the inside of the polka dot panel.
For the sentiment I used the Condensed Uppercase Alpha Dies and the Condensed Number Dies to cut out HB2U in glitter paper which is short for "Happy Birthday to You". I popped the letters and number up on foam tape for some dimension. To finish off the card I added some fun and colorful 
Party Confetti Sprinkles to mimic the fun polka dots in the background.

I took the entire panel and matted it on to black card stock and then adhered all of that to a side opening slimline card base measuring 8 1/2" x 3 1/2".


The brand new Triangle Embellishment Trays and
Embellishment Pick Up Tool are super helpful when picking up and adhering embellishments to my cards.


---------------------------------------------------------------

 For my second card today I also used the Stitched Scalloped Nesting Slimline Dies but in a less traditional way. 


I began by using the largest die and cutting out a piece of Bristol Smooth card stock so I could do some ink blending. After I cut out the paper, instead of using it as a traditional slimline panel, I folded it in half to make a notecard.


These dies are the perfect size when folded to make the cutest little notecards!
Once it was folded I did some ink blending using Distress Oxide inks and then some stenciling in the same colors.


I just love the way this panel came out. These 3 colors blended together so well!
For the main focal point on my card I stamped and Copic colored the adorable little giraffe from the 
Lola the Giraffe Stamp Set. She cut out perfectly on my Scan n Cut but she could be easily hand cut as well. Before I adhered that cute little giraffe down with foam tape I stamped the sentiment in black ink on the bottom of the card. That beautiful "Thank You" is from the Friendship Greetings Stamp Set and looks lovely on any card! After I had Lola down and the sentiment stamped I added a few random sequins from the Aww-tumn Sequins Remixed and Fall Blessings embellishment sequin packs.


Pictured above are the brand new Triangle Embellishment Trays and
Embellishment Pick Up Tool and I love using them when I have to place sequins or sprinkles on my cards.


Here is one more look at both cards photographed with all of the supplies I used on them.


Thanks for stopping by today! I hope I gave you some new ideas for using your slimline dies in a not so traditional way. The sky is the limit with your imagination and creativity!
Here is a complete list of Kat Scrappiness products used on both of my cards including links.


Have a great day, I already am!
🎉  Lisa  🦒 

Saturday, September 5, 2020

Fur Baby Love


Hello and welcome to my blog! Today I am up on the Kat Scrappiness blog and I have a card for all you animal lovers out there! If you haven't noticed slimline dies are all the rage right now and Kat Scrappiness is now carrying a wide variety of slimline dies with some very unique styles! I used 2 of the newest slimline dies for my card. 

I started out with a card base of 8 1/2"x 7" and scored it 3 1/2". The next layer is the largest die from the Stitched Scalloped Nesting Slimline Dies and it is cut from kraft card stock. The top layer is cut from white card stock using the 2nd largest die from the Embossed Edge Nesting Slimline Dies.

For the main focal point on my card I used the word dies and the pawprint die from the Pet Sentiments Dies. I filled the pawprints with some patterned paper I made myself using a stencil from Taylored Expressions. The sentiment is from a My Creative Time stamp set.

To finish off my card I added these 3 fun sprinkles around the words and the pawprints:


I'm really happy with how this card came out and I just love the 
paw prints in the WOOF and MEOW dies!

Here is one more picture with all of the fabulous  Kat Scrappiness products I used on my card:


Make sure you check out the  Kat Scrappiness store this weekend for all of your crafty needs!
There is an awesome Labor Day Sale going on and you can get 15% off site wide* on all products. 
It will run from September 4th - 8th, just use coupon code: LABORDAY2020
*sale excludes all MISTI and Slimline products


Thanks for stopping by today!
Have a great day, I already am!
🐱  Lisa  🐶 

Sunday, July 12, 2020

Vitamin Sea


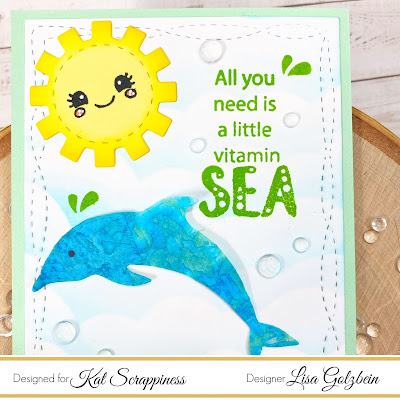
Thanks so much for stopping by my blog today, I am up on the Kat Scrappiness blog as well and I am featuring a slimline card using the brand new Wonky Stitched Nesting Slimline Dies. The new release over at Kat Scrappiness brought with it quite a few new slimline dies to really dress up your slimline cards! These new dies include the Stitched Slimline Wave Die that is the perfect size for a slimline cards and lets you add waves to your cards with a fun stitched edge.

Here is the card recipe:

1. I started with some Lawn Fawn Vellum and swiped 2 different colors of Distress Oxide Ink across the paper in no real pattern. I used Cracked Pistachio and Mermaid Lagoon. I splattered some water over the paper and blotted it off with a paper towel to give it the look of water.

2. After the panel was dry I die cut 2 dolphins using the Kat Scrappiness Dolphin Dies. I also wanted the waves to be cut from the same panel so I used the Wonky Stitched Nesting Slimline Dies and the Stitched Slimline Wave Die to cut out 3 panels that would fit the slimline panel from side to side and also have the stitched edging like the rest of the card. As you can see in this picture I also cut out the top panel of the slimline card in white card stock using the Wonky Stitched Nesting Slimline Dies


3. Once the vellum pieces were cut it was time to prepare the large white panel. I decided to do some stenciling and give the background some clouds.  I used the MFT Cloud Stencil and a Ranger Blending Foam to stencil on some clouds with Peacock Blue Atelier Ink. I just love the look of those big puffy clouds. I love to do all of my ink blending on my Tonic Glass Media Mat because it makes cleaning up so easy!


4. Once the clouds were done I added the sentiment from the Sofishticated Stamp Set using my Misti Stamping Tool and some Goddess Green Atelier Ink. After I adhered the dolphins to the panel using Scor Tape I stamped some water splashes from the Lawn Fawn Hello Baby stamp set using the Goddess Green Atelier Ink again to match the sentiment. I also included a cute little sun die cut from My Creative Time with a fun face in it using the Fresh Faces stamp set from Jaded Blossom. 


5. It was time to put everything together so I adhered my 3 vellum wave panels to the bottom of the  white panel using Scor Tape at the bottom of the waves so they would look 3-D on the card. 
The whole panel was adhered using Nuvo Deluxe Adhesive to a piece of Heffy Doodle Hint of Mint card stock measuring 8.5" x 3.5". For some extra watery fun I added a bunch of Kat Scrappiness Sparkling Clear Droplets. They also look great around cards in photographs (added bonus)!


Here is one more look at the whole card.  I really enjoyed putting this card together!


Thank you so much for stopping by today!
Make sure you head over to Kat Scrappiness today and check out all of the amazing new slimline dies they have. The possibilities are endless and there are so many fun stamps and dies to go along with them, not to mention all of the embellishments there as well!

That's all for today, don't forget to follow 
Kat Scrappiness on all
social media platforms to be alerted to new releases, sales and giveaways!


Have a great day, I already am!
🐬  Lisa  🐬 


Disclaimer: My blog uses affiliate links 
whenever possible at no additional cost 
to you. I only promote products I actually 
use and love and think other crafters might 
enjoy as well!

Sunday, April 26, 2020

Shine Bright shaker card


Hello crafty friends! I am up on the Kat Scrappiness blog today with this fun shaker card!
Today is day 3 of the new releases at Kat Scrappiness and the design team and I are featuring shaker cards made with easy to use shaker kits! The shaker kit I used to make this card is called the
Shine like a Diamond shaker card kit and I filled it with 
Sparkling Clear Jewels.


There are 18 new shaker kits available in the store today so head on over and check them out!
There are so many fun shapes available and they are super easy to use! Here is a link to a video that gives a brief explanation how to use these kits.
Kat Scrappiness Shaker Kits

Here is a list of all of the new shaker kits available in the store today! 
Dog House Paw Print Baby Bottle Onesie Teddy Bear Large Cloud Small Cloud Television Beach Ball Hot Air Balloon Balloon Car Large Diamond Small Diamond Small Splat/Star Large Splat Star Large Star


You can make so many types of cards with these kits ranging from baby cards, to get well cards and even wedding and birthday cards! There is also an extensive line of sequins/sprinkles to add to your shaker cards! They are adorable and feature such items as paw prints, candy, confetti, jewels, kitty kats, rainbows, teddy bears and so much more! You can check them out here.
There are lots of new confetti sprinkles in a rainbow of colors being released today!
Check out all of this confetti rainbow goodness!


Ok now it's your chance to head over to Kat Scrappiness to check out all of these new shaker goodies!

That's all for today, don't forget to follow 
social media platforms to be alerted to new releases, sales and giveaways!


Have a great day, I already am!
💎 Lisa 💎