Showing posts with label Pretty Pink Posh. Show all posts

Sunday, July 26, 2020

Happy Mail


WHO DOESN'T LOVE HAPPY MAIL?!
I KNOW I DO!
πŸ’Œ πŸ’Œ πŸ’Œ πŸ’Œ πŸ’Œ πŸ’Œ πŸ’Œ πŸ’Œ πŸ’Œ πŸ’Œ πŸ’Œ


If you landed on my blog today, you probably enjoy papercrafts or cardmaking and  
I have a fun card to share with you today! 
It's my turn on the Kat Scrappiness blog today and I've created a fun shaker card that was inspired by 
a new embellishment in the Kat Scrappiness online craft store!

Take a look at these adorable little Happy Mail Sprinkles!


From the minute I got my hands on these little cuties I knew I wanted to make a card that had a mailbox on it with a shaker window for these little envelopes and here it is!


I just love how this card came out and it was super easy to create!

Since I don't own a specific mailbox die I figured out a way to make my own mailbox and I'm going to show you how I did it today!


For my mailbox I started with the Pretty Pink Posh Stitched Duo 3 Tag Die. The top part of it is shaped like the top of a mailbox so I took the smallest die in the Kat Scrappiness Double Stitched Square Dies and cut out a notch in the bottom of the tag die.

The remaining shape looked just like a mailbox. 

I then took the smallest die from the Double Stitched Square Dies again and cut a window out of the lower part of the tag so I could create a shaker window. 

Once I had the window cut out I took a sheet of Kat Scrappiness A2 Acetate Sheets  and cut out a small enough piece to cover the back side of that small square window. 


To make the half circle on top of the mailbox I used the smallest die from the Double Stitched Circle Dies and cut it in half creating a half circle where I could stamp my sentiment from the Simon Says Stamp Envelops Sentiments Stamp Set. I added one envelope and one heart from the Happy Mail Sprinkles and the Red Heart Sprinkles on either side of the sentiment. 

Here is a picture collage tutorial step by step of how I created the mailbox with the shaker window and half circle for my sentiment.


I used foam tape to build up the area around the window so it would hold my shaker bits.

The next step was to prepare the base of my card to adhere the shaker mailbox to.  The Stitched Postage Stamp Edge Rectangle Nesting Dies are the perfect dies to create fun background panels for your cards.  I used the largest die from that set, cut out some white cardstock and did some fun stenciling using the Taylored Expressions Puppy Love stencil! I just love how the cute little red hearts looked all over the background.

Once the background was ready I tied some red and white twine around the top and adhered it to a blue card base to match my mailbox.

Next I sprinkled some of the Happy Mail Sprinkles and the Red Heart Sprinkles into the middle of the stenciled panel. I then removed the backing from all the foam tape behind the mailbox and centered the window over the cute sprinkles. I actually angled the mailbox just because I thought it gave it a fun random look.


I loved the little envelopes SO much I added a bunch more of them around the card in between the stenciled hearts.

It was a lot of fun to make my own mailbox. Just because you don't have a specific die sometimes doesn't mean you can't shop your die collection and make something unique!


Thank you so much for joining me on my blog today! I hope you'll check out all of the great crafty products over at Kat Scrappiness! There are literally hundreds of embellishments to create the most unique and fun shaker cards like mine! There are sequins, sprinkles, jewels, coffee beans and so much more!

That's all for today, don't forget to follow 
social media platforms to be alerted to new releases, sales and giveaways!


Have a great day, I already am!
πŸ’Œ  Lisa  πŸ’Œ

Friday, April 12, 2019

Watercoloring Over Gold Embossing


Hello crafty friends and welcome to my blog.
Today I have a beautiful card to share with you using two beautiful 
 Pretty Pink Posh stamps sets!
I absolutely love making floral cards and one of my favorite techniques
is watercoloring over gold embossing. I think it is such an elegant look!
Today I used the Pretty Petunias florals and the Everyday Greetings stamp sets
to make this beautiful garden inspired card.
Lately I've been crushing on this pink and orange combination.
I used 4 different color Distress Inks on this card:

I started off by stamping my flowers in Versamark Ink on to watercolor paper
It's hard to get a good impression on watercolor paper and the
MISTI helps with stamping over and over in the same spot!
I sprinkled WOW gold embossing powder over the Versamark and 
melted it with my heat gun.  The gold embossing makes it so easy to watercolor
and stay in the lines. After I watercolored the flowers and leaves I did a light wash
of Peacock Feathers all over the card around the flowers.
I took the Thank You sentiment from Everyday Greetings and stamped it in the
center of the floral panel in Versafine Black Onyx Ink.
I used the scalloped frame die from the My Favorite Things Blueprints 20
die set to cut out my floral panel and layered it on a gold foil background.
To finish off my card with some sparkle and shine I used some
Clear Sparkling Jewels from Pretty Pink Posh.

Here is a closeup of the card so you can see all the gold shimmer from
the embossing and the foil card stock.
I just love that gold shine!


I am also entering this card in the Simon Says Stamp Wednesday 
challenge this week.  The theme is No Designer Paper.
Instead of designer paper, I made my own background with pretty flowers.

Thanks for joining me today, I hope you enjoyed
my card and will come back soon for more crafty card
inspiration.  You can visit my IG and Facebook accounts
as well for many more cards!

Please note affiliate links have been used in this post.
 This means that I get a small commission at no additional cost to you when 
products are purchased through links that I share on my blog.

Also, if you do any shopping at Kat Scrappiness you can use my code 
LISA10 to save 10% on your order anytime!

Have a great day, I already am!
🌺Lisa 🌺


Tuesday, April 9, 2019

Hummingbird Love


Hello crafty friends and welcome to my blog.
Today I have a beautiful card to share with you using some 
sweet Pretty Pink Posh stamps and dies.
For my card I used the 
and the Love Shaker Die.

I started with a square card base made from white card stock
measuring 4" x 4". I then took the largest die from the Kat Scrappiness
Stitched Scalloped Square Dies and cut a panel out with white card stock.
The next step was to use the PPP Love Shaker Die and place it in the center
of the scalloped square die and run it through my Vagabond.
I also used the Love Shaker Die and cut out 4 more pieces
in white card stock so that I could layer those die cuts on top of each other.


Once I glued them all together I had a thick die cut
that was as thick as a chipboard element.
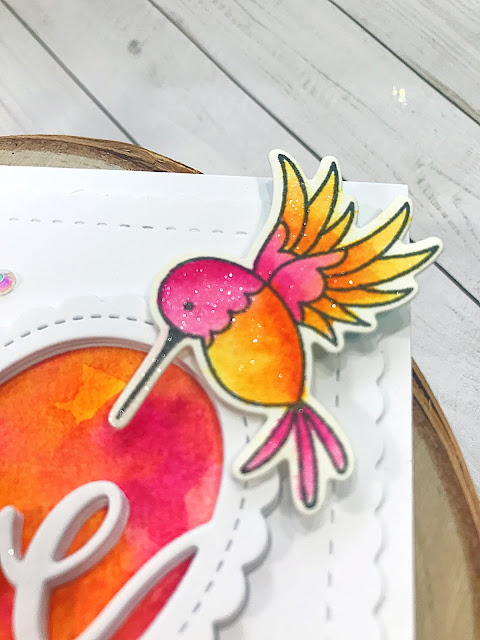
I took some watercolor paper and loosely painted some
Distress Inks in Picked Raspberry and Spiced Marmalade.
I trimmed down my watercolor panel to a heart shape to fit behind the 
Love Shaker panel. While I had my watercolor paper and inks
out, I stamped 2 hummingbirds in Gina K Amalgam ink 
and watercolored them with the same 2 distress inks from above.


After I glued my scalloped square on to my card base, I took 
my Love Shaker element with the watercolored piece behind it 
and glued it down to the base as well.
The hummingbirds were mounted with foam tape to the top
and bottom corners of the card.
To finish off the card I used PPP Sparkling Clear Jewels
to add some sparkle and shine.
For the last step I used my Spectrum Noir Clear Overlay Sparkle Pens
to add some glimmer to the hummingbirds and love die cut.


It's hard to catch the glimmer in a photograph but in real life
this card really does sparkle and shine!

Thanks for joining me today, I hope you enjoyed
my card and will come back soon for more crafty card
inspiration.  You can visit my IG and Facebook accounts
as well for many more cards!

Please note affiliate links have been used in this post.
 This means that I get a small commission at no additional cost to you when 
products are purchased through links that I share on my blog.

Also, if you do any shopping at Kat Scrappiness you can use my code 
LISA10 to save 10% on your order anytime!

Have a great day, I already am!
πŸ’“Lisa πŸ’“


Monday, December 10, 2018

Happy Little Stampers ATC December Challenge

Hello everyone!
I am back again with the 


Every month Happy Little Stampers has an 
ATC challenge and the theme for December is Pets.  
For anyone who isn't familiar with ATC cards, they are mini
works of art that measure 2.5" x 3.5" and are traded around the world.
Usually they are numbered and signed on the back by the artist.


For my pet themed ATC I decided to emboss the background of my card with a 
paw print embossing folder and paint it with some off white paint
followed by some soft inking in blue.
I added a cute little doggie from Pretty Pink Posh 
and a sentiment from My Creative Time!
To finish it off I added some cute red glittered hearts.

I hope you'll play along with us this month
 and enter the ATC challenge at 
The winner for this challenge will receive a $20 coupon to spend at the shop!

IF YOU USE STAMPS BY HAPPY LITTLE STAMPERS 
AND YOU ARE OUR RANDOM WINNER,
YOUR PRIZE WILL BE DOUBLED!

Have a great day, I already am!
🐢Lisa 🐢


Thursday, July 12, 2018

Mini Notecards by Lisa


Good morning crafty friends! 
I'm over on the Kat Scrappiness blog today to bring you a sweet mini trio of notecards. I have an easy technique that I think you are going to fall in love with. We are going to make mini notecards using the nested dies we all love and reach for all the time for our regular sized cards. The finished size of each card is approximately 4 1/8" x 2 3/4". What you need is the largest die from any of your nested die sets.  I've used rectangles but squares would work as well.  The 3 nested die sets I've used are the Stitched Postage Stamp Edge Rectangles, the Stitched Scalloped Rectangles and the Wonky Wavy Stitched Rectangle Dies


For my trio of sweet cards I used patterned paper for the card base for some color and variety but any paper or card stock would work.


 After I die cut the largest size die from each set, I folded the paper in half to create a mini card.  


Then comes the fun part! Decorate to your heart's desire! I added a piece of white card stock to the front of each mini card and stamped a background with florals and then popped the focal points up on foam tape. I used the Scripty "Hello My Crafty Friend" die as the sentiment on 2 of the cards. I finished each card off with some pretty colored twine and 3 sparkly sequins from the Barbie Sequin mix. I stuck with the rule of 3 to place my sequins down and it was just the right amount of added sparkle. Since the card base is made from dies that have decorative edges, your cards will have 3 fancy edges that are so pretty!


Making these mini notecards is a cinch and uses dies that you probably already have in your stash.  Kat's nested dies are the perfect size to create these mini cards. It might not be a new technique but it sure is fun! Small notecards are perfect for lunchbox notes, quick thank you cards or for any occasion that calls for a quick small card! For some added fun you can make your envelope out of the same patterned paper to match your card.  The possibilities are endless!
All supplies used are linked below.
Thank you so much for joining me today and don't forget to use code Lisa10 to get 10% off your order at checkout.
Have a great day everyone!
I already am!
πŸ’LisaπŸ’


Tuesday, April 24, 2018

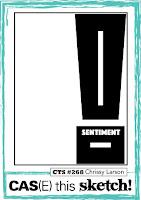
CAS(E) This Sketch #268

Quick post today to share my card for the CAS(E) this sketch challenge #268.  I love following these sketches because it speeds the creativity process along.  Simple card using basic crayola watercolors, a Kat Scrappiness wonky rectangle die and a beautiful Papertrey Ink sentiment, finished off with some Pretty Pink Posh clear sequins.
Have a great day everyone!
I already am!
🌈Lisa 🌈


Saturday, April 14, 2018

Simon Says : Add Some Texture (Take 2)


I am loving this week's Wednesday challenge at Simon Says Stamp to add texture so much that I made a second card.  Instagram is filled with all things Springy and Butterfly related now and I just had to jump on the bandwagon.  Since I am waiting on my butterfly dies from the SSS Fluttering By collection I thought I would take out 2 of my older butterfly dies from 
SSS called Devonshire and Paulina. The 2 smaller butterflies are SU punches.
So much inspiration on this card but mostly from Melissa Phillips at Lilybean Paperie.  She has a way of making every card look magical!  On a recent card for the SSS blog hop she sponged her butterflies with distress ink, sprayed with water and splattered white paint on top.  
LOVE THOSE RESULTS!

I didn't glue the wings down so they could fly off the page.  
I layered those beautiful butterflies on top of the Papertrey Ink Shapeshifters Oval 1 die and I used the Aqua Mist Bitty Big paper as a background.  Since I know my mom will love this card I finished it off with a Happy Mother's Day sentiment from PTI's Butterfly Blooms stamp set.  I heat embossed it with white powder onto a strip of Aqua Mist Bitty Big paper and popped it up on foam tape.  All that was left was to add some sparkly clear sequins from Pretty Pink Posh and my card was done.
Thanks so much for stopping by today to take a look!  
I hope you all are enjoying your Saturday, I know I am!
πŸ¦‹Lisa πŸ¦‹


Tuesday, January 16, 2018

In love with Papertrey Ink

Good morning.  Last night the January release went live over at Papertrey Ink and I was able to get the adorable Brushed Birds stamp set I've been swooning over.  I also bought a few other birthday themed goodies while I was shopping.  I cannot wait for that delivery!!!  After I had my PTI shopping spree I decided to break out my Farmer's Market Florals again and make another card.  I swear that stamp set just infuses creativity into my hands!  I also used the Chevron cover plate, an old stamp set called Handwritten notes for the cute sentiment and some beautiful PTI patterned paper.  The delicate sequins are from Pretty Pink Posh, everything looks better with sequins, right???  My next shopping spree will be over there for some of the new release stamps.  Paulina has the cutest hummingbird stamps that I want!  I really should work some overtime to fund my habit!
Anyway here's my card for today.
Have a lovely day, I already am!
πŸ’LisaπŸ’