Showing posts with label Brutus Monroe. Show all posts

Tuesday, December 10, 2019

A Cup of Joy


Welcome back to my blog and my "ICU"
Today I am over on The Coffee Loving Cardmaker's blog
with a Cup of Holiday Joy!
Here in Florida we don't really get the frigid cold that they experience
up North but we do get our share of "chilly" days and that's when
you see everyone in boots with a red Starbucks cup in hand!


My caffeinated inspiration for today's card comes from 
all of the festive to go coffee cups we see at this time of year.
Here is a picture of a to go coffee cup I saw at Target recently
and I wanted to recreate that same look on a card.


I began with a red card base and layered the 2 largest dies from the 

For my coffee cup I chose my favorite die,
the Kat Scrappiness Layered Coffee Cup Die and I cut it from red foil cardstock.
The lid was cut from some beautiful white glitter cardstock.
I find it easiest to apply the accents on the coffee cup lid with the
Xyron Sticker Maker. Since the lid was cut from glitter cardstock
I knew the sticker maker would really help to stick my pieces in place.

To decorate the front of the cup like the Target cup I used 
the gorgeous Simon Says Stamp Lea Snowflake Die cut from the same
glitter cardstock as the lid of the cup. I just love the shimmer from that paper!


Once I had the coffee cup all decorated it was time to add some festive
holly to the card.  I used the Kat Scrappiness Holly Leaves and Berry Dies
to add a pop of green to my card and I cut them out using foil cardstock
to match the cup. I just love these holly leaves and berry dies 
because they come in a variety of different sizes.


All that was left to do was to add a sentiment.
I knew it had to be small one because the cup and holly took up so much
room on the front of the card.
I found the perfect small circular die in my stash in the 
Spellbinders Hipster 1 Dies and I cut it out of red foil and heat embossed


I really love how festive this card came out and I hope it brings
some early holiday joy into your day!

Have a wonderful day, I already am!
❄️Lisa ❄️

Saturday, July 27, 2019

Pear Blossom Power Pack Hop


Welcome to my blog if this is your first time stopping by and if you've
been here before than welcome back!
Today I have a really exciting project to share with you!
My friend Amanda from Pear Blossom Press has asked me to join in on her
The Power Pack is an incredible device that allows you to make easy 
light up cards! Trust me when I tell you how easy it is!
I was intimidated at first but I'm so glad I gave it a try because it turned out
to be SOOOOOO much fun! I even made a video to show you my entire
process for making my card. I had never made a light up card until now but I 
know I will be making more thanks to Amanda's awesome Power Packs!

Here are 2 pictures of the card I created for the Blog Hop,
the second shows the card lit up in the dark.
I'll give a quick description with links to products used but 
for the full instructions please see the video below.


Card Recipe:

Step 1 - I used the Kat Scrappiness Stitched Scalloped Rectangle Dies to cut a piece of Bristol Smooth Card Stock.


Step 2 - Next I taped the Brutus Monroe Tangled Waves Stencil to my card stock and used the Picket Fence Life Changing Brushes to blend Twisted CitronPeacock Feathers and Salty Ocean 
Distress Inks over the stencil.


Step 3 - I stamped the Angler Fish and Starfish from The Rabbit Hole Designs  SoFishticated Stamp Set in Gina K Amalgam Ink and colored with Copic markers.


Step 4 - I used my Scan n Cut to cut out the images and painted Inkon 3 Liquid Pixie Dust to them. This will give your images beautiful sparkle and shine. I used the Stitched Flag Dies  to stamp my sentiment on to and colored with Twisted Citron Distress Ink.


Step 5 - Place your stenciled panel over your card base and mark where you want your Power Pack 
battery and LED light to go. Build your circuit with the copper tape included in the Power Pack by connecting positive to positive and negative to negative. Use a double layer of foam tape to build up your card around your circuit.  Make sure not to cover the copper tape with the foam tape.


Step 6 - Press the button and watch your LED lightbulb light up!
Step 7 - Repeat step 6 over and over and over because it's just SO MUCH FUN!!!!


You can see the video on YouTube or you can watch it here:


Make sure you hop along today to see all the inspiration using the Power Packs.
You can enter to win your own set of Power Packs by commenting on the blogs and 
videos as you go.

Prizes 
Three Power Pack Kits will be awarded to winners, chosen at random, from comments left on participating blogs and videos. Comments must be posted by 11:59 pm PDT on August 3, 2019. Void where prohibited by law. For complete contest rules, click here.  Winners will be announced on August 5, 2019 here.

Here is a list of all participating designers:

Lisa Golzbein  (you are here)


Complete Product List with links
(affiliate links used when available at no additional cost to you)


Friday, July 12, 2019

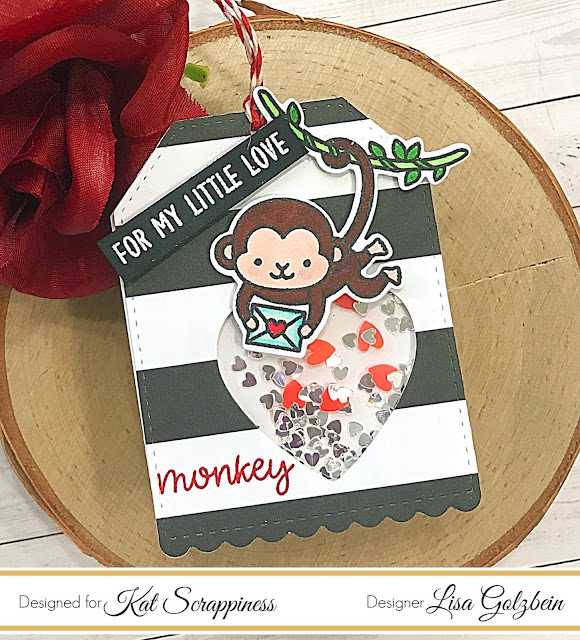
Monkey Shaker Tag


Good morning and welcome back to my blog friends!
I am up on the Kat Scrappiness blog today and I have an adorable 
Monkey Shaker Tag to share with you! 
I am having so much fun using all of the new sprinkles and sequins
in the shop, there are so many to choose from!

I just love making shaker cards and tags! For my project today
to create an adorable tag. I started by cutting 
a tag from the Stitched Scalloped Nesting Tags in black and white
striped paper and a second one in white for the base of the tag.
Next I took one of the smaller heart dies from the Layered Nesting Heart Dies
and die cut a heart shape from the bottom right side of the tag so I could fill
it with my shaker bits. Before I continued with the shaker element I stamped the 
word "monkey" in Versafine Clair Glamorous Ink at the bottom of the tag
next to the heart cut out. The next step was to cover the back of the heart shape 
up with some Lawn Fawn Acetate and then build up the area around the heart with 
some Brutus Monroe foam tape. After I created the well for my shaker bits I filled it 
with the red hearts from the Heart Sprinkles mix and some sparkly
3 mm Mirrored Solid Heart Confetti.  I just love adding some sparkle to any shaker
card or tag! I added the second tag I cut out in white to the back of my shaker to enclose
all of the shaker bits.  The adorable monkey image was stamped in Gina K Amalgam ink
and colored with my Copic markers. After I colored him I die cut him out with the 
I popped him up on some more Brutus Monroe foam tape for some dimension.
For the sentiment I used Brutus Monroe Alabaster embossing powder to 
heat emboss the sentiment from the Sunny Studios Love Monkey stamp set
on to some black card stock and pop it up on an angle at the top of the tag. 
The finished touch was to thread some red and white bakers twine through 
the hole in the top of the tag.

I just love how this cute tag came out and I love shaking it even more!
Here is a another pic with a few of the Kat Scrappiness supplies used on my tag.


I hope you'll give shaker tags a try! They are so much fun to make and even more
fun to shake! You will feel like a chef in the kitchen picking out the perfect mix
of shaker bits to fill your card or tag!

If you wish to purchase any of the products I used on my tag, just click on the
product links to go to the store. Make sure you use my code "LISA10" at 
checkout to save 10% on your entire order.
(Affiliate links are used at no additional cost to you)

As always thank you so much for stopping by and have
a great day, I already am!

πŸ’Lisa πŸ’