Showing posts with label Pumpkin Spice Latte. Show all posts

Tuesday, October 13, 2020

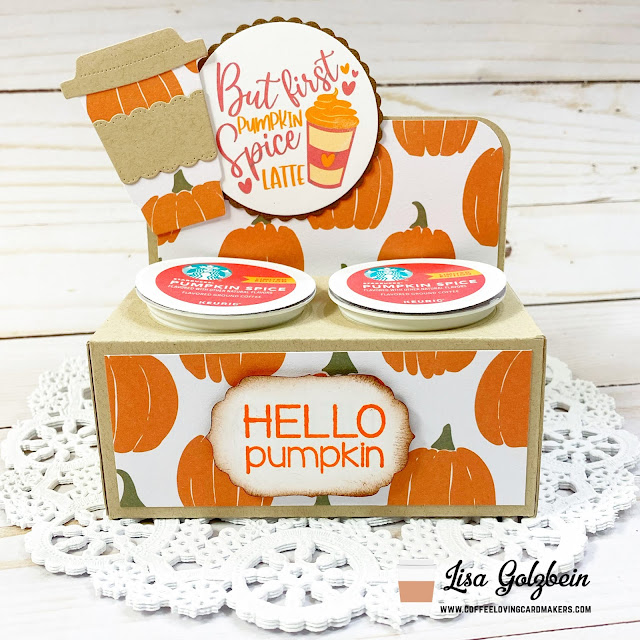
Pumpkin Spice Latte K-Cup Holder


I am up on the Coffee Loving Cardmaker's blog today and I have a special project to share with you!
Although I live in Florida and we won't feel cooler weather here for quite some time, it doesn't change the fact that Fall is here and that means Pumpkin Spice Latte season is here as well!

For today's project I thought it would be fun to create a custom made K-cup holder with a PSL theme!


I followed a very easy YouTube tutorial that you can find by clicking on this link:

Here are the basic scoring measurements and the rest of the assembly is super easy!

The holder itself only uses one piece of 8 1/2 x 11" piece of card stock.
With the 8 1/2" side up, score at 2" and 6 1/2"
With the 11" side up, score at 4", 6 1/4", 8 1/4" and 10 1/2"
Cut 2 pieces of patterned paper in sizes 2" x 4 1/4" and 1 3/4" x 4 1/4"

After assembly you can decorate your holder any way you want.  It's super easy and fun!
I cheated on mine because I didn't have any PSL coffee in the house, I printed the graphic off of the internet for the Starbucks PSL K-cup, cut it out and stuck it on my Vanilla flavored K-cups.


Since the holidays are coming up this holder is a quick, easy and inexpensive treat that can be mass produced! It would be perfect for teachers, mail carriers, nail techs, or anyone who deserves a little treat for all they do! The best part is that it can be decorated for any occasion and it is universally sized to fit all K-cups. 


For my holder I used some patterned paper from my stash and some clipart for the sentiment on top.
The coffee cup die is an old Top Dog Die that I love and the sentiment on the bottom is from an older Reverse Confetti stamp set.


This was a lot of fun to make and I hope that you'll give it a try! I know you'll be amazed at how truly easy it is to make one yourself! If you want a 4 cup holder you can make 2 of these and glue them back to back to each other! The video even shows you how to cut a handle into the top!

Thanks so much for joining me today!
Have a great day, I already am!
☕️ Lisa  🎃 

Wednesday, September 12, 2018

Pumpkin Spice & Everything Nice


It's my turn today on the Kat Scrappiness blog.  Pumpkin Spice season is fast approaching and today's card should put you in the mood!  I wanted to use the Layered Coffee Cup Die to create a Pumpkin Spice Latte card and I thought it would look great against a fall colored background.  To make such a background I decided to watercolor with some Distress Inks.  I took 3 colors, Mustard Seed, Spiced Marmalade and Peeled Paint and I watercolored a background and then splattered it with black paint. 


After it dried I took my Peacock Backdrop Die and cut it out.  
The next step was to cut out a piece of brown paper with the Stitched Scalloped Rectangle Die.  I used the 2 largest sizes in the set and I nested them in each other and ran them through my vagabond.  That left me with a frame that I could put around the watercolor panel to finish it off.

  
Once I had my background done I moved on to creating the coffee cup for the front of the card. I die cut the Layered Coffee Cup Die
 in dark brown, the koozie in craft and the top in white. I used a white gel pen to add stitching around the coffee cup and koozie to give it a finished look. 
I added a pumpkin die cut from my stash to the front of the koozie. I cut it out in orange paper and  dry embossed it using a polka dot embossing folder to give it some texture. 
I thought that this pumpkin could use a little something extra so I popped a dark brown heart to the front for some extra cuteness. 


Now that the coffee cup was finished, I needed a little something to adorn the top of the coffee cup. I wrapped a piece of twine around the top of the cup and hand punched the word "enjoy" out with a mini tag punch.  I didn't have the word enjoy in a stamp in a font I liked so I computer generated it.
Now I needed a sentiment so I printed out a cute one using the same font as the little "enjoy" tag.  I layered the sentiment onto a piece of orange card stock. 
Inking the edges really allowed it to stand out. 

Last but not least I added Orange Jewels all around the sentiment and the 
coffee cup for some added sparkle!

If you use the code "Lisa10" in the shop you can save 10% on your order!

All in all I think that this card came out beautiful!
Hope you enjoy!
Have a great day, I already am!
☕️ Lisa  ☕️

Products Used: