Showing posts with label distress ink. Show all posts

Tuesday, February 5, 2019

Medallion Coverplate Card

Happy Tuesday crafty friends!
I'm up on the Kat Scrappiness blog today and
I've got a new card to share with you!

Today is a special day on the blog because it is day 1 of of the New Releases
and not only is Kat releasing some fabulous new dies
but there is a GIVEAWAY as well!

The newest die in the collection being released today is called the
This intricate die will quickly become a favorite of yours and I've
done some watercoloring with gold accents using this new die.
Here is the card I made and I will walk you through the process I used to make it.


Step 1:  First I took Salty Ocean and Lucky Clover Distress Ink and I "smooshed" them
down onto my Tim Holtz glass media mat and then sprayed them with water.
 Next I cut a piece of watercolor paper down just slightly larger than the
Medallion Coverplate die and laid it into the ink, moving it around to
spread the ink all over the paper.  I dried it with my heat gun and 
then pressed it down again into the ink to cover the paper.


Step 2: Once I was happy with the background pattern I did some ink splattering 
with the Gansai Tambi Starry Colors in gold all over the background with a 
large fan brush. It added a really nice shine to the panel!


Step 3: When the entire panel was dry I took it over to my die cut machine and 
used the Medallion Coverplate die to cut it out. 


Step 4: Because the die is so intricate I used Elmer's spray adhesive to mist 
the back of the panel so I could adhere it to my card front. This technique
works very well on dies with lots of intricate cuts.


Step 5: Now that the panel was done and adhered to the card, the final step
was to stamp the sentiment.  I stamped an older Happy Birthday stamp from 
my stash on to some vellum with Delicata Gold Ink and heat embossed it with 
I cut out the sentiment with the smallest die from the Double Stitched Circles Dies.


Step 6: I added the vellum circle to the middle of the Medallion Coverplate panel 
with some liquid adhesive making sure to only get the glue behind the letters so
it wouldn't show through.


I really love how the watercoloring came out so randomly all over the coverplate and the
gold paint gives it a very elegant look!
I hope you enjoyed seeing the process I took to make this card!

Thank you so much for joining me today and I hope you'll check out
all of the new releases in the shop over the next few days!
Don't forget about the giveaway on the blog as well!

If you use my code Lisa10 you can save 10% on your order anytime!
Have a great day, I already am!
🌟Lisa 🌟


Wednesday, January 30, 2019

Happy Valentine's Day Card With Video

Today I'm up on the Kat Scrappiness blog and  I want to share an easy 
Valentine's Day card with you that has a beautiful ink blended background.
I also have a quick video so you can see how I made this card.
I used 3 of the new products that are in the store, I'll link all of the products below.


This card came together very quickly but the ink blending and beautiful 
Lacy Layered Heart in silver foil card stock give it a very elegant look.
Here are the products I used on this card:


I also made a video to show you how I made this card. 
You can watch it here or on YouTube.


All of the products listed above are available in the Kat Scrappiness store
and you can save 10% on your order if you use code Lisa10.
Have a great day, I already am!
πŸ’˜LisaπŸ’˜


Saturday, June 30, 2018

Crazy Bird


Good morning everyone! 
It's my turn today over on the Kat Scrappiness blog and I've got a fun card to share with you.  This month Kat released a great new die called the Wood Grain Framed Diamond Wire and it really is a unique die that can be used in so many different ways.  Make sure to check out the other projects by the DT members to see how they have used this fun die.  
Today I decided to use the die as an interesting background and a place to showcase my crazy bird and computer generated sentiment. 
I started by stamping my Tim Holtz Crazy Bird on to some watercolor paper with 
Versafine Onyx black ink and coloring him with 2 colors of distress ink.  I rubbed some Squeezed Lemonade and Peacock Feathers on to an acrylic block and I used my water brush to pick up the ink and color my bird.  After I was happy with the results I hand cut him out and put him aside to dry.
  
Next I die cut the Wood Grain Framed Diamond Wire die out of some black cardstock and adhered a piece of black striped patterned paper behind it.  I really love the look of the wire die over the striped paper.  It adds to the "crazy" look on the birds face.  
I glued the wire die with the patterned paper to an A2 sized white card base with some 

For this card I wanted to add a sentiment with a crazy font so I generated a sentiment with my computer and hand cut it out.  I trimmed down the words into 6 different strips and inked the edges of each strip with some Black Soot distress ink.  

The only thing left to do was to pop up my bird and sentiment strips up on some foam tape. 
I love how this card turned out and the Wood Grain Framed Diamond Wire die 
gives it such a unique look.  


Thanks for joining me today, make sure to check out these great products in the shop and don't forget to use code Lisa10 to get 10% off your order at checkout!
All products will be linked below.
Have a great day, I already am!
🐦Lisa 🐦

Products Used:


Thursday, April 5, 2018

Got Coffee?

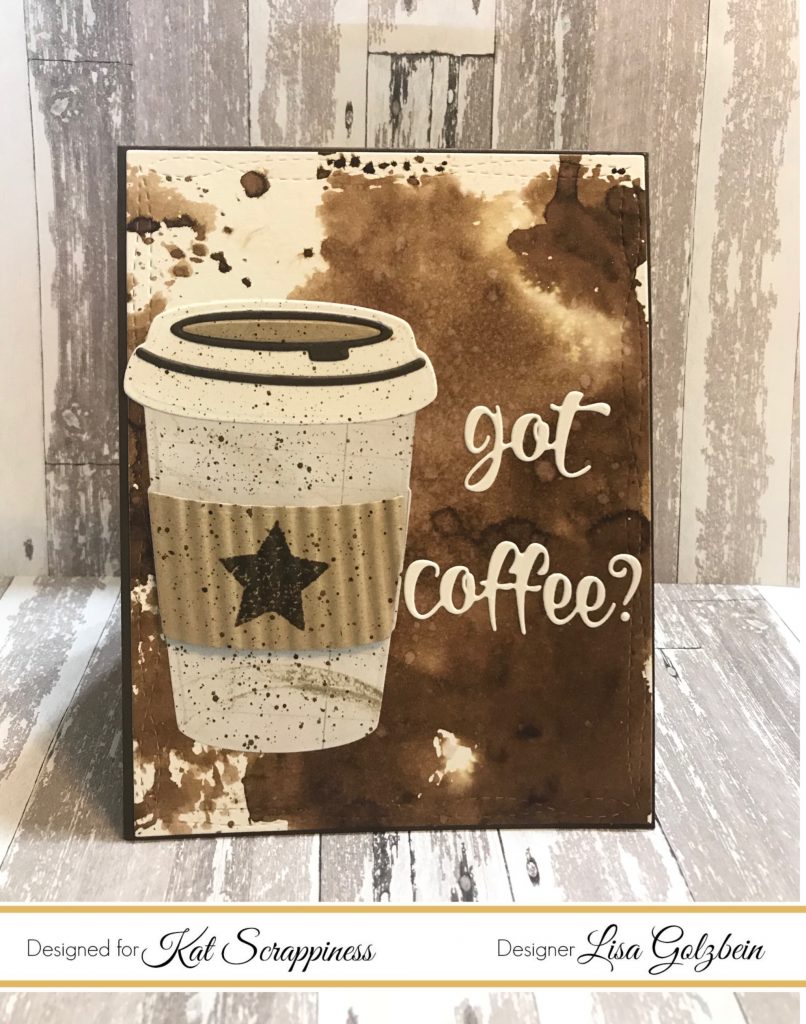
Hi crafty friends, today I'm on the Kat Scrappiness blog to share a cup of coffee with you.  If you've already had your morning cup, pour another and relax.  This month Kat has come out with an awesome new Layered Coffee Cup Die and I'm in love!  I'm a big fan of all coffee themed projects.  I'm not a huge coffee drinker but since I work night shift at the hospital I do find myself reaching for it at 3 and 4 in the morning to stay awake.  If the truth be told I just enjoy a little coffee in my half and half.... heh heh heh.
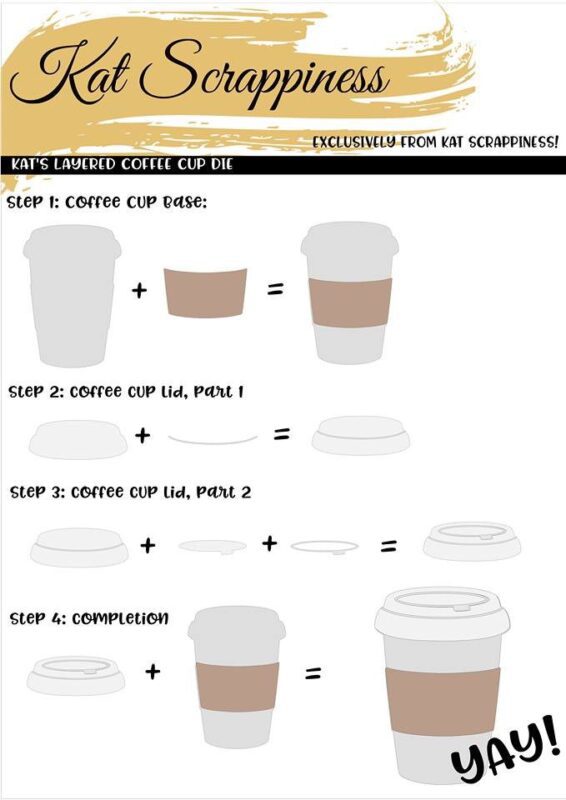
Ok enough coffee talk, on to the card.  I wanted this card to have a "coffee stained" background so of course I reached for my Ground Espresso colored Distress Ink pad and  I "smooshed" (technical crafty term) some ink onto a piece of acetate and then sprayed it with water.  When the ink was moving around I placed the acetate onto a piece of watercolor paper and the results were gorgeous!  I then assembled my coffee cup out of various colors of card stock and patterned paper.
Here is a very handy instruction sheet to show you how to assemble the pieces from the die.
For the coffee cozy section of the die I used kraft cardstock and I stamped a star from the new Kat Scrappiness Swatches stamp set.  After that I ran the cozy through my paper crimper to give it a realistic look with some dimension and I added it to the cup with some foam tape.  When the coffee cup was fully assembled I added some paint splatter with the Ground Espresso color to the whole cup.  I just love the added interest paint splatter gives to any project!
For my sentiment I used the new Kat Scrappiness "Got Coffee?" die and added it to the side of the card.  This sentiment is awesome and uses a fun whimsical font that is perfect for any coffee themed card.
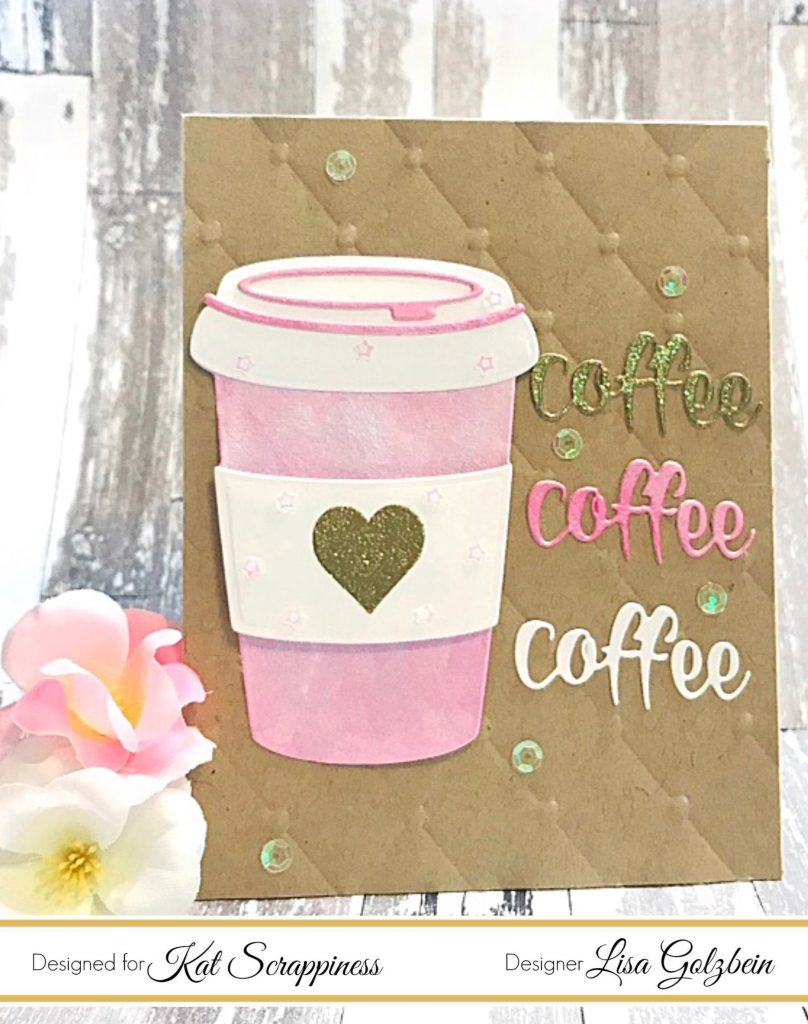
For this next card I used just the word "coffee" and cut it out 3 times in different colors for a fun look.  I painted the coffee cup with a pink pearlescent color from the Kuretake Gansai Pearl colors watercolor set and I added a heart to the cozy from the "Swatches" stamp set and heat embossed it with Ranger Gold powder.  I placed it on a diamond embossed background and added some fun
Kat Scrappiness Barbie sequins for a feminine touch.
Such a different look with the same die!
If you added the sentiment "Wanna" above this die, it would make a cute card for a friend inviting them to get together over coffee reading "Wanna Get Coffee?"
This coffee cup die makes it easy to create an eye catching card in no time!
Make sure to stay tuned this month to the blog to see what my talented fellow design team members have come up with for this die and all of the other new release stamps and dies!  You'll be glad you did!
That's all for today, I am glad you stopped by and I hope you have a great day crafty friends!
I already am!
☕Lisa☕
Supplies used on Coffee cards:
Be sure to use code: Lisa10 to get 10% off of your purchase at checkout!
Layered Coffee Cup Die
Got Coffee Word Die
Swatches Stamp Set
Barbie Sequin Mix
Ground Espresso Distress Ink
Kuretake Gansai Pearl Watercolors
Ranger Gold Embossing Powder