Showing posts with label embossing. Show all posts

Wednesday, May 8, 2019

Depresso Bunny Shaker


Good morning crafty friends! It's 
my day on The Rabbit Hole Designs blog.  I have a
fun card to share with you using the brand new 


Since the Coffee Lovers Blog Hop is still going on until May 10th, I
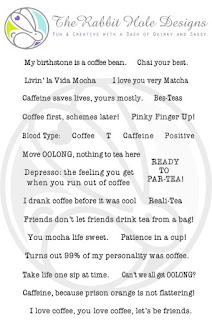
made a coffee themed card with the help of one of the funny sentiments from the 
Perfectly Blended stamp set.  Whether you are making a coffee or tea themed card,
this set has a sentiment for you!

I started by stamping the sentiment stamps and the caffeine molecule 
from the Caffeinated Rabbit stamp set all over some kraft colored
card stock in black ink. I made a shaker card frame out of teal card stock using the
Wonky Wavy Stitched Rectangle dies from Kat Scrappiness and
filled it with Teal Jewels, Light Gold Stars and the Espresso Sequin Mix.
The Rabbit was colored with Copic markers
and I put him inside the shaker so the sequins would lay on top of him.
I love how it looks when the sequins are partially on the image.


For the duration of the Coffee Lovers Blog Hop,
The Rabbit Hole Designs will be offering
FREE SHIPPING
on orders of $25.00 or more before taxes and shipping (US orders only).
No code necessary, exclusions apply.

*FREE WITH QUALIFYING PURCHASE*
While supplies last, all orders placed during the hop spending $35.00
or more before shipping and tax will receive this exclusive 2x3 inch 
stamp set titled Handmade Brew.


Please Note: A limited number of these stamp sets have 
been set aside for those wishing to purchase them.

For more inspiration, updates, and news make sure to check out these links.


I'll be linking up my depressed bunny shaker card over at 
Make sure you come play along!
Have a great day, I already am!
🐰☕️Lisa ☕️🐰


Tuesday, April 16, 2019

Paper Sweeties April 2019 Release Rewind


Welcome to the Release Rewind for Paper Sweeties!
I hope you've enjoyed all of the inspiration these past few days 
from the talented design team!
We've been sharing our projects using the brand new


For my card today I made an ink blended background and I
embossed some fun images in white from the Bee Happy, Happy Icons
Hello and Sent From My Heart stamp sets. 

The top panel of my card features the beautiful Sweet Cuts Die Hello
and the "sunshine" sentiment from the stamp set. 

To finish off my card I added three sweet sequins from 
the Cupcake Sprinkles mix. 

Thanks for stopping by my blog today!
Make sure you visit all of the other New Release Team members blogs to 
see what they have created for their release rewind projects!

Debbie Marcinkiewicz - Paper Sweeties

Have a great day, I already am!
πŸ¦‹Lisa πŸ¦‹


Tuesday, February 5, 2019

Medallion Coverplate Card

Happy Tuesday crafty friends!
I'm up on the Kat Scrappiness blog today and
I've got a new card to share with you!

Today is a special day on the blog because it is day 1 of of the New Releases
and not only is Kat releasing some fabulous new dies
but there is a GIVEAWAY as well!

The newest die in the collection being released today is called the
This intricate die will quickly become a favorite of yours and I've
done some watercoloring with gold accents using this new die.
Here is the card I made and I will walk you through the process I used to make it.


Step 1:  First I took Salty Ocean and Lucky Clover Distress Ink and I "smooshed" them
down onto my Tim Holtz glass media mat and then sprayed them with water.
 Next I cut a piece of watercolor paper down just slightly larger than the
Medallion Coverplate die and laid it into the ink, moving it around to
spread the ink all over the paper.  I dried it with my heat gun and 
then pressed it down again into the ink to cover the paper.


Step 2: Once I was happy with the background pattern I did some ink splattering 
with the Gansai Tambi Starry Colors in gold all over the background with a 
large fan brush. It added a really nice shine to the panel!


Step 3: When the entire panel was dry I took it over to my die cut machine and 
used the Medallion Coverplate die to cut it out. 


Step 4: Because the die is so intricate I used Elmer's spray adhesive to mist 
the back of the panel so I could adhere it to my card front. This technique
works very well on dies with lots of intricate cuts.


Step 5: Now that the panel was done and adhered to the card, the final step
was to stamp the sentiment.  I stamped an older Happy Birthday stamp from 
my stash on to some vellum with Delicata Gold Ink and heat embossed it with 
I cut out the sentiment with the smallest die from the Double Stitched Circles Dies.


Step 6: I added the vellum circle to the middle of the Medallion Coverplate panel 
with some liquid adhesive making sure to only get the glue behind the letters so
it wouldn't show through.


I really love how the watercoloring came out so randomly all over the coverplate and the
gold paint gives it a very elegant look!
I hope you enjoyed seeing the process I took to make this card!

Thank you so much for joining me today and I hope you'll check out
all of the new releases in the shop over the next few days!
Don't forget about the giveaway on the blog as well!

If you use my code Lisa10 you can save 10% on your order anytime!
Have a great day, I already am!
🌟Lisa 🌟


Thursday, October 18, 2018

CAS(E) This Sketch 294 with Groot

I have not played along with CAS(E) this sketch in a while so I stopped in to take a look at this week's sketch and realized how much I missed it. I love the inspiration I get from a sketch, it's like taking the guesswork out of a card when your mojo is on vacation!
My daughter Taylor is a planner girl and she recently found this adorable clipart of 
Groot from Guardians of the Galaxy for her planner and 
I immediately thought how cute he would look on a card.
I knew he would be perfect to sit along side the sentiment of sketch #294!


Since Groot's signature tag line is "I am Groot" I thought it would be funny to 
make my sentiment "I am Cute" and let's face it he is CUTE!!!!
I used an older "Your Next Stamp" alphabet set to stamp the sentiment.
It was the perfect simple font for the card and I used Mowed Lawn 
distress ink since it matched the leaf theme.
My wood grain embossing folder was the perfect touch for the bottom panel of the 
card to go with the theme and give it some texture.
A few leaves growing out of Groot from an old Stampin' Up 
punch and my card was finished!

I really had fun making this card! Thanks for stopping by to take a peak!
Please consider leaving me a note if you stop by and give me your blog
name so I can visit you too!

Now go get crafty, I already did!
🌱Lisa 🌱

Friday, March 9, 2018

Video: Kat Scrappiness Design Team Project: Rainbow Brush Strokes

I'm so happy to be bringing you another fun project from the Kat Scrappiness design team!  Today I have a really fun and colorful card to share!  One of the new stamp sets in the shop this month is the Everyday Brush Strokes stamp set.  I'm a sucker for rainbow colors, I have been since I'm a kid! 
❤️ 🌈 🌈 🌈 ❤️ 
Those bright colors just make me happy!
Here is the card I'll be sharing with you today.


I used 4 different colors of Distress Oxide inks and I stamped a repeating background in a rainbow pattern on the front panel that I die cut from the
Kat Scrappiness Stitched Postage Edge Rectangle Dies.


Once I stamped all the colors all the way down the card I decided to play with a little black paint splatter.  I love to add some fun paint splatter to my cards, it really adds a ton of interest to any project, not to mention it's just plain FUN!!  I'll show you a tip for adding this look to your cards with a fan brush in the video below.
After I was happy with the paint splatter on the background, I stamped the sentiment in Versamark Ink and heat embossed it with white embossing powder.  Then just because I couldn't get enough paint splattering I decided to do it again with white paint on the black sentiment panel! What a stress reliever!  You must try this technique if you haven't already!

After I had just the right amount of white paint splatter on the sentiment, I popped the black panel up on foam tape over my rainbow background.  To finish off the card I added some Sparkling Clear Solid Confetti Sequins randomly over the card and a colorful pink heart die cut from the Concord and 9th Quilted Heart Die set.

That's all the rainbow 🌈 paint splattery 🎨  fun for today!
I hope you'll try some paint splattering for yourself!
You can see the process on YouTube or click on the video below.


Products used on card will be linked below and you can use code: LISA10 at checkout
to get 10 % of your order at KatScrappiness.com.

Have a great day!
I already am!
🌈 Lisa 🌈


Products Used:


Monday, January 22, 2018

Altenew January 2018 Inspiration Challenge

Today I'm joining Altenew for their January Inspiration Challenge.  The inspiration photo has some brightly colored flowers and I was in the mood to try some watercoloring today.  I used the Tulip stamp set and after I stamped the tulip images I watercolored them with watercolor pencils.  Next I stamped the stems on a piece of white cardstock and then embossed the panel with a woodgrain embossing folder.  The next step was to cut out the tulips and pop them up on the embossed panel.  I added some stickles over top of the flowers to give them some sparkle.  The sentiment from the same stamp set was then heat embossed in white on a kraft color banner I cut from the MFT fishtail flag die set.  Lately I've been loving adding twine bows to my cards so I pulled out my lovely PTI twine and made a bow.  Here is my card for today.  I'm quite happy with how it turned out. πŸ’—πŸ’›πŸ’šπŸ’™

 Thanks for visiting my blog today, I hope you are enjoying your day, I certainly am!
πŸ’LisaπŸ’

Thursday, January 18, 2018

SSS Wednesday Challenge

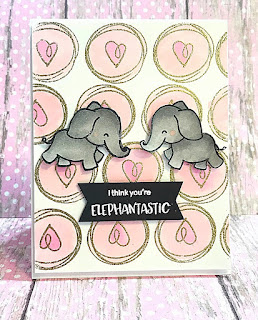
Hello everyone from chilly South Florida.  Although we are not having snow and freezing temperatures here it is VERY cold for us Floridians.  This morning when I left work it was in the high 30's to low 40's.  By the time I got home I couldn't feel my fingers.  When I finally got the feeling back I got out my cute Heffy Doodle elephants and started playing.  The SSS Wednesday challenge is to add a sentiment.  The "Elephant of Surprise" stamp set has such cute sentiments with elephant puns.  I stamped my sentient in versamark ink and heat embossed it with some Hero Arts white embossing powder.  I stamped a mirror image of the elephant so they could be facing each other.  I made the background with a cute heart stamp and I heat embossed it with gold embossing powder and then water colored it with Spun Sugar and Picked Raspberry distress inks.  
I'm very happy with the card and I think it really came together in the end.  
Thanks for stopping by today, stay warm and have a great day!
I already am!
πŸ’•πŸ˜LisaπŸ˜πŸ’•