Showing posts with label Easter. Show all posts

Tuesday, April 14, 2020

Paper Sweeties April 2020 Release Sneak Peeks!!


Hello everyone and welcome to the Paper Sweeties April 2020 Release Sneak Peeks!
Today we are introducing 2 new stamp sets that are part of the April Sweet Kit.

and 

Here's a look at these 2 sets:


Sweet Mini Duo: Just a Note Stamp Set 
Sweet Mini Duo: Have a Happy Day Stamp Set

These sets are part of the Sweet Kits Quarterly Club.
You can read all about member benefits HERE!
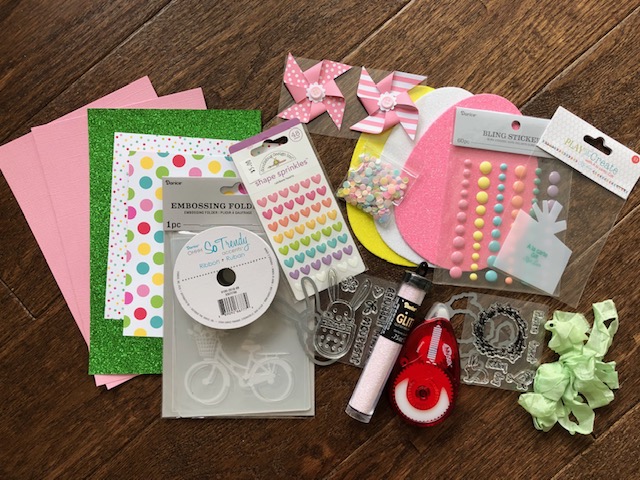
Here's a look at all the fun goodies you'll receive in this month's quarter kit!


I am in love with all the sweetness in this month's kit and I made a card using the adorable bunny  from the Sweet Mini Duo: Just a Note Stamp Set  and the sweetest little die cut flowers!


If you’re not interested in the AWESOME Kits, at this time you can find the sets created exclusively for the quarter kits in the Sweet Minis category on our website … WHILE SUPPLIES LAST.  These sets are created for the kits and will NOT be restocked after they sell out!!
 Please continue to hop along and visit our talented Design Team Contributors’ blogs to be inspired by their AMAZING projects:
Debbie Marcinkiewicz – Paper Sweeties 

 Thanks so much for stopping by and be sure to stop by tomorrow for another project using the sweet products from the 
April Sweet Kit!

Have a sweet day, I already am!
🐰Lisa 🐰 

Tuesday, April 16, 2019

Tag You're It Challenge #85


It's time for another Tag You're It Challenge!
It's challenge #85 and the theme is Happy Easter.
I just love the cute graphic for this week's challenge, 
the bunnies and chick are so cute!

For my tag I started with a Pretty Pink Posh Stitched Duo 1 Die and I did some
soft ink blending on top with Tumbled Glass Distress Ink.
The adorable Easter Bounty stamp set from
The Rabbit Hole Designs had the perfect images for this challenge!
 I just adore that sweet little bunny and her
oversized carrot! The grass, cloud, and cute little butterflies are all from

Thanks so much for stopping by today!
Enjoy your day, I already am!
🐇Lisa 🥕 


**Please note affiliate links have been used in this post.
 This means that I get a small commission at no additional cost to you when 
products are purchased through links that I share on my blog.

Thursday, March 29, 2018

So Egg-Cited for Easter


Hi crafty friends!  I'm up on the Kat Scrappiness blog today to bring you another fun card using an awesome stamp and die set from "Your Next Stamp".  This stamp set is called "So Egg-citing" and there are cute matching dies.  It features the most adorable egg carton to put some little chickies and eggs into.  Since Easter is on Sunday I thought it would be fun to make a cute Easter card featuring that cute carton with some sweet baby chicks inside.
I started out by stamping all the images I wanted to color and place on my card.  I colored them with my Zig Clean Color Brush Markers and blended them out for a watercolor look.

After the coloring was done I used the matching dies to cut out my cute little chickies and eggs.

Next I stamped the egg carton image with Versafine Onyx Black ink and heat embossed it with Hero Arts Clear Embossing Powder so that I could watercolor it with my Pearl Colors by Kuretake Gansai Tambi.  This technique seals the black ink preventing it from smearing when it gets wet. I just love the pearlescent shine of these paints.

Next I worked on the sentiment.  For this card I used one of my favorite techniques for die cutting letters.  I love to make a beautiful watercolor backgrounds and die cut letters out of it.  It gives them a very random and pretty pattern.  The Kat Scrappiness Condensed Lowercase Alphabet Dies were perfect for this technique.  I used my Pearl Colors by Kuretake Gansai Tambi again and I took some watercolor paper and randomly painted 4 different pastel colors.  The result was a very pretty pastel background from which I cut my letters out for a very bold sentiment.
Next I cut out a piece of cardstock with the Kat Scrappiness Rectangle Stitched Dies and ran the panel through my die cut machine with a wood grain embossing folder for some dimension and texture.  I adhered the wood grain panel to a standard card base and glued my letters down.  After gluing my chicks and eggs down inside the egg carton I popped it up over the letters with some foam tape for added dimension.  I added a few more chicks and eggs to the letters for some fun and finished the card off with some Kat Scrappiness Rainbow Splash and Barbie sequins. And of course no card is complete without some sparkle and shimmer so I took my Spectrum Noir Sparkle Marker to add some glittery goodness to my chicks and eggs.

I hope you enjoyed today's card and I hope you'll try cutting some alphabet dies from some handmade watercolor or painted cardstock!  All supplies linked below.  Check out KatScrappiness.com to find the supplies used to make this card and lots of other crafty goodness!  Don't forget to use code Lisa10 to save 10% off of your total purchase at checkout!
Have a great day everyone!
I already am!
🐣Lisa🐰

Supplies used: