Showing posts with label Valentine's Day. Show all posts

Friday, February 12, 2021

Valentine Quokka Gift Bags


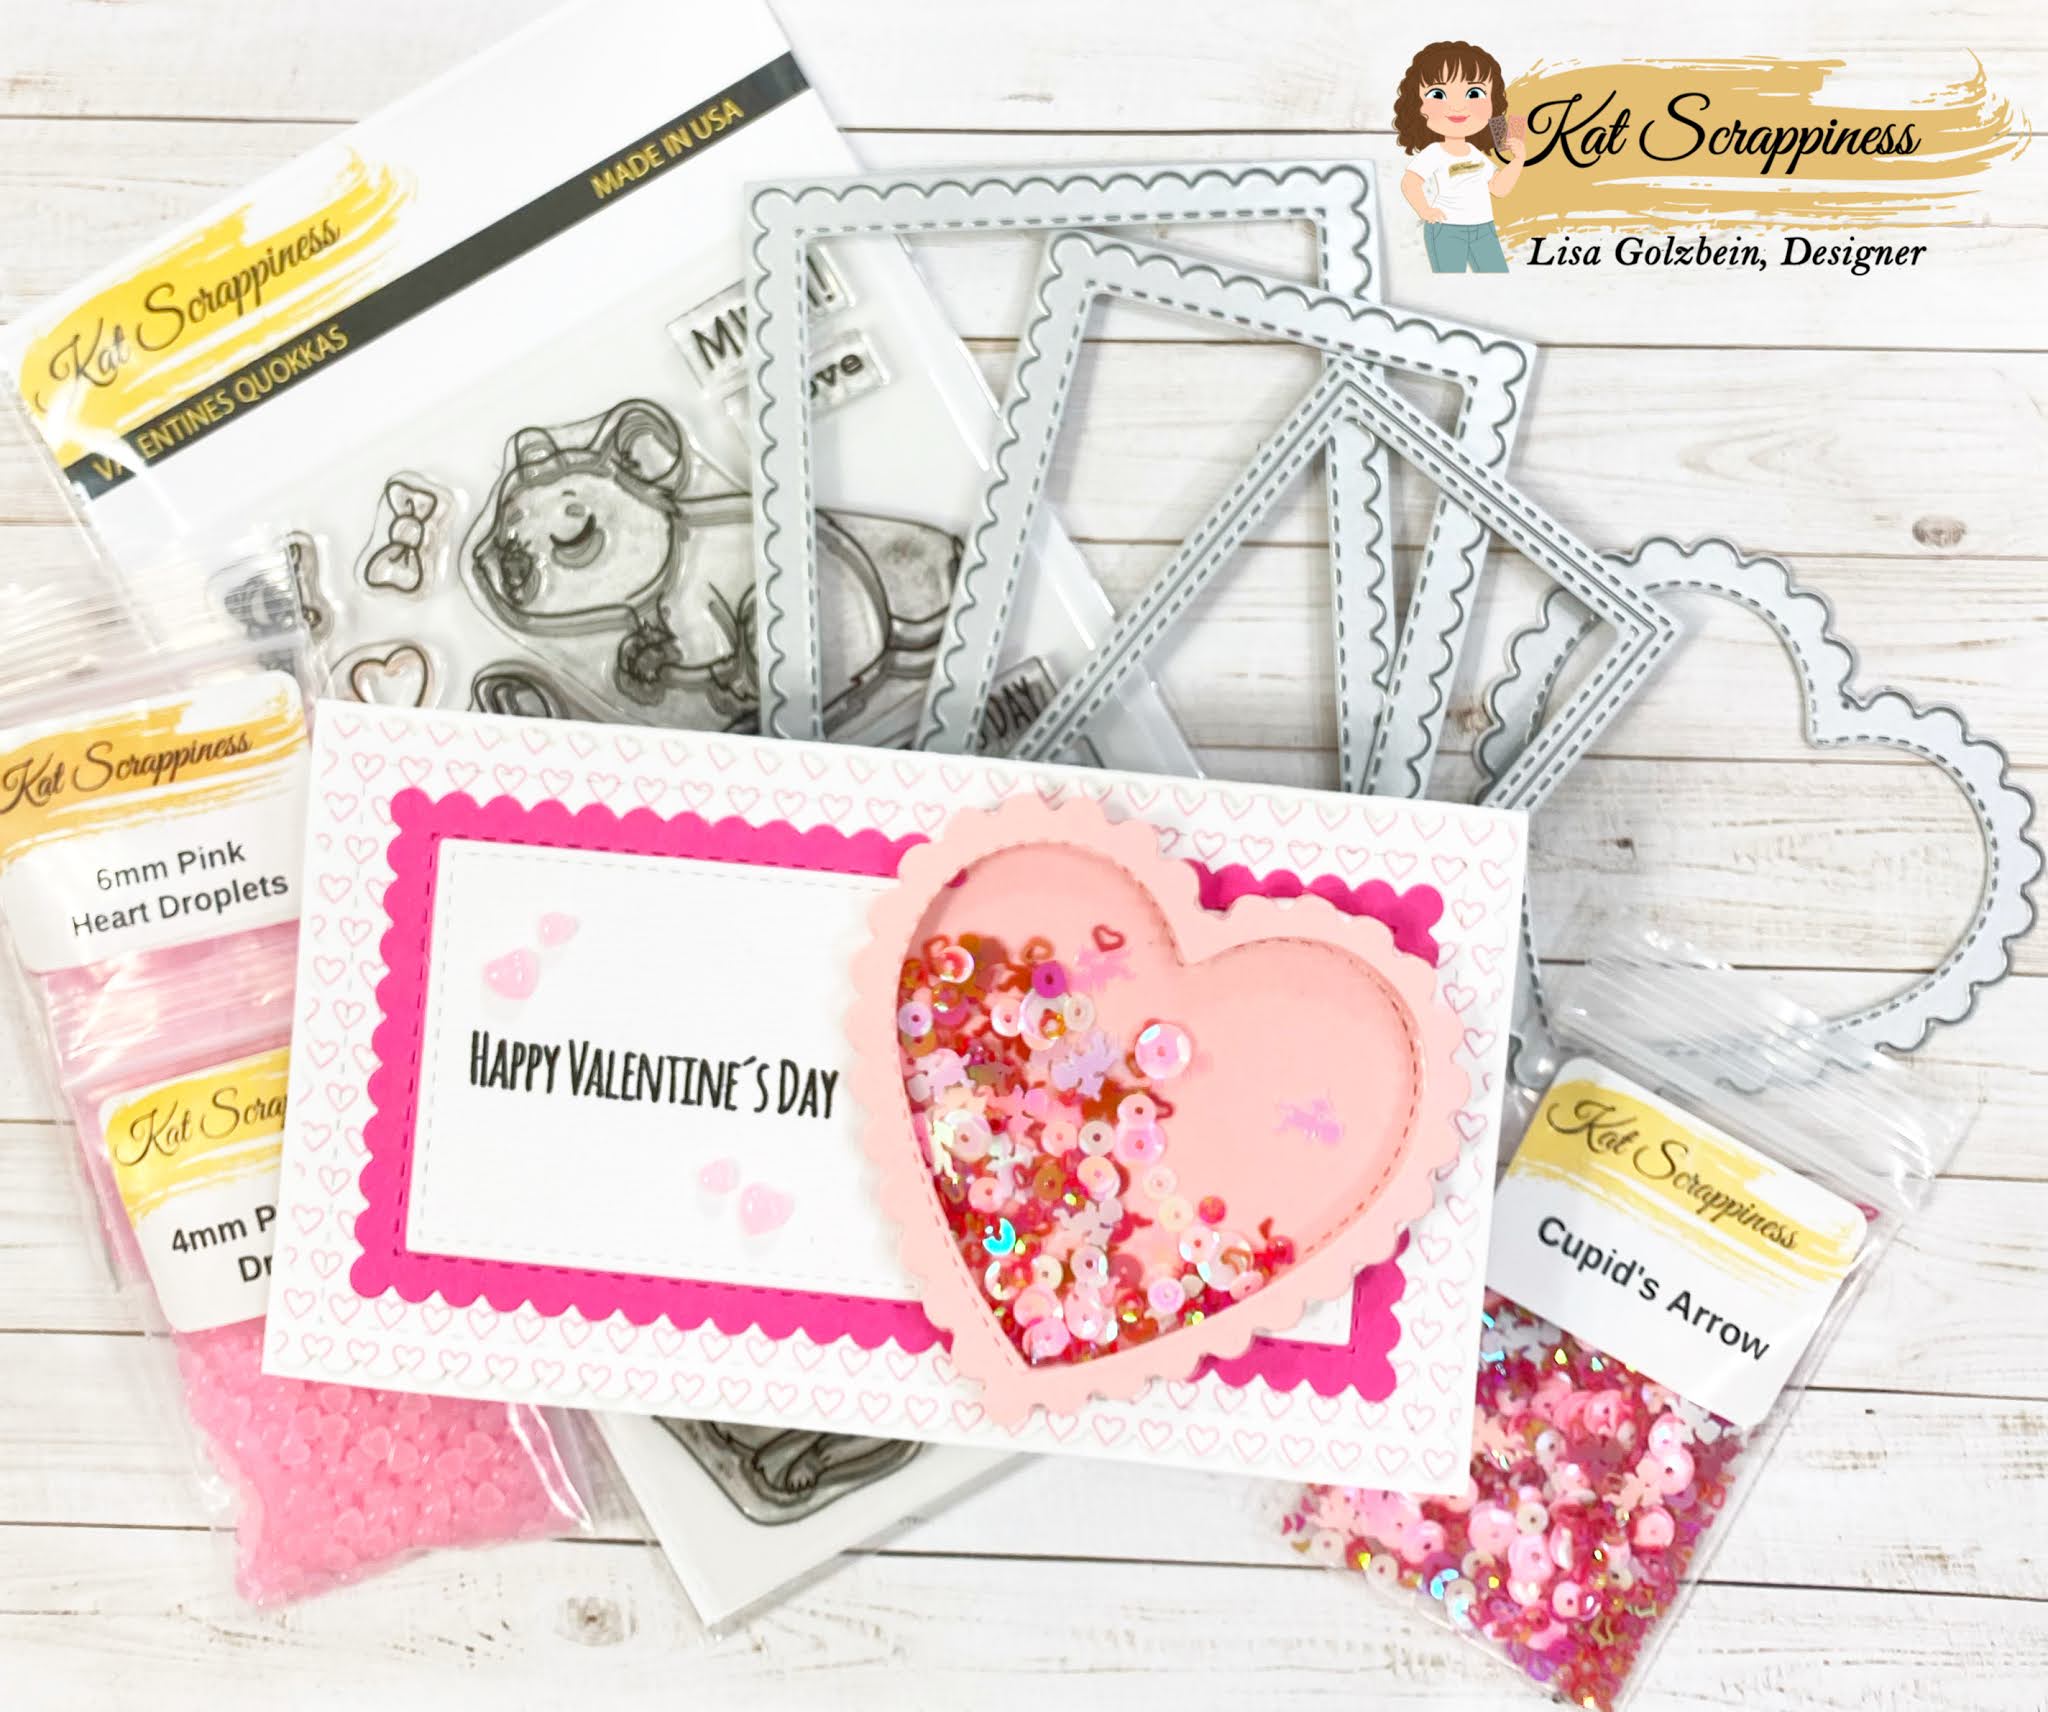
Valentine's Day 2021 is just 2 days away and if you're struggling to find a cute little package to wrap a small gift or some candy in, I've got an idea for you! 
Kat Scrappiness has tons of Valentine's Day inspired products including the brand new 
Valentine Quokka Stamp Set!  I used the Stitched Heart Tag Dies to make these cute little gift bags and I decorated them with those adorable Quokkas!


These cute little bags were super easy to make but I cannot take credit for the original idea.
My fellow Kat Scrappiness teammate Maria made a video a few years back explaining how to put this gift bag together. Here is a link to that video on YouTube in case you'd like to see the process.
Maria makes it super easy to follow the instructions to construct the treat bags.

I created 2 treat bags for today's post using patterned paper from the Heartfelt Wishes Slimline Paper Pad.
This paper pad coordinates with the Valentine Quokka Stamp Set and has the cutest little images of the Quokkas throughout the pad.

I started by cutting out 2 panels from the larger of the 2 dies in the Stitched Heart Tag Dies. You can actually get 2 panels out of one piece of paper from the Heartfelt Wishes Slimline Paper Pad.


The next step was to create the strip of paper that will connect the 2 panels to each other to make the gift bag. The connecting strip measures 2" x 11 7/8" and is scored at several points on the strip.
Score at 4" and 7 7/8" on the 11 7/8" side
and
Score at 1/4" on the 2" side down both sides
Maria's video shows exactly how to do this and shows the markings on the score board.


The long strip is attached to the 2 heart panels with strong double sided tape.


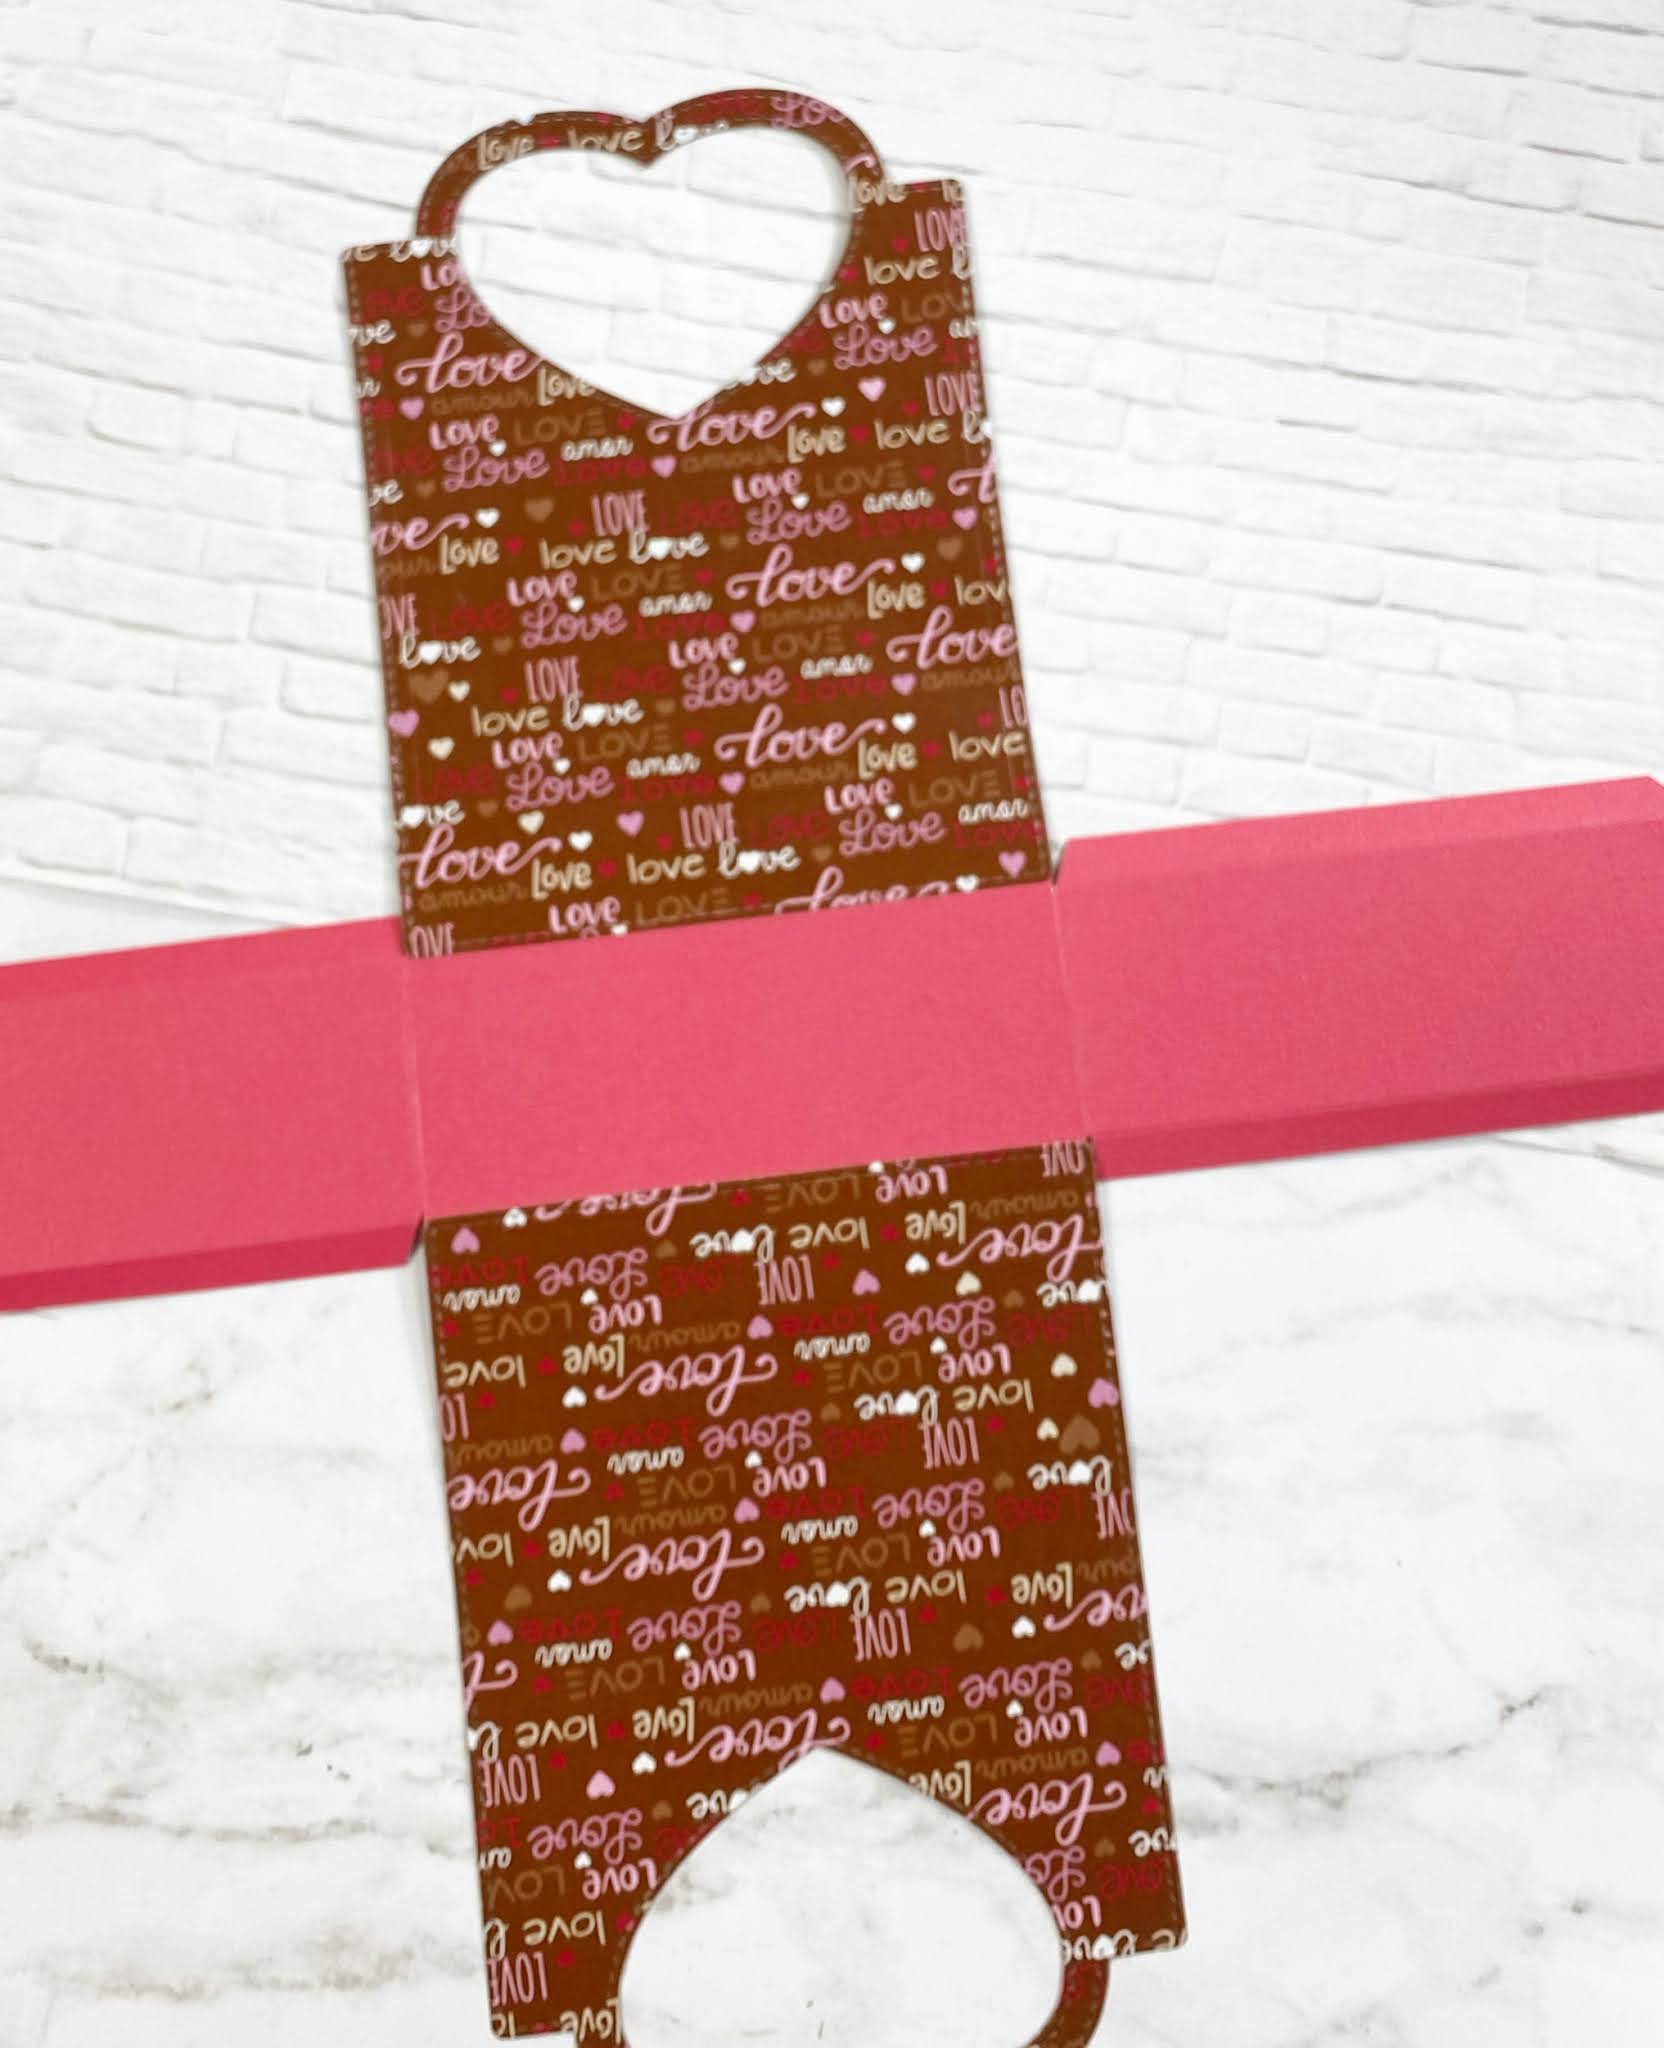
The long panel lines up perfectly with the heart panel and forms a little box to add your gifts and/or treats to. It's the perfect size for a small gift such as jewelry or a fun mask or some home baked cookies.


I decided to custom wrap some granola bars to add to my bags. I picked out some fun polka dot paper and wrapped the granola bars giving them a fun scalloped edge on each end of the bar.


For the decoration on the front of the wrapped bars, I stamped images from the Valentine Quokka Stamp Set on to a Stitched Scalloped Circle Die and a sentiment from the stamp set on to a Stitched Flag Die.
I decorated the front of the bags the same way.


Don't they look sweet all wrapped up with matching paper and stamps! What a darling little treat bag to give out on Valentine's Day!

Here's another look at them all wrapped up and ready to go with the granola bars inside.


Here's a quick look at all of the products used for this project as well as they are linked throughout the blog post.


I hope you enjoyed my little project today and I hope it gave you some fun ideas for creating fun and unique Valentine's Day packaging!

Have a great day, I already am!
❤️ Lisa  ❤️  


Disclaimer: My blog uses affiliate links 
whenever possible at no additional cost 
to you. I only promote products I actually 
use and love and think other crafters might 
enjoy as well!

Friday, February 5, 2021

Mini Slimline Dies with a Heart Shaker


While most crafters love making Christmas cards, I actually love the crafty season that follows next!
Valentine's Day is my favorite crafty holiday! I've always loved hearts and pink and girly things ever since I was a little girl! The recent release at Kat Scrappiness brought with it the most awesome Mini Slimline Dies you've ever seen! There are so many different varieties which means there is something for everyone! My favorite of all of them is the Mini Stitched Scalloped Slimline Dies! Those dainty little scallops just make my heart go pitter patter! My second favorite Mini Slimline Die has to be the Mini Slimline Double Stitched Dies because it is the perfect layering dies for ALL the minis!

I used both of my favorite minis today for my shaker card.


For the shaker element on my card I used 2 different heart dies. The first is the Stitched Scalloped Heart Dies and the second is the Layering Nested Heart Dies. To make the shaker window I took the largest Stitched Scalloped Heart and I cut the middle out of it with the second largest Layered Heart Die. Once I had the scalloped frame I adhered a piece of acetate to that back of it that I cut out using one of the Layered Heart Dies.

The next step was to add foam tape to the back of the frame. A tip to help you mold foam tape around a specific shape easier is to remove the backing tape before you start to adhere it. Once I had the entire frame lined with foam tape it was time to pick out the fun shaker bits to go inside the window.
The back of the shaker heart is the largest Stitched Scalloped Heart  cut out and left whole.

For my Valentine's themed card I chose the adorable Cupid's Arrow Sequin Mix and I stamped my Happy Valentine's Day sentiment from the Valentine Quokka stamp set. I also used the beautiful Pink Heart Droplets around my sentiment in the 4mm and 6mm sizes.


This card was so much fun to make and probably because I used so many of my favorite Kat Scrappiness products! Head on over to the shop and check out all of the new Mini Slimline Dies, the new Quokka stamp set and the hundreds of adorable sequins and sprinkles!

Here is one more look at my card with all of the supplies used.


In addition to all of this Valentine goodness Kat Scrappiness has just released some more awesome new Valentine dies and they are ADORABLE!! They make shaker cards so easy and one of them even has peekaboo flaps! You can check them all out here!


Thanks so much for stopping by my blog today! If you love any of these products as much as I do than it would make me so happy if you clicked on any of my affiliate links throughout the post to purchase them and add them to your crafty collection!

Have a great day, I already am!

πŸ’“ Lisa πŸ’“

Saturday, January 16, 2021

Paper Sweeties | January 2021 Look Back Inspiration Day #3


I'm here with Paper Sweeties 

for the January 2021 Look Back Inspiration Day #3!!

Valentine's Day is right around the corner so I thought I'd make a LOVE themed card and Paper Sweeties has the absolute perfect die just for these types of card! The Sweet Cuts Love Die is written in a beautiful scripty font! I cut it out of several colors of card stock to make a pretty rainbow and I adhered it to a heart embossed background.
Here is a look at my card.


I also used some beautiful sequins to embellish my card in different colors to match the card stock.
I just love how the flower shape sequins add to the elegance of the card!


I love how this card turned out and I hope you do too!
Make sure to hop around to all of the Paper Sweeties designer's blogs and see what they made for the January look back inspiration! Thank you for joining me for the January Look Back Paper Sweeties Inspiration! Next month Paper Sweeties will be releasing a brand new stamp set with matching dies. 
See you for the release on Valentine's Day! ❤️ πŸ’ πŸ’• 


Have a great day, I already am!
πŸ™  Lisa πŸ™    

Friday, January 17, 2020

❤️ Kat Scrappiness Valentine's Release ❤️ Day 1

Image result for valentine's day images"


Hello everyone and welcome to my blog!
Today is the first day of the new Valentine's Day release over at Kat Scrappiness!
This is probably my favorite holiday of the year.  The truth is I love all things pink, girly and heart related and Valentine's Day is one of those holidays that has it all! I especially love to see all the new crafty products made especially for this day! Kat is launching a bunch of new dies and sprinkles over the next few days and I've got lots of card samples to share with you!

Today the DT will be featuring 2 new dies called:


and


I have 2 cards today featuring these new dies as well as some 
previously released Kat Scrappiness dies.


For my first card I used the brand new 

and the previously released


For my second card today I used the brand new

and
Hot Pink Heart Sprinkles
Yellow Heart Sprinkles
Teal Heart Sprinkles
Dark Blue Heart Sprinkles
Purple Heart Sprinkles

and the previously released 


I just loved designing cards with these dies and sprinkles and I know you will too!
Make sure to check back tomorrow and Sunday to see the reveal of all the new 
Valentine's Day dies and sprinkles!


Clearance Craft

Kat Scrappiness also has a great CLEARANCE section on her website!
You can pick up some crafty goodness at clearance prices!
Woohoo win win!


Don't forget to follow Kat Scrappiness on all
social media platforms to be alerted to new releases, sales and giveaways!


Have a great day, I already am!
πŸ’˜Lisa πŸ’˜

Sunday, January 12, 2020

Lacy Layered Love card and an Announcement


Good morning crafty friends!
I have some exciting news to share today! As of today I am once again
joining the Kat Scrappiness design team. I am so happy to be back on the team 
and designing for Kat again! Those of you who shop at Kat Scrappiness often know 
what a variety of crafty products she carries in her online shop, not to mention the
growing number of products being released under the Kat Scrappiness brand.
And all of this at excellent prices!
All of my nested background dies are from Kat and I reach for them 
on almost every card I make!

For my first project back on the team I made a Valentine's Day
inspired card to put you in the mood for the new release!
You're definitely going to want to check back in the shop on 
January 17th, 18th and 19th to see all of the wonderful new Valentine's products
being released!

Here is the recipe for today's card:

1) Cut a panel of white Bristol Smooth Cardstock with the largest die in the 

2) With the My Favorite Things Cloud Stencil, blend some 
Tumbled Glass Distress Oxide Ink on your scalloped panels
in varying heights. Adhere stenciled panel to square card base.

3) Die cut the solid heart from the Lacy Layered Heart Die 
from Bristol Smooth Cardstock and the Lacy cover die from vellum.

4) Do some ink blending in rainbow colors on the solid heart and then 
lay the lacy vellum over the rainbow heart.  It looks so pretty to see the 
pretty rainbow colors peaking through the lace.

5) Lastly adhere the heart shaped die to the cloud blended background 
and die cut the word "love" from the I Love You Shadow Dies 
out of silver foil cardstock. Adhere the "love" die cut over the lacy heart.


Here are the Kat Scrappiness products used on my card:


That's all for today's card, don't forget to follow Kat Scrappiness on all
social media platforms to be alerted to new release, sales and giveaways!


Have a great day, I already am!
πŸ’˜Lisa πŸ’˜

Tuesday, January 15, 2019

Paper Sweeties January 2019 Winter Inspiration Day #2

Welcome back to day 2 of the Winter Inspiration Paper Sweeties Fans!
I hope you enjoyed seeing all of the wonderful projects
that the design team created yesterday!

In keeping with my Valentine's Day theme, I've created a sweet little tag with the adorable
bumble bee from the Bee Happy stamp set.


To begin with I stenciled a honeycomb pattern on to a piece of 
Bristol Smooth card stock with 4 different color distress inks.
Squeezed Lemonade
Mustard Seed
Fossilized Amber
and
Vintage Photo
This gave the tag an ombre look with the darkest color at the bottom.
After that I splattered some black paint around the tag for some added interest.
Once I liked the look of the background I die cut it out with the

The next step was to stamp and color that cute little bumble bee from the
Bee Happy stamp set. I used my Copic markers to do the coloring and
I added white highlights with my Gelly Roll white pen.
I also added a little bit of shimmer to the wings with my 
Spectrum Noir Sparkle brush but it is hard to see that in the picture. 


I selectively stamped the word Bee from the Bee Happy stamp set on 
to black card stock and heat embossed it in white.
The letters to spell out MINE were cut with my Scan n Cut machine
as well as the 3 little sparkly hearts!
I also cut a second tag slightly larger in so I could mat the first tag on
black to make the yellow honeycombs stand out.

To finish off the tag I added a beautiful bow from some
The bow was the perfect finishing touch for my sweet little tag!


I love how this tag turned out and I can't wait to use
it on a Valentine treat!
Paper Sweeties certainly has everything you could need
to create some SWEET projects!

Make sure you visit the rest of the design team today to see
what they have created for you! 
Here are the links to their blogs:

Larissa Heskett
Lisa Bzibziak
                                         Lisa Golzbein ←←←← (you are here)
Mackie Robertson


Please check back tomorrow to see the last
Paper Sweeties project I created for the Winter Inspiration hop!

Enjoy your day, I already am!
🐝Lisa 🐝
❤️


Monday, January 14, 2019

Paper Sweeties January 2019 Winter Inspiration Day #1!

Happy New Year Paper Sweeties Fans!
Welcome back to my blog, this month we are sharing winter inspiration
projects using Paper Sweeties products.
My favorite winter holiday is Valentine's Day probably because of 
all the pink and hearts.  2 of my favorite things to decorate with!
In Florida we don't see some of our coldest weather until February so 
for me it is definitely a winter holiday!

Today I chose to play with the recently released stamp and die set:
I just love the pickup truck image in the set and I thought it would
look darling hauling a load of hearts for Valentine's Day!


I watercolored that sweet truck with my Zig Clean Color Markers
and used the coordinating die to cut it out.
The heart stamp is from the stamp set Happy Icons.
I stamped the heart multiple times and colored them in 
with my Zig markers and then cut them out on my 
Scan N Cut so I could do them all at once.
They look so cute piled up in the bed of that truck!


The sentiment is from the For You stamp set and I stamped it
on to one of the rectangles from the Rectangle Scallop Frames dies. 

I love how this card turned out and I hope I've inspired you
to start making some sweet Valentine's Cards!
Paper Sweeties certainly has everything you could need
to create some SWEET projects!

Make sure you visit the rest of the design team today to see
what they have created for you! 
Here are the links to their blogs:

Larissa Heskett
Lisa Bzibziak
                                         Lisa Golzbein ←←←← (you are here)
Mackie Robertson


Please check back tomorrow and Tuesday to see the rest of the
Paper Sweeties projects I have created!

Enjoy your day, I already am!
πŸ’˜Lisa πŸ’˜


Saturday, January 12, 2019

πŸ’˜Love Is In The AirπŸ’˜

Happy New Year crafty friends!
I want to wish you a happy early Valentine's Day as well
since this post will be centered around the newest
Kat Scrappiness "Love" themed products!

There was recently 4 new products released in the shop and if you
haven't seen them yet, WHAT ARE YOU WAITING FOR?

Kat Scrappiness just released 3 new dies and 1 new stamp set to help
get you in the Valentines mood!


Valentine's Day has always been one of my favorite holidays
mostly because of the color scheme and pretty hearts.
I've always loved the decorations and the way the stores look
at this time of year.  It's a wonderful sea of pink and hearts!
πŸ’˜πŸ’˜πŸ’˜πŸ’˜πŸ’˜πŸ’˜πŸ’˜

I created 3 cards with the new products that I'll share today and I have
some process pictures to share with you for one of them.

Here is the first card I made using the I LoveYou Shadow Dies
and I'll share the process with you.


For this card I made my own background by ink blending
3 different distress inks in the following colors:
and

Even though I only used 3 colors it looks like so much more
because of the blending properties of the distress inks!
This is my favorite color combo right now and I 
am reaching for them a lot!

Once I got the background blended just the way I wanted it
I pulled out a heart stencil from my stash and used it to
cover the background in soft white hearts.
I had an old makeup brush on hand that worked perfectly
to apply the white ink.

After the hearts were stenciled in I hit the panel with my heat gun 
so it wouldn't smear in my Vagabond.
out the panel for the front of my card.


The next step was to pick out colors that I wanted to die cut
I knew I wanted the shadow pieces to be black since
it makes the rainbow colors pop.
I decided on some sparkly pink paper for the actual words.


Once I adhered the words to their black shadows I popped them 
all up on foam tape so they would really stand out on the card.
And of course I needed to add some Sparkling Clear Jewels to the card
for some extra BLING!


I really love how this card turned out and I am planning on making a lot 
more ink blended cards in the near future.

Here are all 3 cards I made for the new release and I can tell there 
will be a lot more LOVELY HEART cards very very soon!
As you can also see I used the ink blending technique on all 3 of 
these cards in different ways.


Thanks for stopping by today and letting me share my cards with you!
I am enjoying the new stamps and dies and I know you will too!
Please use my code Lisa10 to do some crafty shopping and 
you can save 10% on your order.

Have a great day, I already am!
πŸ’˜LisaπŸ’˜


Tuesday, January 16, 2018

Papertrey Ink Create Along With Us January 2018


I love the days where I can spend time crafting.  Lately I've had a lot of them and I am very grateful.  Today I am playing along with Papertrey Ink and their Create Along With Us for January 2018.  I've been following PTI for years and I am always in awe of the cards and projects that their design team comes up with.  These are some crazy talented women and they never cease to amaze me.  I have always loved Melissa's shabby style, Betsy's use of bright colors and Dawn's clean and simple cards.  Today I got some inspiration from Melissa's card from release day 2.  She layered a heart over a fancy frame and I love that look!  

Since Valentine's day is just around the corner I decided to watercolor a Wonky Heart die from Simon Says Stamp. Kristina Werner recently shared a video where she used Arteza markers to watercolor with a piece of acetate so I tried it and loved it.  I used the Uppercase Block Alphabet dies from Papertrey to cut out the word LOVE in gold foil paper.  I used the inlaid die cutting technique to nest the letters back into the heart. A scalloped vellum rectangle with some gold print was the perfect backdrop for the pretty heart.  I finished off the project with some gold thread and a few dainty sequins from The Ton. 

I also bought a new toy recently that I wanted to share.  It's called a Crystal Katana and it works really well at picking up sequins and gluing them down.  It's the best placement tool I've ever used!  You can see a demo on YouTube of it.  They sell it on Amazon and at Kat Scrappiness, check it out! 

I am in love with this card and I can't wait to get my new PTI goodies in the mail that I ordered last night.
Have a wonderful week everyone and get some crafty time in!
πŸ’–LisaπŸ’–