Showing posts with label Rainbow Ink Blending. Show all posts

Friday, June 12, 2020

Hooray Times Two


Hello and welcome! Today on my blog I have two very different cards using the same die.
I love how versatile the Kat Scrappiness Hooray with Shadow Die is! It is large enough to stand alone on a card and be the main focal point. All you need is an interesting background and your card practically makes itself. I made 2 very different cards today with the Hooray card. One has lots of ink blending and stenciling in the background while the other is more of a clean and simple type of card.


For my first card today I used assorted Distress Oxide Inks in 
rainbow colors to get a polka dot ink blended background.


The first step was to take a piece of Bristol Smooth cardstock and do some ink blending with these Distress Ink colors in this order using an ink blending tool and foam applicators:


I applied these colors to my cardstock with a fairly light hand and then I applied the 
Altenew Bubble Wrap stencil to the same panel and went back over the panel with the same colors but using a slightly heavier hand to get the large polka dot stenciled look. I just love how it came out! 
Next I used the largest die from the Wonky Wavy Stitched Rectangle Dies to cut a rectangle out from the ink blended panel.  I then took the Kat Scrappiness Hooray with Shadow Die and cut the shadow layer out in black and the actual word layer out in white.  The layers are so easy to put together because the shadow layer is the perfect matte for the word. I added in an extra sentiment under Hooray to make this a birthday card and then I decorated with my favorite embellishment from Kat Scrappiness,  Sparkling Clear Droplets!

I matted the card on a black panel to really make the rainbow colors pop and my card was done.
Here is a look at the card with all the supplies pictured.


For my next card I went a little more CAS but still using the 


I also did some ink blending with Distress Inks on this card but only for the word Hooray.
Once again I did a little ink blending with these 3 colors in this order using an ink blending tool and foam applicators:


Once I had the blend the way I wanted I cut the word Hooray out of the panel.  I just love how those 3 colors blend together to give a warm tropical look! I cut the word Hooray out 4 more times, twice in white and 2 more times in a coral color.  I used the white words to give a tone on tone look by adhering them directly to the white card base and the 2 coral words I used to build up the ink blended Hooray die cut.  Once I applied the two white Hooray cuts to the top and bottom of the card I did some ink splattering in gold using the Kuretake watercolor paint in gold to add some interest to the background of the card. Once the ink splattering was done I added the ink blended Hooray to the center of the card and finished off the card with some Altenew Gold Sequins
Here is a look at the card with all the supplies pictured.


Although I don't often make CAS cards, I like how this one came out!

Thanks so much for joining me today! Head over to Kat Scrappiness to check out all of the amazing sentiment dies with shadows! 

Don't forget to follow Kat Scrappiness on all
social media platforms to be alerted to new releases, sales and giveaways!


Have a great day, I already am!
🌈 Lisa  πŸŒˆ

Disclaimer: My blog uses affiliate links 
whenever possible at no additional cost to you.
I only promote products I actually use and think 
other crafters would like as well!
.


Sunday, February 16, 2020

Paper Sweeties February 2020 Look Back Inspiration - Day #3


Welcome back to day 3 of the inspiration blog hop for Paper Sweeties!
I hope you had a chance to see all of the sweet projects from the DT yesterday!
Today I have another card for you using the Love you to pieces stamp set.


This set has the most beautiful sentiments in a mixed font style.  They can be very cute or dressed up to look very elegant! I did some simple ink blending over a circle pattern stencil and I let the sentiment take center stage.  I stamped it in watermark resist ink and heat embossed it with white embossing powder.  I have always loved the look of rainbow colors against a black background.
I really love how this card turned out and I hope you do too!

I hope you'll take a look at some of the older Paper Sweeties stamp sets and dies in a new way. Hop along with the rest of the design team so they can share some more inspiration using these sets and some other favorites!


Have a great day everyone, I already am!

🌈Lisa 🌈 

Tuesday, February 11, 2020

Rainbow Cards with Heart Panel Die and Video


I'm up on the Kat Scrappiness blog today with a couple of pretty rainbow cards using these 3 
Kat Scrappiness products:


I started with a piece of Bristol Smooth Cardstock and did some ink blending with these 
6 Distress Oxide Inks:

Candied Apple 
and

I cut the Heart Panel Die out in black and white and laid them on 2 different rainbow ink blended panels cut using the Embossed Edge Rectangle Dies.  I added the "Love" word die from the 
I Love You Shadow Dies on both cards.  One is white backed in black and the other is black backed in white.


I have a process video up on my YouTube channel showing how I made both of these cards.
You can watch it here or on YouTube.


I hope you enjoyed my rainbow cards and they have inspired you to get inky!

Check out my other blog post using the Heart Panel Die to DIY your own stencil! There's a video along with that process as well!
DIY Stencils 

That's all for today, don't forget to follow Kat Scrappiness on all
social media platforms to be alerted to new release, sales and giveaways!


Have a great day, I already am!
πŸ’“Lisa πŸ’“

**Affiliate links are used occasionally
at no additional cost to you. These
are products that I may have been sent
or ones that I purchased on my own.
Either way, they are products that I 
use frequently and LOVE!


Sunday, January 12, 2020

Lacy Layered Love card and an Announcement


Good morning crafty friends!
I have some exciting news to share today! As of today I am once again
joining the Kat Scrappiness design team. I am so happy to be back on the team 
and designing for Kat again! Those of you who shop at Kat Scrappiness often know 
what a variety of crafty products she carries in her online shop, not to mention the
growing number of products being released under the Kat Scrappiness brand.
And all of this at excellent prices!
All of my nested background dies are from Kat and I reach for them 
on almost every card I make!

For my first project back on the team I made a Valentine's Day
inspired card to put you in the mood for the new release!
You're definitely going to want to check back in the shop on 
January 17th, 18th and 19th to see all of the wonderful new Valentine's products
being released!

Here is the recipe for today's card:

1) Cut a panel of white Bristol Smooth Cardstock with the largest die in the 

2) With the My Favorite Things Cloud Stencil, blend some 
Tumbled Glass Distress Oxide Ink on your scalloped panels
in varying heights. Adhere stenciled panel to square card base.

3) Die cut the solid heart from the Lacy Layered Heart Die 
from Bristol Smooth Cardstock and the Lacy cover die from vellum.

4) Do some ink blending in rainbow colors on the solid heart and then 
lay the lacy vellum over the rainbow heart.  It looks so pretty to see the 
pretty rainbow colors peaking through the lace.

5) Lastly adhere the heart shaped die to the cloud blended background 
and die cut the word "love" from the I Love You Shadow Dies 
out of silver foil cardstock. Adhere the "love" die cut over the lacy heart.


Here are the Kat Scrappiness products used on my card:


That's all for today's card, don't forget to follow Kat Scrappiness on all
social media platforms to be alerted to new release, sales and giveaways!


Have a great day, I already am!
πŸ’˜Lisa πŸ’˜

Tuesday, December 3, 2019

Anti Valentine's Day Cards


 Good morning crafty card making peeps!
I hope you all enjoyed your Thanksgiving and ate lots of turkey
and spent some quality time with family and friends!
I spent the holiday with family in Georgia and had
tons of fun shopping and laughing!

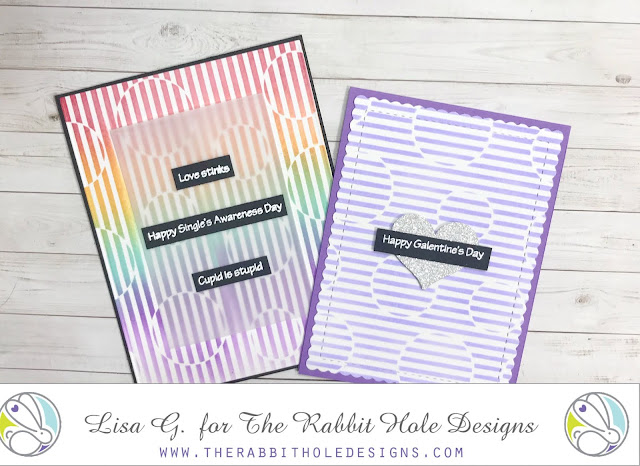
Today I am up on The Rabbit Hole Designs blog with 2 fun cards
using products from the recent December release!
In the crafty world we are ahead of schedule with the holidays
so we are currently in Valentine's Day mode.
I used the new Anti Valentine Sassy Sentiments combined with the
Circle Illusion Stencil and came up with 2 fun and easy cards.

For my first card I blended rainbow colors over the Circle Illusion Stencil
for a fun and colorful background.
I used a smaller rectangle of vellum paper to mute out the center
of the stenciled background and then I added 3 sentiments from
the Anti Valentine Sassy Sentiments. I white heat embossed the sentiments
on to black paper and stacked them on the vellum.
I even decorated the inside of the card with another sentiment
and included the heart image from the same set with the
word "blah" inside of it.


For my second card I used purple ink only over the 
Circle Illusion Stencil for a more monotone look.
I added a heart shape that I cut from silver glitter paper on to the
center of the stenciled background.

Once again I white heat embossed a sentiment on black paper from the
Anti Valentine Sassy Sentiments.
and mounted the sentiment it across the silver heart.
Lastly I  decorated the inside of the card similar to the first card.


I love the new stencils, they really make quick work 
of a fun and interesting background with minimal effort.
The Anti Valentine Sassy Sentiments stamp set really 
cracks me up and at the same time can be used for a legit 
Valentine's day card if you use the cupid and heart images 
and any number of other "true love" sentiments.

Thanks so much for stopping by today and don't forget you can 
purchase The Rabbit Hole Designs products at Simon Says Stamp.

Have a great day, I already am!
πŸ’˜Lisa πŸ’˜