Tuesday, March 8, 2022

Peace Love Coffee


Good morning Coffee Lovers! I'm up on the Coffee Loving Carmaker's blog today and I have an easy peasy caffeinated creation to share with you!

As card makers do you ever get stuck on a technique and find yourself doing it on every card or every other card? It's like a rut that you just can't get out of because you love it so much? Well my technique is ink blending rainbow colored backgrounds and then stenciling over them with a bold pattern. Today's card is exactly that and I love how it turned out.


For my background I blended 4 colors of Distress Oxide Inks in:
Kitsch Flamingo, Squeezed Lemonade, Cracked Pistachio and Broken China.
Once that panel was all blended I took the coffee stencil from Sugar Pea Designs and used brown ink to stencil on the coffee beans and cute hearts.

For my main panel I wanted to keep it small and simple. I cut out a piece of white card stock using the A2 Diagonal Stitched Layered Card Topper from LDRS Creative and stamped my 3 images and sentiment.

The peace sign and heart are from an older Lil’ Inker stamp set and the coffee cup is from the La La Land Take it Sloth stamp set. Since I needed small letters I searched my stash for the perfect alphabet and came up with an older Stampin Up set called Rough Type. I just love the vintage typewriter feel of this set.

I'm loving this technique for quick and easy backgrounds that just make me smile! I don't think I'll be giving it up anytime soon!

Thanks so much for joining me today on the blog! I hope you have an amazing Tuesday and don't forget to get yourself some PEACE, LOVE and COFFEE!

Have a great day, I already am!

Lisa

Inlaid Die-Cutting


Hello friends! I am on the LDRS Creative blog today and I have a real treat for you! 

I have 4 cards to share with you and I used a new to me technique called "inlaid die-cutting". This may not be a new technique for some of you but this was my first time and it was so much fun!

It all started with the Pretty Things Coverplate Die III. This die in particular lends itself perfectly to this technique. I chose to use the whole die for one card and part of the die for another card, I'll explain below.

Let's start with these 2 cards because I used all of
the die cut pieces for one of them.
The process is the same for all the cards but less work for the second pair.
I will walk you through the process for this technique as simply as possible:

Step 1 - Apply ink blending to card stock in whatever colors you choose to make your background.
(OPTIONAL) Stamp Joyful Blooms Stamp in clear embossing ink and sprinkle clear glitter embossing powder over panel for subtle detail on background.
*click on picture to enlarge and see detail*

Step 2 - Die cut inked and stamped panel with the
Pretty Things Coverplate Die III and make sure to leave on cutting plate for next step!

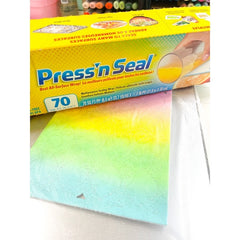
Step 3 - Cover pretty side with sticky side down using Press'n Seal film.
*trust me on this one*😉

Step 4 - Flip panel over using Press'n Seal to hold panel together and add foam tape or dots to back side of large die cut shapes. 
Step 4b - Remove backing paper from foam and adhere white card stock panel to foam to cover entire panel in same size.

For my birthday card I added foam dots to ALL the tiny shapes but in the above picture you can see the foam dots on just the large pieces.
(Just as pretty with less work!)

Step 5 - After you've adhered your white panel to the foam dots flip panel over to make some MAGIC! Now you get to peel off the frame surrounding the shapes that stuck to the backing paper. 
*Bonus, you get to use this frame for a second card!*


For my second set of cards I used the same technique but I shaded the back panel of the pop up card to add some color to the background. 

The sentiments on all the cards are from the 
For the background detail on the "So Glad You're My Mom" card I used the Brocade Stencil for the added detail instead of the  Joyful Blooms Stamp on the birthday card.

Here is one more look at all 4 cards separately:


Thank you so much for joining me today for some fabulous LDRS Creative inspiration! I hope you enjoyed my tutorial on inlaid die-cutting and that you'll give this technique a try! 

Have a great day, I already am!
Lisa