Showing posts with label LDRS Creative. Show all posts

Tuesday, March 8, 2022

Peace Love Coffee


Good morning Coffee Lovers! I'm up on the Coffee Loving Carmaker's blog today and I have an easy peasy caffeinated creation to share with you!

As card makers do you ever get stuck on a technique and find yourself doing it on every card or every other card? It's like a rut that you just can't get out of because you love it so much? Well my technique is ink blending rainbow colored backgrounds and then stenciling over them with a bold pattern. Today's card is exactly that and I love how it turned out.


For my background I blended 4 colors of Distress Oxide Inks in:
Kitsch Flamingo, Squeezed Lemonade, Cracked Pistachio and Broken China.
Once that panel was all blended I took the coffee stencil from Sugar Pea Designs and used brown ink to stencil on the coffee beans and cute hearts.

For my main panel I wanted to keep it small and simple. I cut out a piece of white card stock using the A2 Diagonal Stitched Layered Card Topper from LDRS Creative and stamped my 3 images and sentiment.

The peace sign and heart are from an older Lil’ Inker stamp set and the coffee cup is from the La La Land Take it Sloth stamp set. Since I needed small letters I searched my stash for the perfect alphabet and came up with an older Stampin Up set called Rough Type. I just love the vintage typewriter feel of this set.

I'm loving this technique for quick and easy backgrounds that just make me smile! I don't think I'll be giving it up anytime soon!

Thanks so much for joining me today on the blog! I hope you have an amazing Tuesday and don't forget to get yourself some PEACE, LOVE and COFFEE!

Have a great day, I already am!

Lisa

Inlaid Die-Cutting


Hello friends! I am on the LDRS Creative blog today and I have a real treat for you! 

I have 4 cards to share with you and I used a new to me technique called "inlaid die-cutting". This may not be a new technique for some of you but this was my first time and it was so much fun!

It all started with the Pretty Things Coverplate Die III. This die in particular lends itself perfectly to this technique. I chose to use the whole die for one card and part of the die for another card, I'll explain below.

Let's start with these 2 cards because I used all of
the die cut pieces for one of them.
The process is the same for all the cards but less work for the second pair.
I will walk you through the process for this technique as simply as possible:

Step 1 - Apply ink blending to card stock in whatever colors you choose to make your background.
(OPTIONAL) Stamp Joyful Blooms Stamp in clear embossing ink and sprinkle clear glitter embossing powder over panel for subtle detail on background.
*click on picture to enlarge and see detail*

Step 2 - Die cut inked and stamped panel with the
Pretty Things Coverplate Die III and make sure to leave on cutting plate for next step!

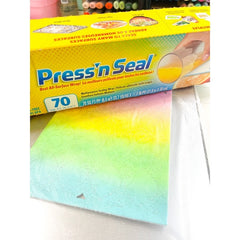
Step 3 - Cover pretty side with sticky side down using Press'n Seal film.
*trust me on this one*😉

Step 4 - Flip panel over using Press'n Seal to hold panel together and add foam tape or dots to back side of large die cut shapes. 
Step 4b - Remove backing paper from foam and adhere white card stock panel to foam to cover entire panel in same size.

For my birthday card I added foam dots to ALL the tiny shapes but in the above picture you can see the foam dots on just the large pieces.
(Just as pretty with less work!)

Step 5 - After you've adhered your white panel to the foam dots flip panel over to make some MAGIC! Now you get to peel off the frame surrounding the shapes that stuck to the backing paper. 
*Bonus, you get to use this frame for a second card!*


For my second set of cards I used the same technique but I shaded the back panel of the pop up card to add some color to the background. 

The sentiments on all the cards are from the 
For the background detail on the "So Glad You're My Mom" card I used the Brocade Stencil for the added detail instead of the  Joyful Blooms Stamp on the birthday card.

Here is one more look at all 4 cards separately:


Thank you so much for joining me today for some fabulous LDRS Creative inspiration! I hope you enjoyed my tutorial on inlaid die-cutting and that you'll give this technique a try! 

Have a great day, I already am!
Lisa

Tuesday, February 8, 2022

You Are So Beautiful To Me

 Good morning crafty friends!  I'm so excited about the new January release from LDRS Creative and I've been busy creating some beautiful cards to share with you! The possibilities are endless with the new Strip Dies and in my opinion they are excellent for getting your creative juices flowing!

My card today features the:

1/2" A2 Background Strips Die
Joyful Blooms Stamp Set
A2 Diagonal Stitched Layered Card Toppers


This card was so much fun to make. These new strip dies really lend themselves to endless possibilities! I decided to go with a monochromatic look for this card. I chose 6 different colors of teal card stock and cut each color out using the brand new 1/2" A2 Background Strips Die. I glued them to a piece of white card stock and then I stamped the gorgeous flower cluster over top using the Joyful Blooms Stamp Set.

Next I used the second largest die from the A2 Diagonal Stitched Layered Card Toppers to cut out my main panel. Once the panel was cut out I added the pretty sentiment from the Joyful Blooms Stamp Set to the bottom left corner.

I attached my panel to a white A2 card base with some foam tape for dimension and added some clear droplets for some extra shine.

Here is one more picture with all the products used on today's card.

I hope you enjoyed today's card. I encourage you to check out all of the new stamps, dies and stencils from the new January release! You won't be disappointed!

Have a great day, I already am!

Lisa

Tuesday, January 11, 2022

You're The Best

 Hi there! I'm up on the LDRS Creative blog today with a floral beauty! I've been obsessed with rainbow colors ever since I'm a kid and I love the look of a stark black stamp over top of a rainbow blended background!  I mixed and matched some of my favorite LDRS Creative products from my stash and made this pretty floral card!


I started out with a white piece of heavy card stock and used the second largest die from the A2 Diagonal Stitched Layered Card Toppers to cut it out. I blended my favorite rainbow colors onto it smoothing out the transitions. The next step was to stamp the Garden Grandeur Slimline Stamp Set on top of that gorgeous rainbow.


Once I stamped the pretty flowers I cut out a center panel with the second largest die from the Diagonal Stitched Layered Frames so I could pop that panel up on foam tape as a focal point. I backed both floral panels on to black card stock so they would really pop!


After I placed the smaller floral panel on to foam tape I added a sentiment from the Essentials Stack Stamp cut out with the Sentiment Stack Die. I heat embossed the sentiment with clear embossing powder to give it a nice shine.


I just love how bright and colorful this card turned out and it really came together quickly! The Garden Grandeur Slimline Stamp Set is so intricate and stands out so beautifully against the rainbow background!

Thanks so much for stopping by today! I hope you have an amazing day!

I already am!

Lisa


Friday, December 10, 2021

Just a Note


Hello to all of my lovely crafty friends! I am up on the LDRS blog today and I have a vision of loveliness to show you. It's no secret to anyone who knows me that my favorite color is pink so it's a very common theme in my card making and in my life in general. Today's card is no different. 

To make this card I started out by painting some lovely pink ink in various shades on to some watercolor paper. I did the same thing with green inks and then yellow. The next step was to use the Perfect Petals Layering Dies to cut out the petals, leaves and center of the flower from the watercolor paper. I just love the all the different shades of color you get with watercolors. For the top layer of the center of the flower I used gold glitter paper for some extra added sparkle.

For the base of my card I cut out a panel of white card stock using the largest die from the A2 Diagonal Stitched Layered Card Toppers. The detailed edging is so pretty from these dies.  Next, I decided to stretch my supplies and use the 
Modern Geometric Coverplate I as a stencil.  I used a very heavy weight card stock to cut out the Coverplate and then I placed it over the stitched layer panel and stenciled over it in a very light grey ink. I was able to achieve a soft look of texture without adding bulk to my card.

All that was left was to add a sentiment to my card and for that I used the Essentials Stack Stamps and Sentiment Stack Die. These stamps and dies make it so easy to cut out multiple sentiments to have on hand for all types of cards. Talk about making life easy!
Here is one more look at this floral beauty!


Thank you so much for visiting the blog today and letting me share my card and process with you!
Have a great day,
I already am!
🌺 Lisa 🌺

Wednesday, November 10, 2021

What's Poppin'?

Hello crafty friends! I am up on the  LDRS Creative blog today and I have a fun and colorful card to share with you featuring stamps and dies from the new Pastry Pals - Exclusive Craft Kit!
Are there any Pop Tart fans out there? I know I loved them growing up and so did my kids!
This card features 2 happy Pop Tarts and a fun polka dot background, details below!


Below is a description of the new Pastry Pals - Exclusive Craft Kit that I used to create this card!

This Pastry Pals Exclusive Craft Kit is available for a limited time only.  You'll have the most fun with the adorable Pastry Pals stamps and coordinating dies. 

Color these 'Pastry' friends in your favorite color combos and create the most adorable scenes.

Have fun creating easy and amazing backgrounds with the Circles Layering Stencils.....use 1 - 2 or 3 stencils, in any combination for a variety of effects on your projects. 

Add the WOW factor with fun edges using the Offset Slimline Stack-ables Dies.  Use them individually or layered in any combination. 

The possibilities are endless with this timeless kit!  

Craft Kit includes:

  • Pastry Pals 4" X 6" Stamp Set
  • Pastry Pals Coordinating Die Set
  • Circles Layering Stencils - 3 stencils
  • Offset Slimline Stack-ables Die Set - 4 dies

I had so much fun creating this card and here's the recipe:

I started out by die cutting a piece of white card stock using the largest die from the Diagonal Stitched Layered Frames Die Set I really love the detailed edge these dies create!

Next I took the Layering Circle Stencils from the Pastry Pals - Exclusive Craft Kit and stenciled some circles in Soft Kisses and Bali Blue ink using the incredibly soft LDRS Blender Brushes.

For the top layer of the card I used the second largest die from the 
Diagonal Stitched Layered Frames Die Set and I cut out a piece of vellum to stamp my Pop Tarts on. The vellum is see through so it allows you to see the pretty background without covering it up.

The last step was to stamp my Pop Tarts and sentiment and color them in to match the circles in the background. I used foam tape to pop up the vellum panel being careful to hide the tape behind the die cuts.


Here is a closeup of those adorable little pastries:


Thanks so much for joining me today! I hope you'll check out the new 
Pastry Pals - Exclusive Craft Kit! I guarantee you'll have hours of fun creating fun and colorful cards with this versatile kit!

Have a great day, I already am!
🍩 Lisa 🍩

Sunday, October 10, 2021

Pretty Poinsettia


Have you been hard at work creating your holiday cards since June or are you just starting now? Either way, LDRS Creative has some fabulous stamps and dies to not only put you in the holiday mood but also help you make beautiful cards for your friends and family!

Today I have a slimline card to share with you that I made using 3 products from the recent holiday release.


I just love the Potted Poinsettia Stamp Set and I decided to stamp it on to some watercolor paper and paint it in some pretty reds and greens. To give the flowers some added sparkle I added glitter to the centers.
The Potted Poinsettia Coordinating Dies cut out my image perfectly and I set it aside to dry and work on the rest of the card.

For the base of my card I used the smallest die in the Elegant Stitched Frames Slimline Dies and cut out a white panel. I lightly stenciled some polka dots all over it to give it a bit of interest. I layered the polka dot panel on to a larger panel cut with patterned paper and the base of the card was cut with kraft card stock using the largest die to form the side opening card.

After assembling all the layers on top of each other, I stamped a sentiment from the Potted Poinsettia Stamp Set at the bottom of the card and then popped my flowers up on some foam tape.
For the finishing touch I added some sparkly red jewels around the card.

Such a festive holiday card! 


Thanks so much for joining me today, I hope you enjoyed my card and will check out all of the 
LDRS Creative holiday collection and get started on your own holiday cards!

Have a great day, I already am!
❤️ Lisa  ❤️ 

Friday, September 10, 2021

Pretty Poinsettia


The holidays are slowly approaching once again and many of you might be starting to make your cards early this year! LDRS Creative has you covered with some fabulous stamps and dies that are perfect for holiday cards! 

I am up on the LDRS Creative blog today with this gorgeous poinsettia card!
This card features the fabulous Layered Poinsettia Dies and the beautiful 

I started by cutting out a panel of white cardstock with the largest die from the A2 Stitched Layered Card Toppers Die Set and then embossed it with a sweater pattern embossing folder. 

Next I did some watercoloring with various shades of red and green so I could cut out my poinsettia flowers and leaves with some varied shades of color. I used gold glitter paper to cut out the center of the flowers to add a little bit of sparkle. I used the same gold glitter paper to cut out the letters so they would match the flowers.

I finished off my card with some pretty little gold pearls to tie the card together.


I really love how elegant this card looks and the Layered Poinsettia Dies make it so easy to create professional looking cards! Make sure you check out the entire release of holiday inspired stamps and dies available now at LDRS Creative!

Thanks for stopping by and have a great day!
I already am!
❤️  Lisa  ❤️

Tuesday, August 24, 2021

Hug in a Mug With Recycling


Hello Coffee Lovers!

I'm back again today in my *ICU (Intensive Coffee Unit) with another caffeinated creation 

for the Coffee Loving Cardmaker's blog.


For today's card I used a new stamp set and coordinating die from LDRS Creative.  

The stamp set is called Cozy Cuppa stamp set and I cut out the cup and whipped cream with the 
Cozy Cuppa coordinating dies.

I began by stamping the cup outline with Versamark ink onto vellum paper and heat embossing with white powder. I stamped the sentiment onto the cup with brown ink and the cute little heart with pink ink. I heat embossed the sentiment and heart with clear embossing powder so they would shine. The next step was to cut the cup out one more time from teal paper to back the vellum. It muted the color of the teal and gave the vellum some stability and allowed me to apply foam tape to the back without being able to see it.

Next I worked on the whipped cream on top of the cup. I stamped the whipped cream image onto white paper with kraft colored ink and applied a generous amount of snow paint. I heated it up with my heat gun so it would puff up to give the appearance of whipped cream. I applied several layers and heated after each one. I think I need a new snow pen because mine keeps coming out with lots of bubbles but it did the trick in a pinch.


For the background under the cup I did some recycling. You might recognize the patterned paper under the cup if you've ever placed an order with Honey Bee Stamps. Their stamps and dies come wrapped in this super cute kraft paper and I've always wanted to include it in one of my projects. I just love the look of white on kraft. I used a scalloped rectangle die from Neat and Tangled to cut it out. I just love how it looks under the mug!

Here's one more look at my card with the supplies used.


Thanks so much for stopping by today! I hope you were inspired by my card and to do some recycling with leftover packaging you might have in your craft room.

Have a great day, I already am!

☕️  Lisa  ☕️