Friday, May 31, 2019

Happy Little Stampers June Watercolor Challenge


Hello crafty friends and welcome back to another Watercolour challenge
over at the Happy Little Stampers blog!
This month the theme is anything goes with an optional "Love" twist.
Here is my card for this month


Come join us for the Happy Little Stampers Watercolor Challenge this month!
We want to see your watercolor projects.

Thanks for stopping by! I hope you get some free crafty time today!
Have a great day, I already am!
🌹Lisa 🌹


Exciting Caffeinated News!!!!

Today is the day that I can finally share some exciting news 
I've been keeping to myself. 
Here is a new logo I've just acquired and I think it sums it up nicely!


I am thrilled and honored to be joining the Coffee Loving Cardmakers
Design Team! When Amy asked me to join the team I was so incredibly happy! 
I've been admiring the design team and all of their
caffeinated inspiration for quite some time now!
I've been enjoying taking part in the Coffee Lovers Blog Hops and 
was fortunate to win a gift certificate to The Letter Lingo, one of
the super sponsors, for the most recent hop!
I bought the Tea-rrific Stamp Set with my gift certificate and 
I thought that this would be the perfect blog post 
to share the card I made with it!


I just love that little girl peeking out from behind her coffee cup!
I cut a piece of cream colored card stock out with the
Zig Zag Rectangle Dies by Kat Scrappiness and then 
I used the Tim Holtz coffee embossing folder to emboss that panel.
I stamped the sentiment on to a small Spellbinders tag die and finished 
it off with some twine!  A couple of Teal Jewels by the sentiment
for a little color and shine and my card was done!

Thanks for stopping by today to share in my good news!
I hope you'll follow the Coffee Loving Cardmakers if you don't already!
They have some amazing designers and incredible caffeinated inspiration
every day of the week!  I'll be sharing my cards every other Tuesday starting June 11th
on their blog so come visit me in "Lisa's ICU" (Intensive Coffee Unit)
to see my coffee loving projects!


Have a wonderfully caffeinated day!
I already am!
☕️Lisa ☕️

Thursday, May 30, 2019

Avocado Shaker Card


Good morning my crafty friends!
I'm up on the Kat Scrappiness blog today and I have a fun card featuring the 
brand new You Guac My World stamp set!
I just love those cute avocados and they can really be used for so
many different themed cards!
I used quite a few Kat Scrappiness products on this card.
Here's how I put it together:

To begin with I made a square card base from kraft card stock
and I embossed the front with a heart embossing folder.
Next I took the largest Stitched Scalloped Heart Die and die
cut it out of white card stock. Since I wanted to make a shaker
element out of the heart I used a smaller Layered Nested Heart Die
to cut a smaller heart shape out of the layered heart.
Once I had the middle heart cut out, I layered acetate over the 
heart shaped opening on the back of the scalloped heart.
I then used foam tape around the heart shaped opening to make 
a well to put my shaker bits into.
I used the Sparkling Wintergreen Sequins and the 
Mirrored Clear Solid Heart Confetti to fill my shaker window.
Once the shaker was full I backed the heart with some light green
patterned paper from the Lawn Fawn Gotta Have Gingham
paper pack. Once I glued the shaker element down,  I layered the 
2 cute avocados on the bottom right of the heart that I had previously 
colored with my Copic markers and cut out on my Scan n Cut machine.
The sentiment is from the same stamp set and I stamped it onto black card stock
 using Versamark clear ink and then heat embossed it with 
I have tried MANY MANY white embossing powder brands in the past
and this one is the first one to give me a bright white finish without
fading away while heating it with my heat gun.
It's definitely my new favorite white embossing powder!
Once the sentiment was embossed and cooled off, I cut it out
using a die from the Stitched Fishtail Banner Dies.


Speaking of favorites, Kat Scrappiness just released their own 
Metal Die Snips to cut apart your dies that come wired together.
They cut like butter and they have a flat edge that lets you cut right up
close to the die so it doesn't leave any sharp edges.  They make clipping your
dies apart a breeze! Make sure to check them out in the shop today!


Here's a picture of all the supplies I used on my shaker card today.


Thank you so much for joining me today! I really had fun making this card,
shakers are my favorite type of card to make and I just adore
those cute avocados from the new You Guac My World stamp set!

If you are interested in any of the Kat Scrappiness products I used 
for today's card you can use my code LISA10 at checkout and save
10% off your order anytime you shop!

Have a great day, I already am!
πŸ₯‘Lisa πŸ₯‘


Wednesday, May 29, 2019

The Rabbit Hole Designs June Release, Day 3

Hello there crafty friends and welcome to the final day of 
The Rabbit Hole Designs new release for June!
I for one have been enjoying this release and I am in love
with all of the new stamp sets coming out this month.
Day #3 will not disappoint!
The stamp set being revealed today is a gorgeous floral 
themed stamp set called Pretty in Peony.
The best part of this stamp set is that the images can be used
for any type of card you need or want to make.
The 4 script sentiments included make it easy to customize your
card for several different themes.
Flowers are universal and can be used on a pretty
birthday card or to bring comfort to someone on a sympathy card.


Here is the Pretty in Peony stamp set in all its glory:


The first card I'd like to share with you today is an Interlocking Shaker card.
The other day I came across a video by Hero Arts demonstrating this technique and
I fell in love! I love making shaker cards and this is a new twist on an old technique.
Here is a link to the video that inspired me:


The Pretty in Peony stamp set has 3 gorgeous blooms and some extra greenery
to dress up your flowers. I just knew that these pretty flowers would really
shine next to this unique shaker element! I used Zig Watercolor 
markers to color the peonies and backgrounds of the shaker windows.
Each window was filled with several different Sequin mixes from Kat Scrappiness.
The sentiment was white heat embossed on black card stock with 
Brutus Monroe Alabaster white embossing powder. 
I cannot praise this embossing powder enough!
I have used MANY MANY white embossing powder brands and this is the first
one that stays bright white and does not fade when you hit it with the heat gun.
If you haven't tried it yet, you owe it to yourself to give it a try!
After it was heat embossed I cut the sentiment out with one of the 
The frames of the shaker windows were made with 2 different sizes
of Wonky Wavy Stitched Rectangle Dies from Kat Scrappiness.
To finish the card off I added some pretty Yellow Jewels around my blooms.


Since I can't resist pink flowers, I decided to watercolor those
pretty peonies with my Zig markers again but in pink this time.
I just love how the white gel pen details really bring the petals to life!


I  embossed a white card stock panel with a We R Memory Keepers
quilted embossing folder and arranged the peonies with some extra greenery
in an arrangement in the bottom corner of the card.  The largest flower
on top is popped up on foam tape for some dimension. 
The sentiment was stamped on white card stock and matted with black
card stock and popped up as well. I matted the whole panel on a black
card base and added some White Jewels from Kat Scrappiness for some
sparkle and shine. I love the simple elegance of this card! I know
I will be reaching for these peonies over and over again for many cards!

Well that wraps up my cards for day 3 of The Rabbit Hole Designs
June release. I hope you have enjoyed seeing all of the new stamp sets
as much as I've enjoyed sharing them with you!

Here is a recap of all the amazing stamps that are available now


Don't forget:
Each day of the hop there will be free shipping on orders of $25.00 or more before
taxes and shipping (US Orders Only). No code necessary, exclusions apply.
Free Shipping ends 5-30-2019

GIVEAWAYS:
To celebrate day 3 of the release The Rabbit Hole Designs is giving away the stamp
set Pretty In Peony to One lucky winner. Winner will be chosen at random from the 
comments left on participating blogs, so make sure to visit each 
stop and leave a comment.
Leave comments by 11:59 pm PST 5-30-2019 on all participating blogs.
Winner will be announced on The Rabbit Hole Designs blog 5-31-2019

Here is the lineup for the June release hop!
Make sure to visit all of the design team's blogs for some
amazing inspiration and fun and don't forget to
leave comments for your chance to win!


Lisa Golzbein (you are here)

Thanks so much for joining me over the past few days for the
June Release over at The Rabbit Hole Designs!
I think this is my favorite release yet and I hope you have
enjoyed seeing all of the wonderful inspiration from the design team!
Stay tuned for lots more creativity and surprises in the months to come!


For more inspiration, updates, and news make sure to check out these links.

Have a great day, I already am!
πŸ’Lisa πŸ’


Tuesday, May 28, 2019

The Rabbit Hole Designs June Release Day 2

Welcome back to day 2 of The Rabbit Hole Design's June Release!
Wasn't yesterday so much fun! In keeping with the beach theme
today The Rabbit Hole is releasing 2 more stamp sets that 
will go swimmingly with your beach collection!

For all the mermaid lovers out there, "Mermaid Hair" is just for you!
Can you say..... Mermaid hair, don't care!
Look at this adorable mermaid! She is just too sweet and her 
3 little fish friends and tiny jellyfish compliment her so perfectly!


I really enjoyed creating with this stamp set.  There are so many fun ways you 
can color her hair and her tail and those cute little fishies! For my first card I 
did some watercoloring over a background die from Reverse Confetti
called the Scalloped Cover Panel. I used some Distress Inks in blues and greens
to mimic the ocean and then layered it over a sea foam green card base.


For the sparkly waves under my mermaid I used a wave die from 
The Cats Pajamas and cut out some chunky glitter paper.
The cute little fishies were the perfect addition to my ocean scene.
I white heat embossed a part of the sentiment from the stamp set
on to black paper and layered it over a "hugs" word die cut in gold foil.
I also added some sparkly liquid Stickles to my mermaid and her fish friends!


For my second mermaid card I went into rainbow mode!


I really wanted my mermaid to have a rainbow colored tail and once I colored
her, the rainbow background just fell into place.
I just adore the new Summer Splash patterned paper pack from Sunny Studios!
Those cute little fishies got a semi rainbow colored theme as well.
The panel with the mermaid and the rainbow background panel were
I think it adds to the whimsical nature of this card.
I finished off the card with some White Jewels from 
Kat Scrappiness and the card was done!


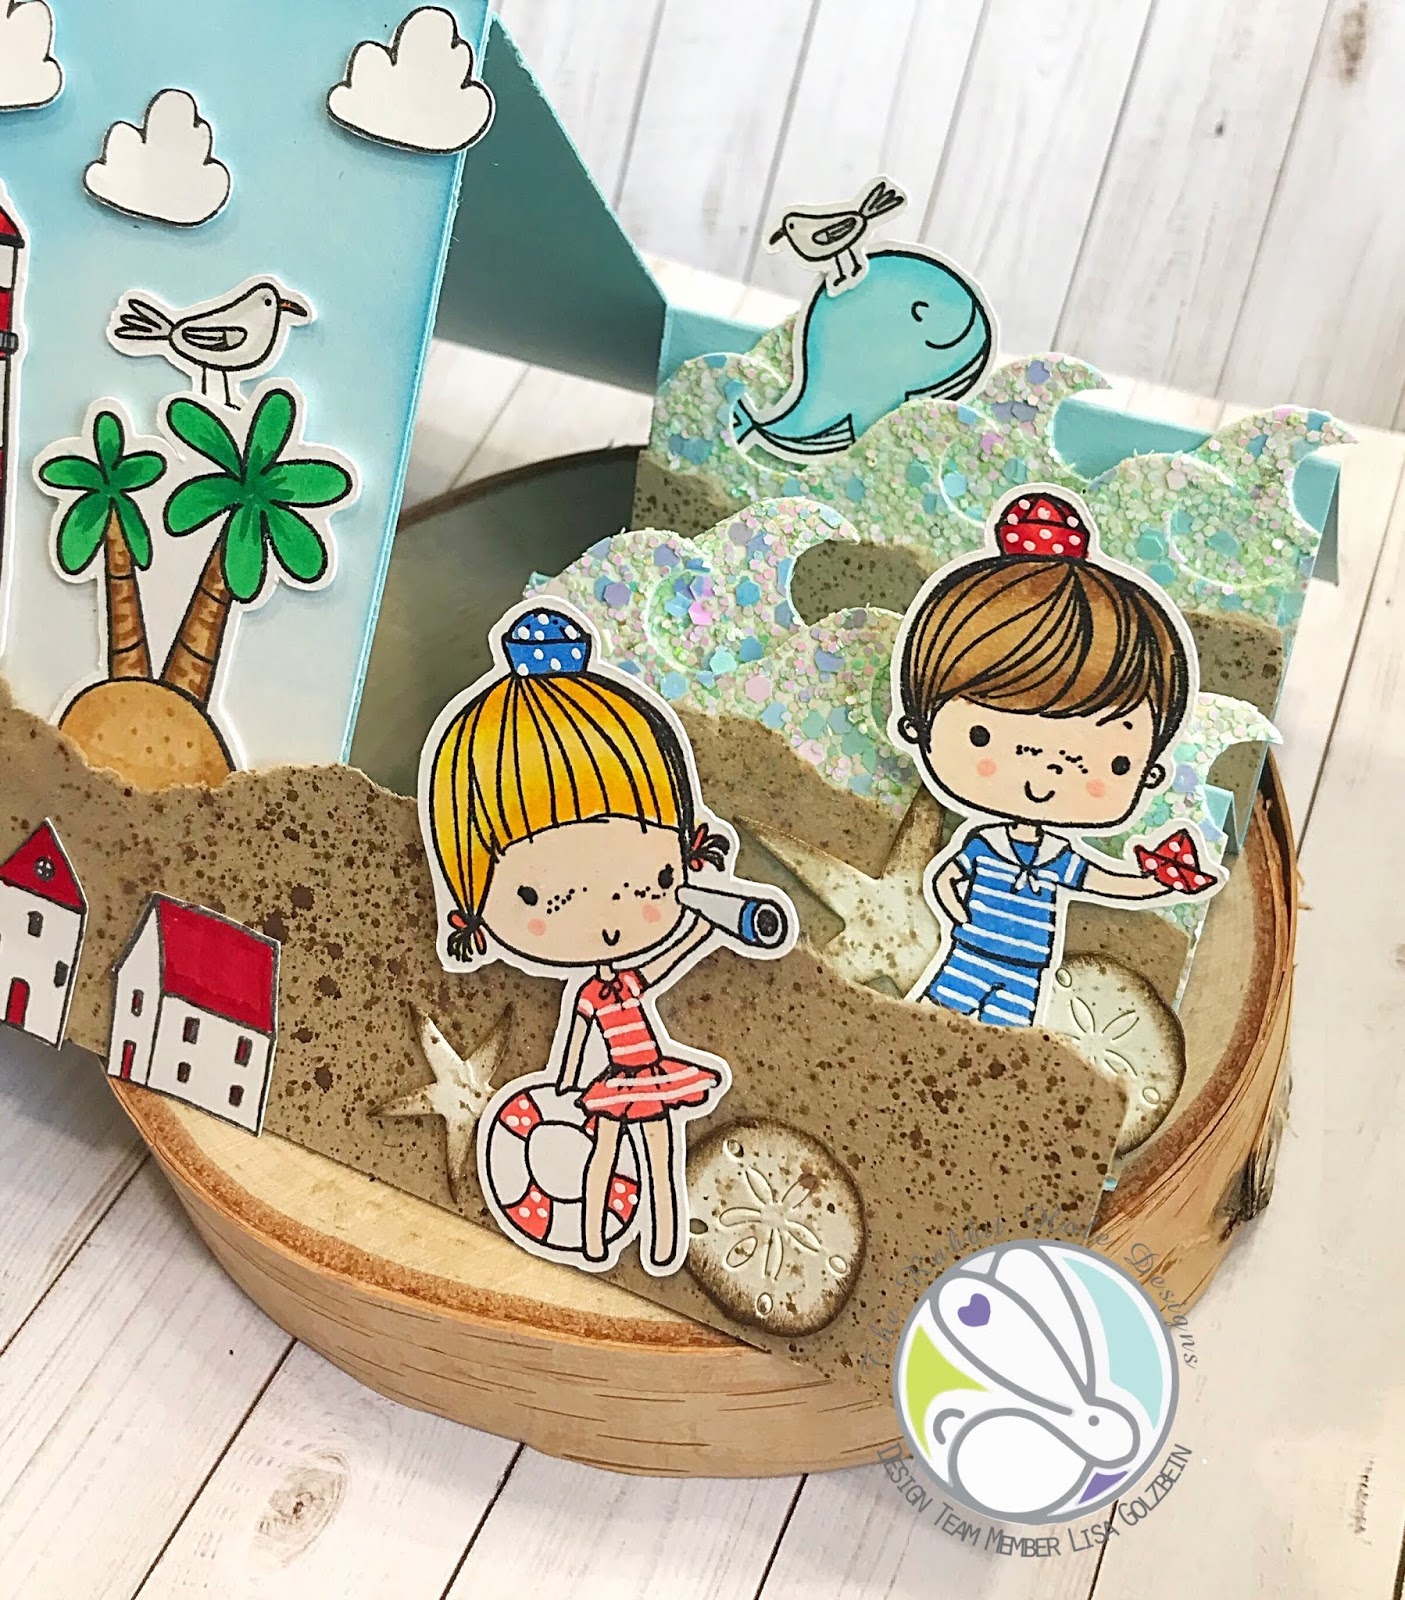
The second stamp set for today, "By The Shore",  features yet another little sweetie!
Can't you just hear the ocean in that sweet shell she is holding!
This cute little stamp set comes with 2 punny sentiments and the cutest 
little sailboat and seagull on a rock!


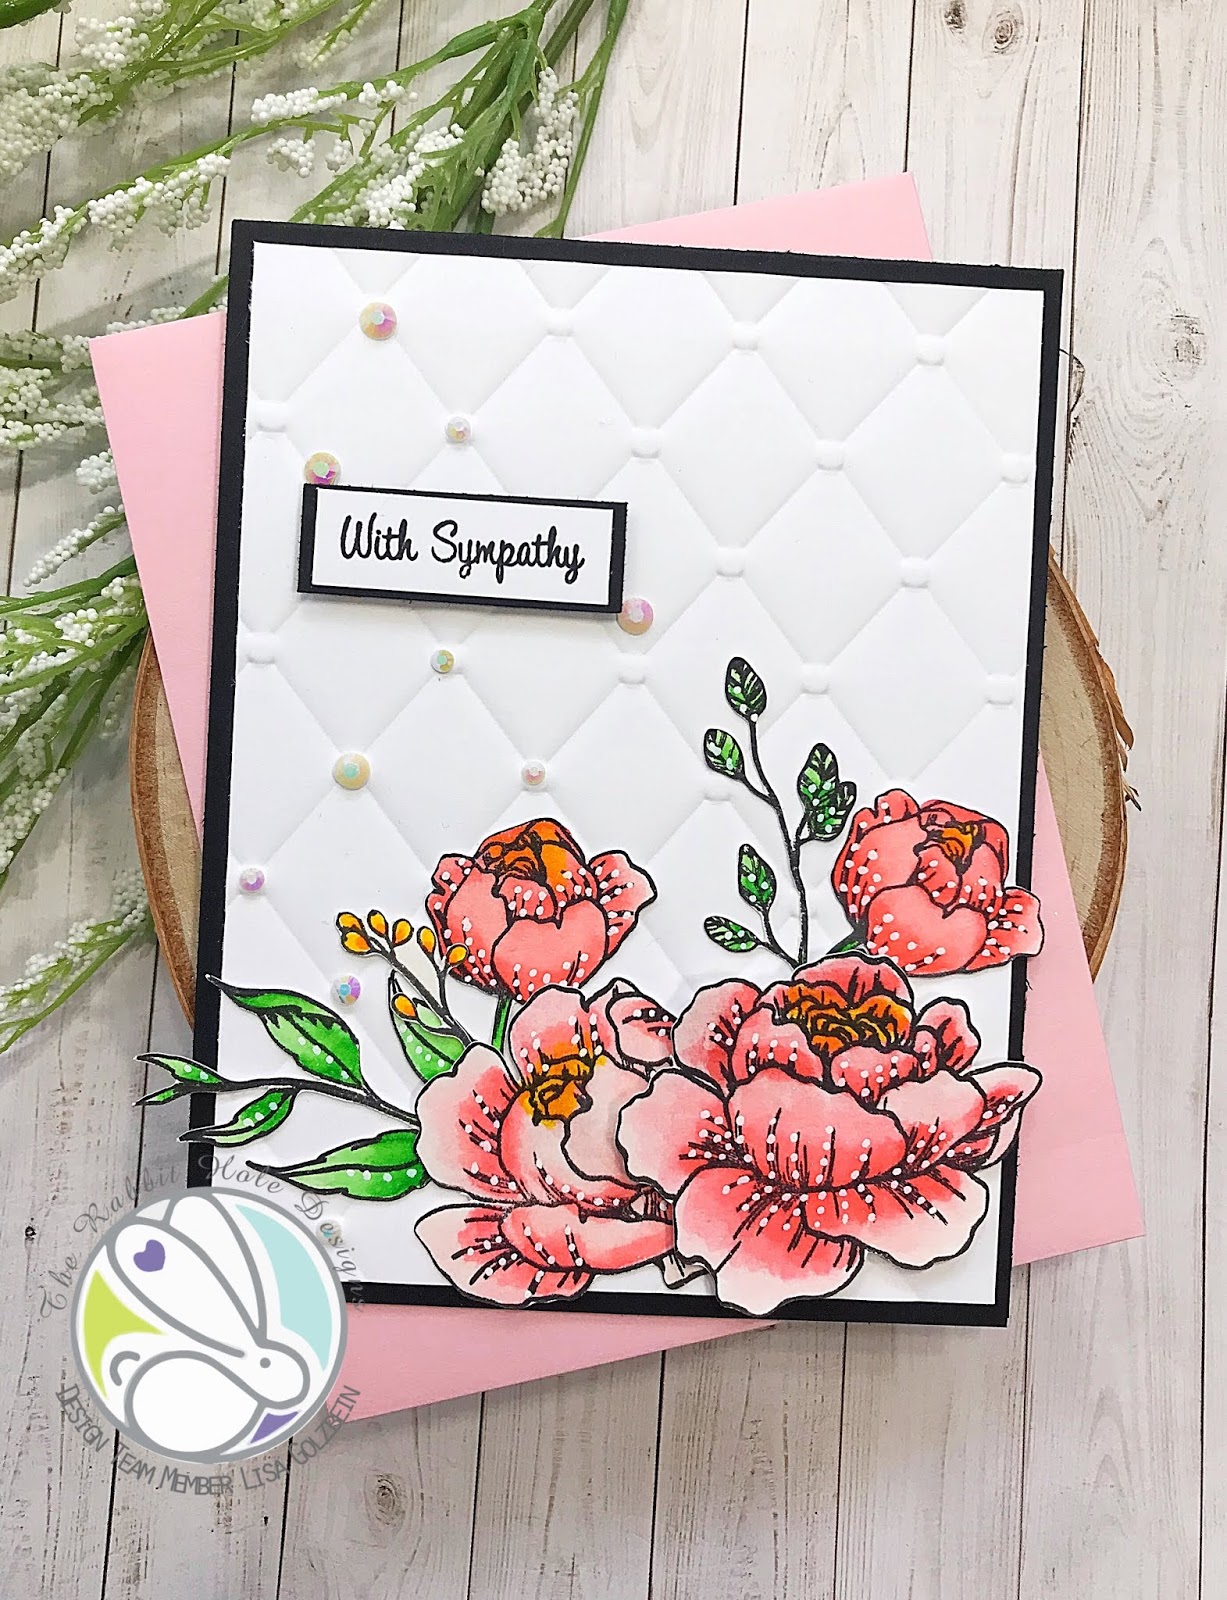
My first card using this stamp set also gave me the chance to use some fun
patterned paper behind my little beach cutie!


I started out by stamping the image onto a small scalloped panel
from Reverse Confetti.  Once I colored everything with my Copic markers
I sponged the edges of the panel with some Mermaid Lagoon Distress Ink.
Once again I chose some pretty paper from the Sunny Studios 
Summer Splash patterned paper pack and I cut out a panel using the 
Stitched Scalloped Rectangle Dies from Kat Scrappiness.
I layered everything over an embossed piece of white card stock and
placed it all on a teal card base.  For some extra fun I added some
some seashell and sand dollar die cuts from an old Cuttlebug set I had in my stash.
The sentiment was stamped in black on white card stock and matted
with the same teal card stock as the card base. 
I'm loving all the bright tropical colors on this card and the fun layers!


Now on to my second card using the By The Shore stamp set.
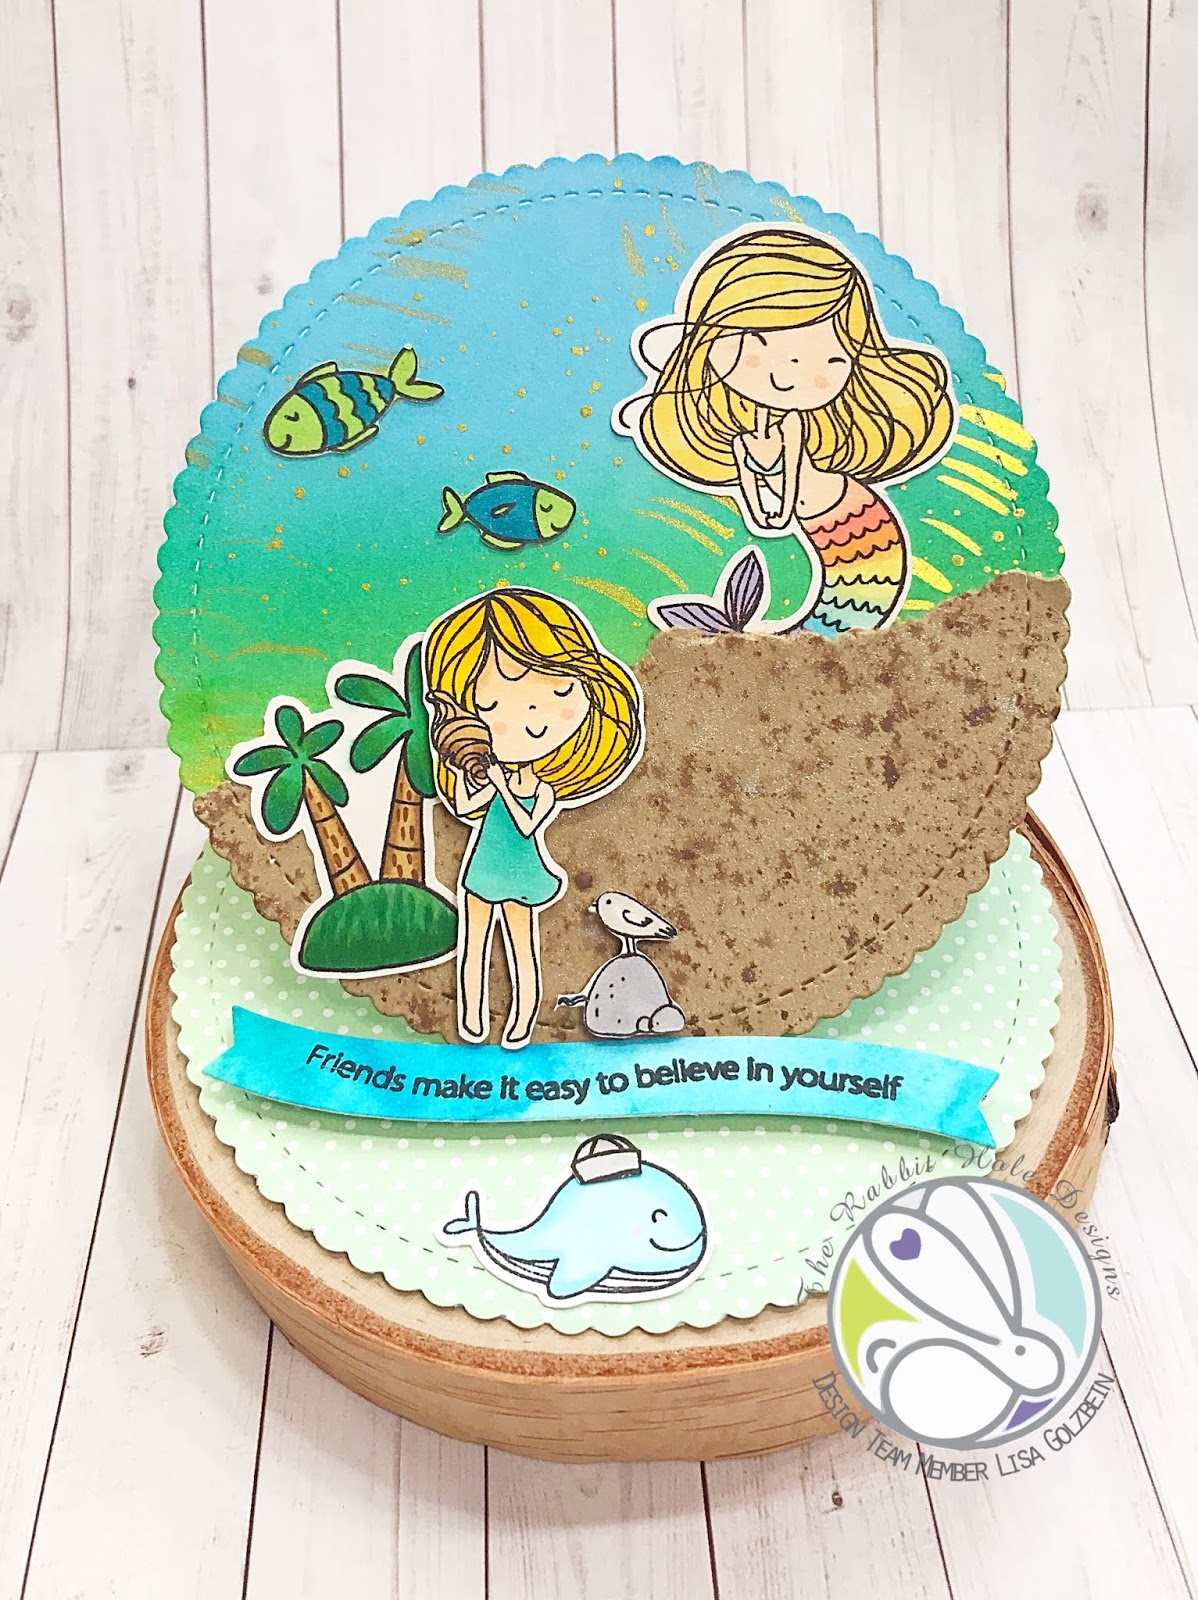
I thought it would be fun to make a round easel card and combine a few
Rabbit Hole stamp sets on one card. 


I honestly got the idea for this card when I was looking at the sentiments
in the Sassy Sentiments stamp set. I thought it would be fun to combine
the 2 girls from today's stamp sets on to one card and use that great
"Friends make it easy to believe in yourself" sentiment. 
For the base of the card I die cut 3 circled from the 
Stitched Scalloped Circle Dies by Kat Scrappiness.
The top of the main circle was ink blended with some pretty 
green and blue Distress Inks and then splattered with some
gold paint from the Kuretake Starry Colors Palette
For the bottom of the front panel I transformed some plain kraft card stock
into faux sand using a technique I demonstrated in this video:
The cute little whale and small palm tree island are from the 
Beach Day stamp set that was showcased yesterday.
I even borrowed the little sailor's cap from the little boy 
in that same set for the whale's head.
I stamped the sentiment from the Sassy Sentiments stamp set
on to a Wavy Frame Die by Lawn Fawn and popped it up on foam tape
to act as a stopper to make my easel card stand up.


I really enjoyed playing with these stamp sets and I know you will too!
Here are some details about free shipping and the giveaway.

Each day of the hop there will be free shipping on orders of $25.00 or more before
taxes and shipping (US Orders Only). No code necessary, exclusions apply.
Free Shipping ends 5-30-2019

GIVEAWAYS:
To celebrate day 2 of the release The Rabbit Hole Designs is giving away 
winners choice of either Mermaid Hair or By The Shore to 
One lucky winner. Winner will be chosen at random from the 
comments left on participating blogs, so make sure to visit each 
stop and leave a comment.
Leave comments by 11:59 pm PST 5-30-2019 on all participating blogs.
Winner will be announced on The Rabbit Hole Designs blog 5-31-2019

Here is the lineup for the June release hop!
Make sure to visit all of the design team's blogs for some
amazing inspiration and fun and don't forget to
leave comments for your chance to win!

Lisa Golzbein (you are here)

Thanks so much for joining me today for the second day of the release!
Make sure to check back tomorrow for the final stamp set reveal!
It's an absolutely beautiful set that you are going to fall in love with!


For more inspiration, updates, and news make sure to check out these links.

Have a great day, I already am!

🧜🏻‍♀️Lisa 🧜🏻‍♀️


Monday, May 27, 2019

The Rabbit Hole Designs June Release Day 1

Are you excited for The Rabbit Hole Design's June release?
Well, you should be! They are releasing 4 new stamp sets over
the next 3 days and you do not want to miss a single one!
Are there any beach lovers out there?
Today's stamp set is called Beach Day and the cuteness factor is 
20 on a scale of 1 - 10! This set features 2 of the cutest little boy and girl
sailor images, a lighthouse, 2 whales, 2 seagulls, a little island and 4 sentiments.
I had way too much fun playing with this stamp set and I have 2 cards to share
with you today using the Beach Day stamp set.
Here is a look at the images in the set:


See what did I tell you??????????? CUTE!!!!!!!!!!!!!!


For my first card I really wanted to include as many of the images from 
Beach Day as I could on one card. 
One of the card types that came to mind was the "step card".


There are many many tutorials on YouTube for constructing a step card
and I chose this one for the basic construction of the card:
It literally took me no more than a few minutes for the basic
construction and then I just had a ball decorating all the different 
folds and surfaces with the images from the Beach Day stamp set.
I stamped all of the images in Gina K Amalgam ink and colored them with
my Copic markers.  My scan n cut made quick work of cutting them
all out and I placed them all over my card.


I especially love the waves on my card, I used a wave die from The Cats Pajamas
to cut out some chunky glitter paper to look like shiny ocean water.
I made the faux sand with a technique I showed in this video:
The 2 little houses under the lighthouse and the clouds in the sky
you might recognize from a previously
released Rabbit Hole stamp set called Love You More.
I just love how this super sweet card came out and I love when
cards have lots of little details to look at!


For my second card I used the little girl and boy images again 
with the fun lighthouse. 


I wanted a die that would frame the images and make them the 
focal point of the card so I used one of the dies from the 
I love how the die has windows that let you see the patterned paper
in the background but still let your images take center stage!
I popped my 3 images up on foam tape to really make them stand out.
The sentiment from the Beach Day stamp set was stamped in
navy blue under the 3 frames and I added one of the cute seagulls 
next to it for some fun!

I really enjoyed playing with this stamp set and I know you will too!
Here are some details about free shipping and a giveaway during the next few days.


Each day of the hop there will be free shipping on orders of $25.00 or more before
taxes and shipping (US Orders Only). No code necessary, exclusions apply.
Free Shipping ends 5-30-2019

GIVEAWAYS:
To celebrate day 1 of the release The Rabbit Hole Designs is giving away the stamp
set Beach Day to One lucky winner. Winner will be chosen at random from the 
comments left on participating blogs, so make sure to visit each 
stop and leave a comment.
Leave comments by 11:59 pm PST 5-30-2019 on all participating blogs.
Winner will be announced on The Rabbit Hole Designs blog 5-31-2019

Here is the lineup for the June release hop!
Make sure to visit all of the design team's blogs for some
amazing inspiration and fun and don't forget to
leave comments for your chance to win!

Lisa Golzbein (you are here)
Thanks so much for joining me today for the first day of the release!
Make sure to check back tomorrow for another super cute reveal!


For more inspiration, updates, and news make sure to check out these links.

Have a great day, I already am!

🏝Lisa 🐳


Sunday, May 19, 2019

Jellyfish Thank You


Welcome back to my blog crafty friends!
I'm up on the Rabbit Hole Designs blog today to bring you a Thank You 
card using the Sofishticated stamp set. 
You can purchase this set from (The Rabbit Hole or Kat Scrappiness)!

I just love the Jellyfish stamp from this set. 
It has such beautiful intricacies in the main body and tail and 
I think it looks very elegant when heat embossed in gold.

I started by doing some ink blending with several colors of
and Salty Ocean. After all of the blending I sprayed some water droplets
for a more distressed look.  I also sprayed some homemade glimmer mist
for some extra shine. The camera doesn't pick that up very well.
I wanted a pretty scalloped edge so I die cut the inked panel
I made sure to use my anti-static tool over the ink blending to I could 
heat emboss without making a mess.  I stamped the Jellyfish stamp
in clear Versamark ink and then sprinkled gold embossing powder
over it. I used my heat gun to melt the powder and I just love the results!
I also added a gold frame with foil card stock to finish off the edges.
The Thank You sentiment was cut with the same gold foil as the frame and 
I added some blue jewels for some added interest and sparkle.

I love how this card came out, the ink blending was the perfect background
for this whimsical Jellyfish and the gold accents are so elegant.

For more inspiration, updates, and news make sure to check out these links.

Have a great day, I already am!
🌊Lisa 🌊 


Friday, May 17, 2019

Happy Birthday to Me!


Good morning crafty friends!
Today is my day on the Rabbit Hole blog and  
it just so happens to be my 50th birthday as well!
I thought it would be fun to make a birthday card in my honor!
It's been a rough week for me so it's kind of appropriate that these 
guys aren't smiling.
Putting party hats on their heads just made 
me laugh since they don't look like they are in a party mood.
My 13 year old son is just getting over the flu and my dad has been in
the hospital since Mother's Day so the mood around here hasn't been
very happy. I'm ready to put it all behind me and 
get everyone healthy again!

All in all though I really like how the card came out, the rainbow
letters really stand out against the black and white background.
Here is a list of all the caffeinated critters used on my card:


Thanks for joining me today for my birthday, I hope you enjoyed
my card, these caffeinated critters really can be used for any 
type of card you want to make..... just change up your sentiment.

For more inspiration, updates, and news make sure to check out these links.

Have a great day, I already am!
πŸŽ‚Lisa πŸŽ‚


Thursday, May 16, 2019

Paper Sweeties May 2019 New Release Rewind!


Welcome to the Release Rewind for Paper Sweeties!
I hope you've enjoyed all of the inspiration these past few days 
from the talented design team!
We've been sharing our projects using the two 
newly released stamp sets:
Truck Add-on: Life is an adventure with matching dies 


and
Basket Add-on: Thinking of You with matching dies


For the last day of the New Release I've created 3 cards.
The first card uses the Basket Add-on: Thinking of You stamp set


On this card I decided to use the previously released
Basket stamp with matching die to place 
my beautiful flowers in. 
I colored my beautiful bouquet with my Copic Markers
and I used the matching die to cut them out. 
The small sign in the basket is from the Thinking of You stamp 
set. I stamped the word friend on it and then
cut it out from patterned paper. 
I splattered black ink lightly on the base of my card
and layered my pretty basket over it. 
Last month Paper Sweeties released the Hello stamp set and matching die.
The Hello word was the perfect addition to this card. 


πŸ’– ON TO THE CAMPER πŸ’–

For my next 3 cards I decided to have some fun and "Glamp" up the 
adorable camper from the
There are so many cute ways to customize the camper using the 

The first thing to do was to pick out some of the prettiest patterned paper
I could find and cut out the camper and matching accessories in every pattern.
The next step was to layer the window and door on to the camper
in many different combinations. Since I wanted to "GLAM" up the camper
I took some glittered card stock and die cut the banner in 2 different
colors and layered them over each other diagonally.  
The wheels obviously needed glitter as well.......right?
Any excuse to use glitter paper, I'll take it.
I added the sweet little Home Sweet Home die to 
all the doors on the camper and my sweet camper cards were complete!
I really enjoyed playing with this super cute camper and all of the 
darling accessories.  I especially love the hearts on the sides of the window!
Here are those 3 cards individually:


Make sure you pick up this super cute stamp and die set, you're going to love dressing
up this adorable camper with paper and bling!

Thanks for spending some time enjoying all of the 
new release fun from Paper Sweeties!
Make sure you visit all of the other New Release Team members blogs to 
see what they have created for the Release Rewind!
We are welcoming 3 new designers to the Paper Sweeties team this month,
Diane Hover, Karen Bull and Sarah Wyles. 
Make sure to welcome them to the team!


Have a great day, I already am!
πŸ•Lisa πŸ•