Showing posts with label distress inks. Show all posts

Friday, September 13, 2019

Sassy Mermaid


Good morning Rabbit Hole fans!
Today I have a Sassy Mermaid to share with you.
I absolutely love the look of an ink blended background 
especially on a sea themed card!

I used the following 2 Rabbit Hole stamp sets on my card today:


Mermaid Hair

Sassy

Card Recipe

I started with a piece of smooth card stock cut from a Kat Scrappiness
Distressed Edge Rectangle die so I could do some Distress Ink blending.

Next I took 3 different color Distress Inks and blended them down the 
die cut panel. 
Cracked Pistachio
Peacock Feathers
Blueprint Sketch
I sprayed some water on the panel to give it a distressed look
when I was all done.

I adhered my colored panel to a white card base using
Nuvo adhesive.

I colored the Mermaid from Mermaid Hair and her 3 fish friends and cut
them out with my Scan N Cut and popped them up on the front of the card.

The sentiment from Sassy was the perfect way to finish off this card.
I masked off the sentiment "born to be a" so that the "a" didn't stamp and
then I added the word Sassy.  I heat embossed the sentiment with
Brutus Monroe Alabaster White
embossing powder so that it would stand out.

A few Kat Scrappines Clear Solid Confetti Sequins and my card was done.

Thanks so much for stopping by the blog today!

Don't forget you can now purchase The Rabbit Hole stamps at


For more inspiration, updates, and news make sure to check out these links.

Have a great day, I already am!
๐Ÿงœ๐Ÿป‍♀️ Lisa  ๐Ÿงœ๐Ÿป‍♀️


**Disclaimer: My blog uses affiliate links whenever possible
at no additional cost to you. I only use products I actually
use and love and think other crafters might enjoy as well!

Saturday, July 27, 2019

Pear Blossom Power Pack Hop


Welcome to my blog if this is your first time stopping by and if you've
been here before than welcome back!
Today I have a really exciting project to share with you!
My friend Amanda from Pear Blossom Press has asked me to join in on her
The Power Pack is an incredible device that allows you to make easy 
light up cards! Trust me when I tell you how easy it is!
I was intimidated at first but I'm so glad I gave it a try because it turned out
to be SOOOOOO much fun! I even made a video to show you my entire
process for making my card. I had never made a light up card until now but I 
know I will be making more thanks to Amanda's awesome Power Packs!

Here are 2 pictures of the card I created for the Blog Hop,
the second shows the card lit up in the dark.
I'll give a quick description with links to products used but 
for the full instructions please see the video below.


Card Recipe:

Step 1 - I used the Kat Scrappiness Stitched Scalloped Rectangle Dies to cut a piece of Bristol Smooth Card Stock.


Step 2 - Next I taped the Brutus Monroe Tangled Waves Stencil to my card stock and used the Picket Fence Life Changing Brushes to blend Twisted CitronPeacock Feathers and Salty Ocean 
Distress Inks over the stencil.


Step 3 - I stamped the Angler Fish and Starfish from The Rabbit Hole Designs  SoFishticated Stamp Set in Gina K Amalgam Ink and colored with Copic markers.


Step 4 - I used my Scan n Cut to cut out the images and painted Inkon 3 Liquid Pixie Dust to them. This will give your images beautiful sparkle and shine. I used the Stitched Flag Dies  to stamp my sentiment on to and colored with Twisted Citron Distress Ink.


Step 5 - Place your stenciled panel over your card base and mark where you want your Power Pack 
battery and LED light to go. Build your circuit with the copper tape included in the Power Pack by connecting positive to positive and negative to negative. Use a double layer of foam tape to build up your card around your circuit.  Make sure not to cover the copper tape with the foam tape.


Step 6 - Press the button and watch your LED lightbulb light up!
Step 7 - Repeat step 6 over and over and over because it's just SO MUCH FUN!!!!


You can see the video on YouTube or you can watch it here:


Make sure you hop along today to see all the inspiration using the Power Packs.
You can enter to win your own set of Power Packs by commenting on the blogs and 
videos as you go.

Prizes 
Three Power Pack Kits will be awarded to winners, chosen at random, from comments left on participating blogs and videos. Comments must be posted by 11:59 pm PDT on August 3, 2019. Void where prohibited by law. For complete contest rules, click here.  Winners will be announced on August 5, 2019 here.

Here is a list of all participating designers:

Lisa Golzbein  (you are here)


Complete Product List with links
(affiliate links used when available at no additional cost to you)


Friday, May 31, 2019

Happy Little Stampers June Watercolor Challenge


Hello crafty friends and welcome back to another Watercolour challenge
over at the Happy Little Stampers blog!
This month the theme is anything goes with an optional "Love" twist.
Here is my card for this month


Come join us for the Happy Little Stampers Watercolor Challenge this month!
We want to see your watercolor projects.

Thanks for stopping by! I hope you get some free crafty time today!
Have a great day, I already am!
๐ŸŒนLisa ๐ŸŒน


Sunday, April 14, 2019

Paper Sweeties April 2019 New Release Sneak Peeks and Video


Welcome to my blog crafty friends!
I'm glad you're here because Paper Sweeties recently underwent
a website makeover and it's bright, beautiful and very user friendly!
In other fun news, today starts the New Release sneak peeks for the
brand new April stamp set! Make sure to head on over to the new
shop and blog and take a look around!
This month Paper Sweeties is releasing the 
Here are pictures of both:


This stamp set features the beautiful Hello sentiment in a flirty font with
lots of additional sentiments to pair it with. It also has 2 flowers and 
2 different size leaves.  The matching dies have the beautiful hello word
along with both flowers and both leaves.

For my card I decided to do some gold embossing over an 
bright ink blended background.
I used Picked Raspberry and Spiced Marmalade
Distress Inks blended over a piece of Bristol Smooth
card stock. I took the flower stamp and the leaf stamp
from the Hello set and stamped them in Versamark Ink
so I could heat emboss them with WOW gold embossing powder.
I placed the Hello die cut on to a 
I finished the card off with a beautiful bow made 
from Licorice Seam Binding and 3 sequins 
from the Cupcake Sprinkles mix.

I made a video tutorial to show you exactly how I made this card.
You can watch it here or on YouTube:


Thanks for stopping by my blog today, don't forget to 
check back tomorrow for Release Day!
Make sure you visit all of the other New Release Team members blogs to 
see what they have created for the sneak peeks!

Debbie Marcinkiewicz - Paper Sweeties

Have a great day, I already am!
๐ŸŒธLisa ๐ŸŒธ


Friday, April 12, 2019

Watercoloring Over Gold Embossing


Hello crafty friends and welcome to my blog.
Today I have a beautiful card to share with you using two beautiful 
 Pretty Pink Posh stamps sets!
I absolutely love making floral cards and one of my favorite techniques
is watercoloring over gold embossing. I think it is such an elegant look!
Today I used the Pretty Petunias florals and the Everyday Greetings stamp sets
to make this beautiful garden inspired card.
Lately I've been crushing on this pink and orange combination.
I used 4 different color Distress Inks on this card:

I started off by stamping my flowers in Versamark Ink on to watercolor paper
It's hard to get a good impression on watercolor paper and the
MISTI helps with stamping over and over in the same spot!
I sprinkled WOW gold embossing powder over the Versamark and 
melted it with my heat gun.  The gold embossing makes it so easy to watercolor
and stay in the lines. After I watercolored the flowers and leaves I did a light wash
of Peacock Feathers all over the card around the flowers.
I took the Thank You sentiment from Everyday Greetings and stamped it in the
center of the floral panel in Versafine Black Onyx Ink.
I used the scalloped frame die from the My Favorite Things Blueprints 20
die set to cut out my floral panel and layered it on a gold foil background.
To finish off my card with some sparkle and shine I used some
Clear Sparkling Jewels from Pretty Pink Posh.

Here is a closeup of the card so you can see all the gold shimmer from
the embossing and the foil card stock.
I just love that gold shine!


I am also entering this card in the Simon Says Stamp Wednesday 
challenge this week.  The theme is No Designer Paper.
Instead of designer paper, I made my own background with pretty flowers.

Thanks for joining me today, I hope you enjoyed
my card and will come back soon for more crafty card
inspiration.  You can visit my IG and Facebook accounts
as well for many more cards!

Please note affiliate links have been used in this post.
 This means that I get a small commission at no additional cost to you when 
products are purchased through links that I share on my blog.

Also, if you do any shopping at Kat Scrappiness you can use my code 
LISA10 to save 10% on your order anytime!

Have a great day, I already am!
๐ŸŒบLisa ๐ŸŒบ


Wednesday, April 10, 2019

Seaside Seagulls mine mine mine


Hello crafty friends and welcome to my blog!
Today I decided to play along with the 
The sketch is #432 and it looks like this:

I also decided that since this week's theme at the 
No Designer Paper I'd play along there too!

I was so excited to win the MFT sketch challenge #430
I bought the adorable Seaside Seagulls stamp set with my 
gift voucher! I also bought the Radiating Rays stencil and I thought
they would pair well together!
I blended 4 different colors of Distress Oxide inks together
and then stenciled some Squeezed Lemonade over the stencil.
I just LOVE the mine mine mine sentiment!
Finding Nemo is one of my favorite movies!


So happy to have time to enter these challenges this week
Thanks for stopping by and have a great day,
I already am!
☀️Lisa ☀️


Tuesday, April 9, 2019

Hummingbird Love


Hello crafty friends and welcome to my blog.
Today I have a beautiful card to share with you using some 
sweet Pretty Pink Posh stamps and dies.
For my card I used the 
and the Love Shaker Die.

I started with a square card base made from white card stock
measuring 4" x 4". I then took the largest die from the Kat Scrappiness
Stitched Scalloped Square Dies and cut a panel out with white card stock.
The next step was to use the PPP Love Shaker Die and place it in the center
of the scalloped square die and run it through my Vagabond.
I also used the Love Shaker Die and cut out 4 more pieces
in white card stock so that I could layer those die cuts on top of each other.


Once I glued them all together I had a thick die cut
that was as thick as a chipboard element.
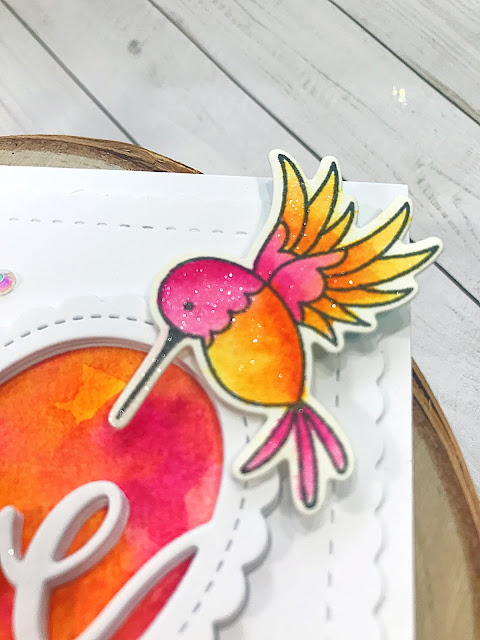
I took some watercolor paper and loosely painted some
Distress Inks in Picked Raspberry and Spiced Marmalade.
I trimmed down my watercolor panel to a heart shape to fit behind the 
Love Shaker panel. While I had my watercolor paper and inks
out, I stamped 2 hummingbirds in Gina K Amalgam ink 
and watercolored them with the same 2 distress inks from above.


After I glued my scalloped square on to my card base, I took 
my Love Shaker element with the watercolored piece behind it 
and glued it down to the base as well.
The hummingbirds were mounted with foam tape to the top
and bottom corners of the card.
To finish off the card I used PPP Sparkling Clear Jewels
to add some sparkle and shine.
For the last step I used my Spectrum Noir Clear Overlay Sparkle Pens
to add some glimmer to the hummingbirds and love die cut.


It's hard to catch the glimmer in a photograph but in real life
this card really does sparkle and shine!

Thanks for joining me today, I hope you enjoyed
my card and will come back soon for more crafty card
inspiration.  You can visit my IG and Facebook accounts
as well for many more cards!

Please note affiliate links have been used in this post.
 This means that I get a small commission at no additional cost to you when 
products are purchased through links that I share on my blog.

Also, if you do any shopping at Kat Scrappiness you can use my code 
LISA10 to save 10% on your order anytime!

Have a great day, I already am!
๐Ÿ’“Lisa ๐Ÿ’“


Thursday, March 7, 2019

Caffeine Makes Me Sparkle!

Good morning and welcome to my blog!
I'm so excited to be sharing my first
 guest designer post for The Rabbit Hole Designs for the month of March!
 I want to share a fun and flirty Flamingo shaker card with you today!


For my card I used the newly released Caffeinated Flamingo stamp.
One of my favorite types of card to make is a shaker card.
The best part is picking out all of the shaker guts to 
match the theme of the card.
I thought the pink and green color palette would look great
with the Caffeinated Flamingo stamp so I picked out
Cracked Pistachio and Raspberry Distress Inks to get started.

The first step was to blend the two colors onto some smooth card stock,
pink at the top and green on the bottom.
I sprinkled some water droplets on the panel and dried them for
a more interesting look. 
Since I wanted the background to sparkle 
I heat embossed some stars in silver over the pink to 
really shine in the background.


The next step was to use some Kat Scrappiness Rectangle Zig Zag dies to cut out a frame.
I used the inside of the frame for the base of the card and I made 
a shaker window out of the leftover frame.
For the shaker guts I chose some Fuschia Jewels,
Lime Green Jewels and lots of Mirrored Clear Solid Stars
for extra sparkle and shine!
After I sprinkled the bits on the base of the card,
I glued my frame down over the mix.
For my sentiment I used the stamp
"Caffeine makes me sparkle" from the
Caffeinated Unicorn stamp set.
I stamped it onto a banner die cut from Paper Smooches with
Picked Raspberry ink and added some fun silver stars.

I watercolored my tired Flamingo with my Zig markers and 
made sure to add some of those silver stars to her 
 and her coffee cup!


I just love how this card came out and the bright
colors just make me happy, not to mention
the fun sound it makes when you shake it!

Thanks so much for joining me today!
Make sure you check out all of the 
new release stamps in The Rabbit Hole shop that are available now!

For more inspiration, updates, and news make sure to check out these links.

Have a great day, I already am!

๐ŸŒบLisa ๐ŸŒบ


Thursday, February 28, 2019

Happy Little Stampers March Watercolour Challenge


Hello crafty friends and welcome back to another Watercolour challenge
over at the Happy Little Stampers blog!
This month the theme is anything goes with an optional "Mist" twist.
Here is my card for this month.


For my card I decided to do some watercoloring with Distress Inks.
I used the Stitched Flowers dies from My Favorite Things and 
I watercolored a few panels with different combos of inks
and then cut out a bunch of flowers to play with.
I randomly paired them up so I'd have lots to choose
from and I picked my 3 most favorite flowers for my card.

For the base of my card I cut a piece of card stock from some PTI 
Hawaiian Shores. I used one of the dies from the 
place my flowers on.
For some added texture I embossed that panel with 
the Fancy Floral Coverplate also from Kat Scrappiness.
Before I added the flowers I misted the panel with some
distress ink splatters in Picked Raspberry and Peacock Feathers.

Come join us for the Happy Little Stampers Watercolour Challenge this month!
We want to see your watercolor projects.

If you decide to go shopping at Kat Scrappiness for any of these products
don't forget to use my code Lisa10 to save 10% on your purchase!

Thanks for stopping by! I hope you get some free crafty time today!
Have a great day, I already am!
๐Ÿ’Lisa ๐Ÿ’


Wednesday, February 27, 2019

Coffee Loving Cardmakers Guest Designer


Hello again Coffee Loving friends!
I'm excited to be sharing my second and last 
guest designer post this month over on 
A big thank you to Amy for having me!
I have enjoyed sharing my cards on their blog this month.

Today I have a card using one of my favorite coffee themed stamps.
It's called Love To Go from Unity Stamp Company.
I just love the whimsical style of this stamp, it really lends itself
to watercolors and that's exactly what I used.


  • To begin with I die cut a panel of cream colored card stock with the largest die from the  Wonky Wavy Stitched Rectangle dies from Kat Scrappiness.  Then I ran it through my Vagabond with a script embossing folder and adhered it to a light teal card base.
  • The next step was to stamp the coffee cup on to some watercolor paper and use Distress Inks to fill in the cup with a fine tip brush.
  • Once the watercoloring was done, I used a smaller die from the Wonky Wavy Stitched Rectangle dies again to cut it out. Before I matted that panel on to the same color as the card base, I tied some twine around the bottom of it. I then adhered it on an angle to the card base.
  • The last step was to die cut some cream card stock with the Stitched Flag dies from Kat Scrappiness and stamp my sentiment in dark brown ink. I matted that flag with a larger one in the same teal color as the card base. I popped it up on foam tape above the coffee cup and my card was done.

Thanks so much for joining me today!
Make sure to check out the Coffee Loving Cardmakers Blog
for your daily dose of caffeinated inspiration!
You can also find them on Facebook and Instagram!
Have a great day, I already am!
☕️Lisa ☕️


Monday, February 11, 2019

Watercolored Mandala Card with Video


Good morning crafty friends!
I'm up on the Kat Scrappiness blog today with a 
card I'd like to share with you using one of the newest dies in the store!
It's called the Mandala die and it cuts a beautiful intricate pattern
into your project. Today I've used a water coloring technique called ink smooshing
(yes it's a thing)๐Ÿ˜†
I used 3 different color distress inks:
and

This technique is easy and fun to do and you can get beautiful
results every time! There are so many color combinations you 
could use depending on your favorite colors.
Here is a video I made to show you the ink smooshing technique.
You can watch it here or on YouTube.


Thanks so much for joining me today.  I hope you'll give this technique a try!
It's lots of fun and it looks beautiful with minimal effort.
Don't forget to use my code Lisa10 to save 10% on your 
order anytime at Kat Scrappiness!

Have a great day, I already am!
๐ŸŽจLisa๐ŸŽจ