Thursday, January 31, 2019

Happy Little Stampers February Watercolour Challenge


Hello crafty friends and welcome back to another Watercolour challenge
over at the Happy Little Stampers blog!
This month the theme is anything goes with an optional "Metallics" twist.
Here is my card for this month.


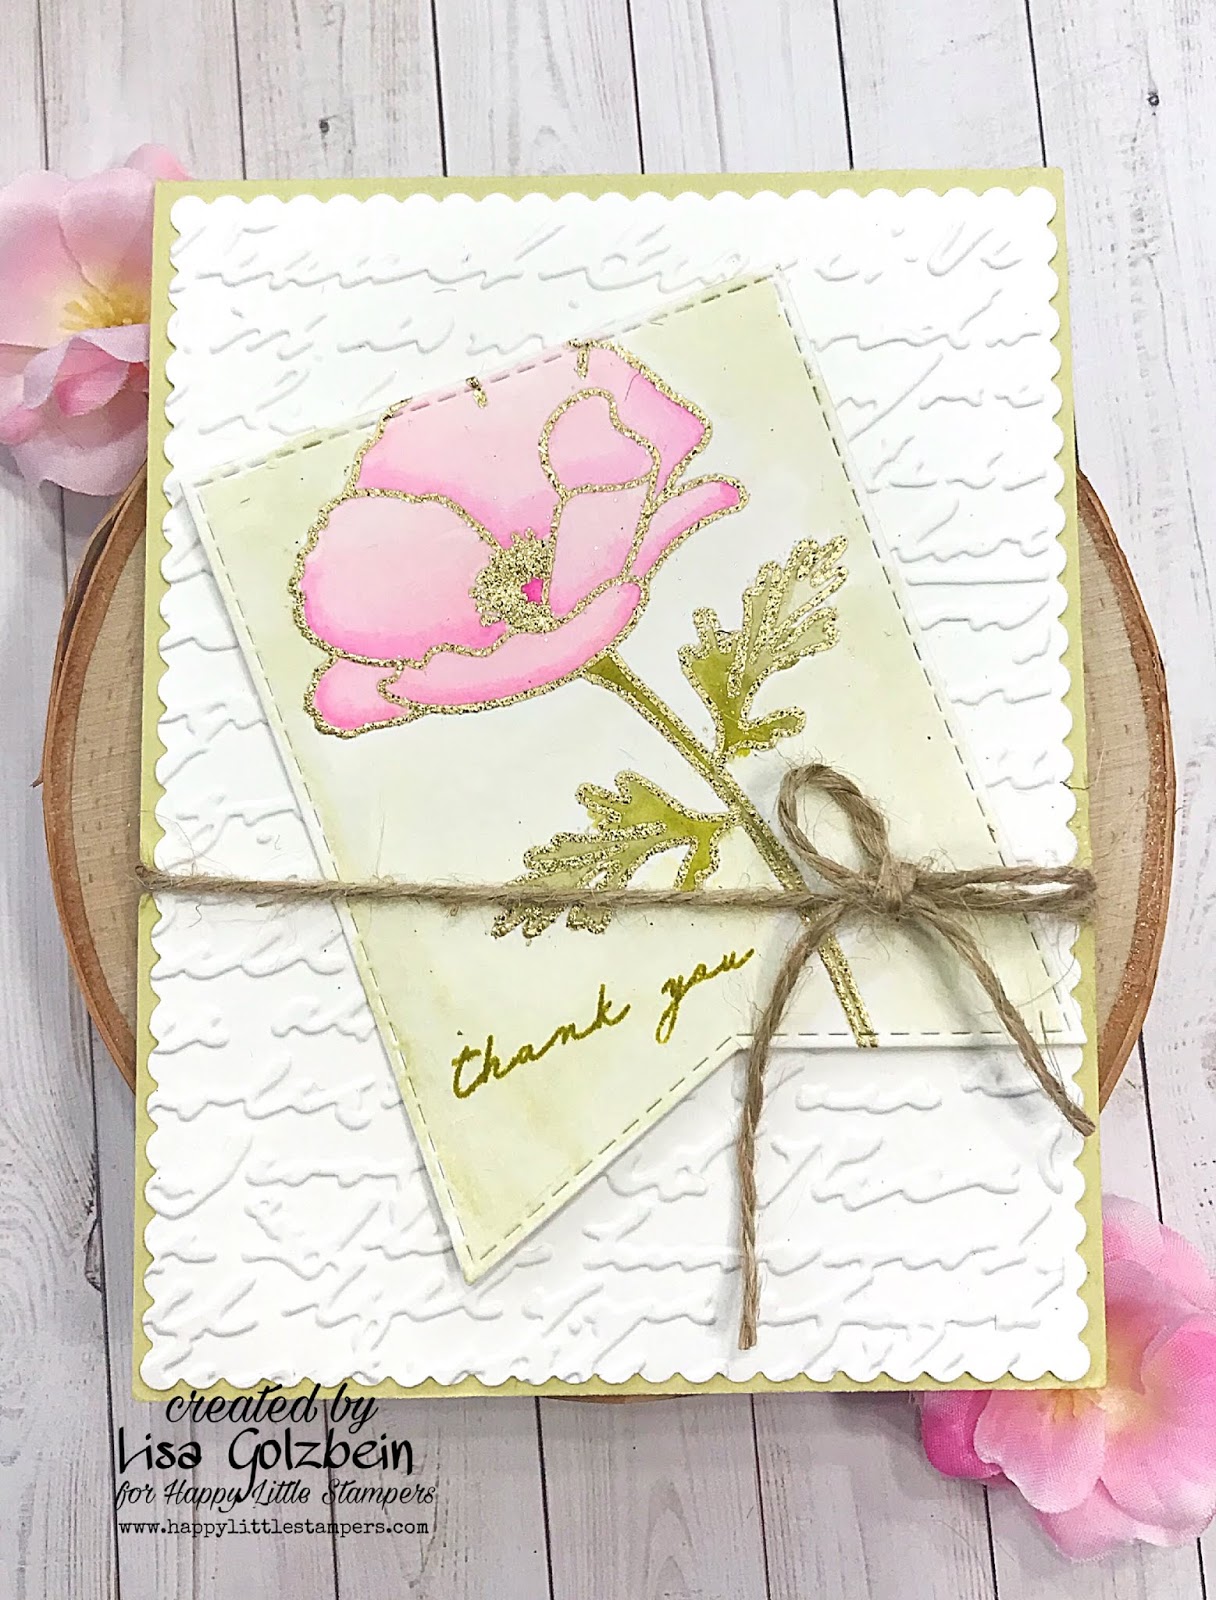
For my card I decided to do some watercoloring with Distress Inks and since the
theme this month is metallics I heat embossed my image with
gold embossing powder before I colored it.
I chose one of my favorite flower stamps from the 2018 Stamp-A-Faire
with Papertrey Ink. Betsy Veldman designed a beautiful stamp set called 
Painted Poppy and it is just perfect for watercoloring!
First I stamped the poppy with Versamark Ink onto a watercolor 
panel that I cut with a die from the My Favorite Things 
Stitched Jumbo Fishtail Banner.
Next I heat embossed the flower with WOW gold embossing powder.
I used 4 different distress inks in these colors for my flower:
and
I also stamped the "thank you" sentiment from the Painted Poppy set in 
Crushed Olive distress ink to match the card.

For the base of my card I die cut a piece of paper from some PTI 
Rustic Cream card stock. I used the largest die from the 
For some added texture I embossed that panel with 
a script patterned embossing folder.
I adhered the watercolor panel on the diagonal and finished 
off the card with some rustic twine.
I love using distress inks to watercolor, there are so
many gorgeous colors to play with!


Come join us for the Happy Little Stampers Watercolour Challenge this month!
We want to see your watercolor projects.

Thanks for stopping by! I hope you get some free crafty time today!
Have a great day, I already am!
πŸ’Lisa πŸ’


Wednesday, January 30, 2019

Happy Valentine's Day Card With Video

Today I'm up on the Kat Scrappiness blog and  I want to share an easy 
Valentine's Day card with you that has a beautiful ink blended background.
I also have a quick video so you can see how I made this card.
I used 3 of the new products that are in the store, I'll link all of the products below.


This card came together very quickly but the ink blending and beautiful 
Lacy Layered Heart in silver foil card stock give it a very elegant look.
Here are the products I used on this card:


I also made a video to show you how I made this card. 
You can watch it here or on YouTube.


All of the products listed above are available in the Kat Scrappiness store
and you can save 10% on your order if you use code Lisa10.
Have a great day, I already am!
πŸ’˜LisaπŸ’˜


Sunday, January 27, 2019

Craftin Desert Divas January Release

Hello crafty friends!
Today I have another fun card to share with you
 on behalf of the Craftin Desert Divas digital design team!
There are so many new releases in the store right now that
are perfect for Valentine's Day and love themed projects.

Today I'll be using the sweet Koala Couple digital stamp!


I started by coloring these cute koalas with my Copic markers and 
then cut them out with my Scan n Cut.
I prepared my card base by stenciling some soft grey hearts using the
Hearts Galore stencil.
My sentiment is from the Say It Big stamp set and I stamped it on to the
smallest heart from the Nested Hearts Die set.
To finish off this card I added a few sequins from the
Fairy Dust Sequins.


I had a lot of fun making this card and 
I hope you'll check out the Craftin Desert Divas
Facebook Gallery and Instagram page for some more inspiration from 
the other design team members. 

Have a great day, I already am!
🐨Lisa🐨

Saturday, January 26, 2019

Craftin Desert Divas Cupid Card


Today I would like to share a cute card I made
 for the Craftin Desert Divas digital design team!
This sweet card features the Cupid in Clouds digital stamp.


I made the background for my card using the Hearts Galore stencil and 
a couple of different Distress Inks.
I used my Copic markers to color my sweet cupid and I popped her
up on to the smallest heart from the Nested Heart Dies.
To finish off the card I added a frame from the Inside Scalloped Rectangle Dies.
The sentiment is from the freebie stamp set Cupid Shot that was 
recently available with a qualifying purchase.


I enjoyed making this card. I hope you'll check out the Craftin Desert Divas
Facebook Gallery for some more inspiration from the other 
design team members as well as Instagram for more fun!

Have a great day, I already am!


πŸ’˜Lisa πŸ’˜

Tuesday, January 22, 2019

KaDoodle Bug Dragon Cards

Valentine's Day is just around the corner and when it comes to 
card making, this is my FAVORITE holiday!
I am a sucker for anything that is pink and involves a good dose
of sparkle, hearts and glitter!
One of the companies that I design cards for is 
and recently they added the cutest files to their shop!
It is a collection of 10 of the cutest Valentine themed dragons and 
one is cuter than the next!  
You can view all of them in the shop right now here.
I have had the delightful opportunity to design a couple of cards 
with them and I used these 2 files:
and

The first card I made is with the Heart Balloons Dragon and here it is:


I am smitten with this card and I just love how it came out.
I started with white card stock and I die cut a panel with 
one of my favorite dies from Kat Scrappiness called the
Stitched Scalloped Rectangle Dies.  I used the largest die from the pack
because it's the perfect size to fill the front panel of an A2 sized card.
The next step was to die cut some card stock with the cloud die
from Lawn Fawn to make a template that I could use to sponge 
some clouds on to my card front.
I used Broken China distress ink and proceeded to sponge it around
the cloud template to form clouds all the way down the panel.
I love the soft look you can get with varying amounts of 
pressure applied to the ink tool.
Once I got the clouds the way I wanted I stamped the sentiment from 
an Avery Elle stamp set called Handwritten notes and 
I added a cute little heart from the Kat Scrappiness stamp 
To finish the card off I used some Pretty Pink Jewels
from Kat Scrappiness. 
Once all that was complete I added the cute little Dragon from KaDoodle Bug
on some foam tape and the card was done.
Here is a picture with the supplies used.


The second card I made uses the Love Letters Dragon file.
It is a shaker card and it is one of my favorite type of cards to make!


For this card I started with the Kat Scrappiness 
It's the perfect die for making shaker cards because it has windows for 
shaker bits and you can easily add foam tape to the back of it.
I put some Magical Unicorn Dust sequins and Fuschia Jewels inside the 
window and I used vellum instead of acetate for a softer look.
The back panel on the card is some adorable Doodlebug paper 
with a Valentines theme.
To decorate the front of the card along with the cute dragon 
I die cut the words from the I Love You Shadow dies from 
Kat Scrappiness out of pink glitter paper.
Here is a close up of the card so you can see the details.


These 2 cards were so much fun to make and I hope you'll check out
all of the cute files at KaDoodle Bug and the awesome dies and sequins
at Kat Scrappiness! They have any and all craft supplies you could want!

If you use my code Lisa10 at Kat Scrappiness you could 
save 10% on your entire order. 

Thanks for stopping by today!
Enjoy your day, I already am!
πŸ’˜LisaπŸ’˜


Craftin Desert Divas January Release

Hello crafty friends!
Allow me to share another card with you
 on behalf of the Craftin Desert Divas digital design team!
There are so many new releases in the store right now that
are perfect for Valentine's Day!

Today I'll be using the sweet Owl Couple digital stamp!


The owls were colored with my Copic markers and cut with my Scan n Cut.
I used some wood grain patterned paper and cut out a circle with the
Inside Scalloped Circles to showcase those cute little owls.
The leaves and flowers included with the Scalloped Circle dies
were the perfect addition to this card!
The sentiment was computer generated and printed out,
then I inked the edges to give it some dimension.

I had a lot of fun making this card and 
I hope you'll check out the Craftin Desert Divas
Facebook Gallery for some more inspiration from the other 
design team members.  I'll be back at the end of the week with another
new release image and card to share with you!

Have a great day, I already am!


πŸ¦‰Lisa πŸ¦‰

Saturday, January 19, 2019

Craftin Desert Divas January Release


Today I want to be share another card
 for the Craftin Desert Divas digital design team!
This month they are relasing another adorable digital stamp called Owl Couple!
This sweet file is just in time for Valentine's Day!
It features an adorable Owl Couple on a branch and has endless possibilities.
Here is my card using this sweet new digital image.


I made a shaker card using the sweet owls and I thought I'd go with a 
non-traditional color scheme.
I just love how this card turned out, I love using soft colors on my cards.

Here are the products I used for my card:


I had a lot of fun making this card.  Shaker cards are one of my favorite
kind of cards to make! I hope you'll check out the Craftin Desert Divas
Facebook Gallery for some more inspiration from the other 
design team members.  I'll be back next week with another
new release image and card to share with you!

Have a great day, I already am!
πŸ¦‰Lisa πŸ¦‰

Thursday, January 17, 2019

Foxy KaDoodle Bug Cards

Good morning crafty friends!
For the past 2 weeks the KaDoodle Bug design team has been sharing
Winter Birthday cards in their Facebook group.
I have 2 adorable cards I wanted to share with you using some of the adorable
fox images in the shop.
The first card features 2 foxes from the Playful Foxes file.
I just love those sweet little foxes and I was inspired by the recent 
My Favorite Things release and their adorable foxes!
I made a birthday card using 2 of the sweet images from the file.


The scalloped rectangle panels are from Neat and Tangled and I used
pink polka dot paper from Papertrey Ink for the larger panel.
 The sentiment is from a My Creative Time stamp set called Sweet Wishes.
The hearts are from one of my Recollections punches 
and for the arrows I used a die set from Little B called Party.
I am totally smitten with this card and I LOVE how it turned out!
I can't wait to give it to a sweet someone for their birthday!

For my second birthday card I used the adorable fox image from 
the Woodland Foxes file.


I started by cutting a panel of watercolor paper from the Fancy Frame Dies
by Craftin Desert Divas. I used Peacock Feathers distress ink to give the 
center of the panel a wash of color for my background.
The beautiful Happy Birthday sentiment is from a Close To My Heart
stamp set called Joyful Birthday Occasions and the 
foxy letters are from the Lawn Fawn Quinn ABC's dies.
I just love how that cute little fox looks with his sweet little party hat!

I am thankful that the theme was Birthday because I never seem
to have enough birthday cards on hand!

Thanks for stopping by today to check out my fun foxy cards!
Check out the KaDoodle Bug shop for lots more adorable SVG and Print and Cut
files!  There are some really cute new dragon files available that I will be using soon!

Have a great day, I already am!
🦊Lisa 🦊


Craftin Desert Divas Bear Tags


Today I would like to share some adorable tags I made
 for the Craftin Desert Divas digital design team!
These sweet tags feature the cute little Love Cupid Bear!
I made 2 tags, one with a girl bear and one with a boy bear.


I started by embossing a Shaker Tag Die with a heart embossing folder and inking
the edges in pink and blue respectively.
I colored my sweet little bears with Copic markers and cut them out 
with my Scan N Cut. 
I generated the sentiments on my computer and printed them out so I 
could cut them down and place them on my tags.
The cute little girl bear needed a bow so I used the bow die from the
Shaker Tag Die set to make her one from some pink and white
polka dot paper.  I added a pearl in the middle for some extra sweetness!


I had a lot of fun making these tags. I hope you'll check out the Craftin Desert Divas
Facebook Gallery for some more inspiration from the other 
design team members.  

Have a great day, I already am!
🐻Lisa 🐻

Wednesday, January 16, 2019

Craftin Desert Divas January Release


Today I am so excited to be sharing my first official card
 for the Craftin Desert Divas digital design team!
This month they are releasing an adorable digital file called Koala Couple!
This sweet file is just in time for Valentine's Day and can be used for
any Love themed card or even a baby card!
It features an adorable Koala Couple but it could easily be interpreted as 
a mother or father with a baby.
Here is my card using this sweet new digital image.


The first thing I did was color those sweet koalas with my copic markers
and cut them out using my Scan n Cut machine.
Next I took the second largest Inside Scalloped Rectangle Dies
and cut out a frame using some pink polka dot paper.
Since I was making a shaker card I cut out a piece of acetate
that was slightly smaller than the frame for my window and adhered it as a window.
I backed the window frame with 2 layers of foam tape so I could
fill the well with all of the pretty sequins.
Before I added the sequins I stamped a sentiment from 
Mice To Meet You on the card base so that it would show through 
the window. The next step was to sprinkle some sequins around the 
sentiment so I could add the shaker window over them.
I used a mix of Sweetness and True Love Sequins.
Finally I laid the shaker window down over the sequins and the 
sentiment.  I positioned the adorable Koala Couple on the lower left
corner of the window and added some flower and leaf die cuts 

I had a lot of fun making this card.  Shaker cards are one of my favorite
kind of cards to make! I hope you'll check out the Craftin Desert Divas
Facebook Gallery for some more inspiration from the other 
design team members.  I'll be back next week with another
new release image and card to share with you!

Have a great day, I already am!
🐨Lisa 🐨

Paper Sweeties January 2019 Winter Inspiration Day #3

Welcome back to day 3 of Winter Inspiration Paper Sweeties Fans!
I hope you gained some inspiration over the past 3 days to
create some sweet projects!

For my final Paper Sweeties project for January I've created a
dashboard for my daughter Taylor's planner!
She is an avid planner and is always making pretty things to put in there.
Every time I make a new project she asks me to duplicate it in the size of her planner.
Today instead of duplicating a card in dashboard size I just made one for my project.
This dashboard measures 6 3/4 x 3 3/4 and fits in her personal rings size planner.
It's sort of like a divider/decoration for her planner that separates different sections.

I used some pretty Doodlebug patterned paper for the middle layer and I
used the Sent From My Heart stamp set to decorate the dashboard.


I love that sweet dog and she looks adorable mailing that cute little letter!
I love how this turned out and I know my daughter will love
displaying it in her planner!

Paper Sweeties certainly has everything you could need
to create some SWEET projects!

Make sure you visit the rest of the design team today to see
what they have created for you! 
Here are the links to their blogs:

Larissa Heskett
Lisa Bzibziak
                                     Lisa Golzbein ←←← (you are here)
Mackie Robertson


Thanks so much for joining us over the past 3 days at Paper Sweeties.
Next month we will be back to releasing new products and I hope you'll 
check back to what goodies we will have for you!

Enjoy your day, I already am!
🐢Lisa 🐢


Tuesday, January 15, 2019

Paper Sweeties January 2019 Winter Inspiration Day #2

Welcome back to day 2 of the Winter Inspiration Paper Sweeties Fans!
I hope you enjoyed seeing all of the wonderful projects
that the design team created yesterday!

In keeping with my Valentine's Day theme, I've created a sweet little tag with the adorable
bumble bee from the Bee Happy stamp set.


To begin with I stenciled a honeycomb pattern on to a piece of 
Bristol Smooth card stock with 4 different color distress inks.
Squeezed Lemonade
Mustard Seed
Fossilized Amber
and
Vintage Photo
This gave the tag an ombre look with the darkest color at the bottom.
After that I splattered some black paint around the tag for some added interest.
Once I liked the look of the background I die cut it out with the

The next step was to stamp and color that cute little bumble bee from the
Bee Happy stamp set. I used my Copic markers to do the coloring and
I added white highlights with my Gelly Roll white pen.
I also added a little bit of shimmer to the wings with my 
Spectrum Noir Sparkle brush but it is hard to see that in the picture. 


I selectively stamped the word Bee from the Bee Happy stamp set on 
to black card stock and heat embossed it in white.
The letters to spell out MINE were cut with my Scan n Cut machine
as well as the 3 little sparkly hearts!
I also cut a second tag slightly larger in so I could mat the first tag on
black to make the yellow honeycombs stand out.

To finish off the tag I added a beautiful bow from some
The bow was the perfect finishing touch for my sweet little tag!


I love how this tag turned out and I can't wait to use
it on a Valentine treat!
Paper Sweeties certainly has everything you could need
to create some SWEET projects!

Make sure you visit the rest of the design team today to see
what they have created for you! 
Here are the links to their blogs:

Larissa Heskett
Lisa Bzibziak
                                         Lisa Golzbein ←←←← (you are here)
Mackie Robertson


Please check back tomorrow to see the last
Paper Sweeties project I created for the Winter Inspiration hop!

Enjoy your day, I already am!
🐝Lisa 🐝
❤️


Monday, January 14, 2019

Paper Sweeties January 2019 Winter Inspiration Day #1!

Happy New Year Paper Sweeties Fans!
Welcome back to my blog, this month we are sharing winter inspiration
projects using Paper Sweeties products.
My favorite winter holiday is Valentine's Day probably because of 
all the pink and hearts.  2 of my favorite things to decorate with!
In Florida we don't see some of our coldest weather until February so 
for me it is definitely a winter holiday!

Today I chose to play with the recently released stamp and die set:
I just love the pickup truck image in the set and I thought it would
look darling hauling a load of hearts for Valentine's Day!


I watercolored that sweet truck with my Zig Clean Color Markers
and used the coordinating die to cut it out.
The heart stamp is from the stamp set Happy Icons.
I stamped the heart multiple times and colored them in 
with my Zig markers and then cut them out on my 
Scan N Cut so I could do them all at once.
They look so cute piled up in the bed of that truck!


The sentiment is from the For You stamp set and I stamped it
on to one of the rectangles from the Rectangle Scallop Frames dies. 

I love how this card turned out and I hope I've inspired you
to start making some sweet Valentine's Cards!
Paper Sweeties certainly has everything you could need
to create some SWEET projects!

Make sure you visit the rest of the design team today to see
what they have created for you! 
Here are the links to their blogs:

Larissa Heskett
Lisa Bzibziak
                                         Lisa Golzbein ←←←← (you are here)
Mackie Robertson


Please check back tomorrow and Tuesday to see the rest of the
Paper Sweeties projects I have created!

Enjoy your day, I already am!
πŸ’˜Lisa πŸ’˜


Sunday, January 13, 2019

Hinged Die Cut Love Card

Happy Sunday Y'all!
I spent my morning with my coffee, Jennifer McGuire and Kat Scrappiness.
What a nice morning!
Whenever I watch a Jennifer McGuire video with a technique I love
I can't stop thinking about it until I try it out.
This morning was the perfect time so I poured my java, turned on YouTube
and broke out my Kat Scrappiness stamps and dies.
Kat's new release was the perfect recipe for this hinged die cut card!


The heart panel on the front is on hinges and it opens up to reveal a secret message.
The hinges are made from 2 thin strips of acetate and they are sandwiched
in between the 2 hearts. Such a cool technique!


How stinkin' cute is that? I just love having that extra surprise on the front of the card.
The card opens up as usual so you can put a handwritten message on the inside
as well and decorate even more.
If you're interested in how to re-create a card like this you'll want to 
head over to You-Tube and watch Jennifer's video.

The gorgeous heart on the front of the card was made from one of the
new releases over at Kat Scrappiness.
It's called Lacy Layered Heart and before I die cut it out
I blended 3 different colors of distress ink on some Bristol smooth cardstock.
and

I wanted a shiny sentiment on the heart to really make the rainbow 
stand out so I cut out the word Love from silver foil card stock.
That die is from the 
I Love You Shadow Dies which was also just released 
at Kat Scrappiness this month.
The sentiment inside the heart panel is from the stamp set
Say It With Hearts and it is also available now.
That stamp set is so cute and you can re-create the cute
conversation hearts on your cards for Valentine's Day!

The cute little stamped hearts on the front of the card panel is from a 

I just love how this card came out and I enjoyed making it!
Thanks Jennifer for all the inspiration throughout the year!

I am also entering this card into the Monday and Wednesday 
The Monday challenge is to use something new.
All of the products used on this card are from the new release
and the technique I used is from a recent video I just learned.

The Wednesday challenge is to make a matching envelope 
and I copied the heart and sentiment on my matching envelope here.


If you want to purchase any of the Kat Scrappiness products I mentioned 
You can use code Lisa10 at checkout and save 10% on your order.

Thanks for stopping by today!
Have a great day, I already am!
πŸ’˜Lisa πŸ’˜


Saturday, January 12, 2019

πŸ’˜Love Is In The AirπŸ’˜

Happy New Year crafty friends!
I want to wish you a happy early Valentine's Day as well
since this post will be centered around the newest
Kat Scrappiness "Love" themed products!

There was recently 4 new products released in the shop and if you
haven't seen them yet, WHAT ARE YOU WAITING FOR?

Kat Scrappiness just released 3 new dies and 1 new stamp set to help
get you in the Valentines mood!


Valentine's Day has always been one of my favorite holidays
mostly because of the color scheme and pretty hearts.
I've always loved the decorations and the way the stores look
at this time of year.  It's a wonderful sea of pink and hearts!
πŸ’˜πŸ’˜πŸ’˜πŸ’˜πŸ’˜πŸ’˜πŸ’˜

I created 3 cards with the new products that I'll share today and I have
some process pictures to share with you for one of them.

Here is the first card I made using the I LoveYou Shadow Dies
and I'll share the process with you.


For this card I made my own background by ink blending
3 different distress inks in the following colors:
and

Even though I only used 3 colors it looks like so much more
because of the blending properties of the distress inks!
This is my favorite color combo right now and I 
am reaching for them a lot!

Once I got the background blended just the way I wanted it
I pulled out a heart stencil from my stash and used it to
cover the background in soft white hearts.
I had an old makeup brush on hand that worked perfectly
to apply the white ink.

After the hearts were stenciled in I hit the panel with my heat gun 
so it wouldn't smear in my Vagabond.
out the panel for the front of my card.


The next step was to pick out colors that I wanted to die cut
I knew I wanted the shadow pieces to be black since
it makes the rainbow colors pop.
I decided on some sparkly pink paper for the actual words.


Once I adhered the words to their black shadows I popped them 
all up on foam tape so they would really stand out on the card.
And of course I needed to add some Sparkling Clear Jewels to the card
for some extra BLING!


I really love how this card turned out and I am planning on making a lot 
more ink blended cards in the near future.

Here are all 3 cards I made for the new release and I can tell there 
will be a lot more LOVELY HEART cards very very soon!
As you can also see I used the ink blending technique on all 3 of 
these cards in different ways.


Thanks for stopping by today and letting me share my cards with you!
I am enjoying the new stamps and dies and I know you will too!
Please use my code Lisa10 to do some crafty shopping and 
you can save 10% on your order.

Have a great day, I already am!
πŸ’˜LisaπŸ’˜