Showing posts with label birthday card. Show all posts

Saturday, June 12, 2021

Summer Quokka Birthday Card


I'm up on the Kat Scrappiness blog today with this fun Quokka Birthday card! He's all ready for summer with his Hawaiian shirt and surfboard! I created the fun camo background strip with a unique layered stencil from A Colorful Life Designs!

That super cute little Australian Quokka is from the Summer Quokka stamp set and comes with 3 summer themed Quokkas and some cute beach themed accessory stamps!


I created the strip of camouflage using a unique stencil from A Colorful Life Designs
The Layered Camouflage stencil comes with 3 different layers of a camouflage design that lets you customize your background any way you want. I went with the traditional camo colors on my card but I think it would look good in blues and grays as well. Here is a look at the 3 stencils that make up this set. They are labeled top, middle and base layer and they are super easy to line up too!


I just love using the Quokkas on my cards, they are so cute and I love how you can customize his shirt and surf board with any patterns and colors you want!

Thanks for stopping by today!
Have a great day, I already am!
πŸ„  Lisa  πŸ„

Friday, January 24, 2020

Celebrate With Cake


Good morning Rabbit Hole fans, I hope your day is off to a great start! Today I have a shiny birthday card to share with you featuring the elegant birthday cake from the Celebrate With Cake stamp set.


Card Recipe

1) I started off with a white card stock panel and I painted some loose pink watercolor stripes horizontally across the background.

2) I stamped the cake image and heart bows in Versamark embossing ink and then sprinkled both with silver embossing powder. I did the same thing with the "Celebrate" sentiment and then heated them both up until they were dry and shiny.

3) I matted the stamped panel on to a sheet of silver foil card stock and then both panels on to a pink card base.

4) To complete my card and add some extra bling I added pink sparkling jewels around my card.


Thanks so much for stopping by today!
And don't forget to visit Simon Says Stamp for all your Rabbit Hole needs as well!


For more inspiration, updates, and news make sure to check out these places ...


Have a great day, I already am!
πŸŽ‚ Lisa πŸŽ‚


Thursday, January 16, 2020

B.Y.O.Bengay


Good morning and welcome to my blog!
Today I am up on The Rabbit Hole Designs blog and I have a snarky birthday card to share with you today. The brand new Sassy Birthday Sentiments 2 have some of the funniest birthday sentiments I've ever seen. I also love the new stencils available in the shop.  They work great as background stamps like the Twisted Sunshine Stencil or they can be masked off to create funny sayings like the "LOL" on my card using the Spell It Stencil! Since this is the birthday month for The Rabbit Hole Designs I decided to use their logo colors for this card.

Card Recipe

1) I started off by blending Tumbled Glass and Twisted Citron Distress Oxide Inks over the Twisted Sunshine Stencil on to a piece of Bristol Smooth card stock.

2) Next I took the Spell It Stencil and masked off the "L" and the "O" so I could create the abbreviation "LOL" towards the bottom of the card.  I used Shaded Lilac Distress Oxide Ink for this to complete the logo colors for The Rabbit Hole.

3) For the sentiment from Sassy Birthday Sentiments 2 I stamped it with Versamark Ink on to black card stock and heat embossed it with white powder then adhered it across the center of the card.

4) All that was left was to add some pretty Rabbit Hole sequins around the card for some fun!


I am really enjoying the Sassy Birthday sentiments, they are unexpected 
and always get a good laugh from the recipient!

Make sure to check out the shop for these products from The Rabbit Hole Designs!


Spell It Stencil 


Thanks so much for stopping by today!
And don't forget to visit Simon Says Stamp for all your Rabbit Hole needs as well!


For more inspiration, updates, and news make sure to check out these places ...

Have a great day, I already am!
πŸ‘΅πŸ» Lisa πŸ‘¨πŸ»‍🦳


Tuesday, August 6, 2019

Celebrate Your Birthday!


Good morning and welcome back to my blog!
Today I'm up on The Rabbit Hole Designs blog with another card featuring the 
newly released Sassy stamp set! I just love that sweet Unicorn!

I started off with a black card base and I covered it in some pretty rainbow 
patterned paper with gold flecks in it.
Next I cut out a white frame using the Inside Scalloped Rectangle Dies 
from Craftin' Desert Divas to bring focus to the main images.
I used my Copic markers to color Sassy and that sweet cloud and then I cut
them out with my Scan n Cut.
To finish off my card I added the die cut word Celebrate in black
and I heat embossed the birthday sentiment from Doggone in 
white on to black card stock.

Thanks so much for joining me today on my blog!

For more inspiration, updates, and news make sure to check out these links.

Have a great day, I already am!
πŸ¦„Lisa πŸ¦„

Sunday, June 30, 2019

SHAKE, RATTLE & ROLL

I'm up on the Kat Scrappiness  blog today and we are going to 
SHAKE, RATTLE AND ROLL!
For those of you who don't know, Kat Scrappiness has a HUGE assortment of 
Sequins and Sprinkles and the collection has recently expanded!
Today I wanted to share 1 card and 3 tags with you using 7 different varieties
of sequins and sprinkles from the shop!


Look at those fun sequins and sprinkles!!  Honestly the possibilities are endless!
Let me show you what I made with those beauties!
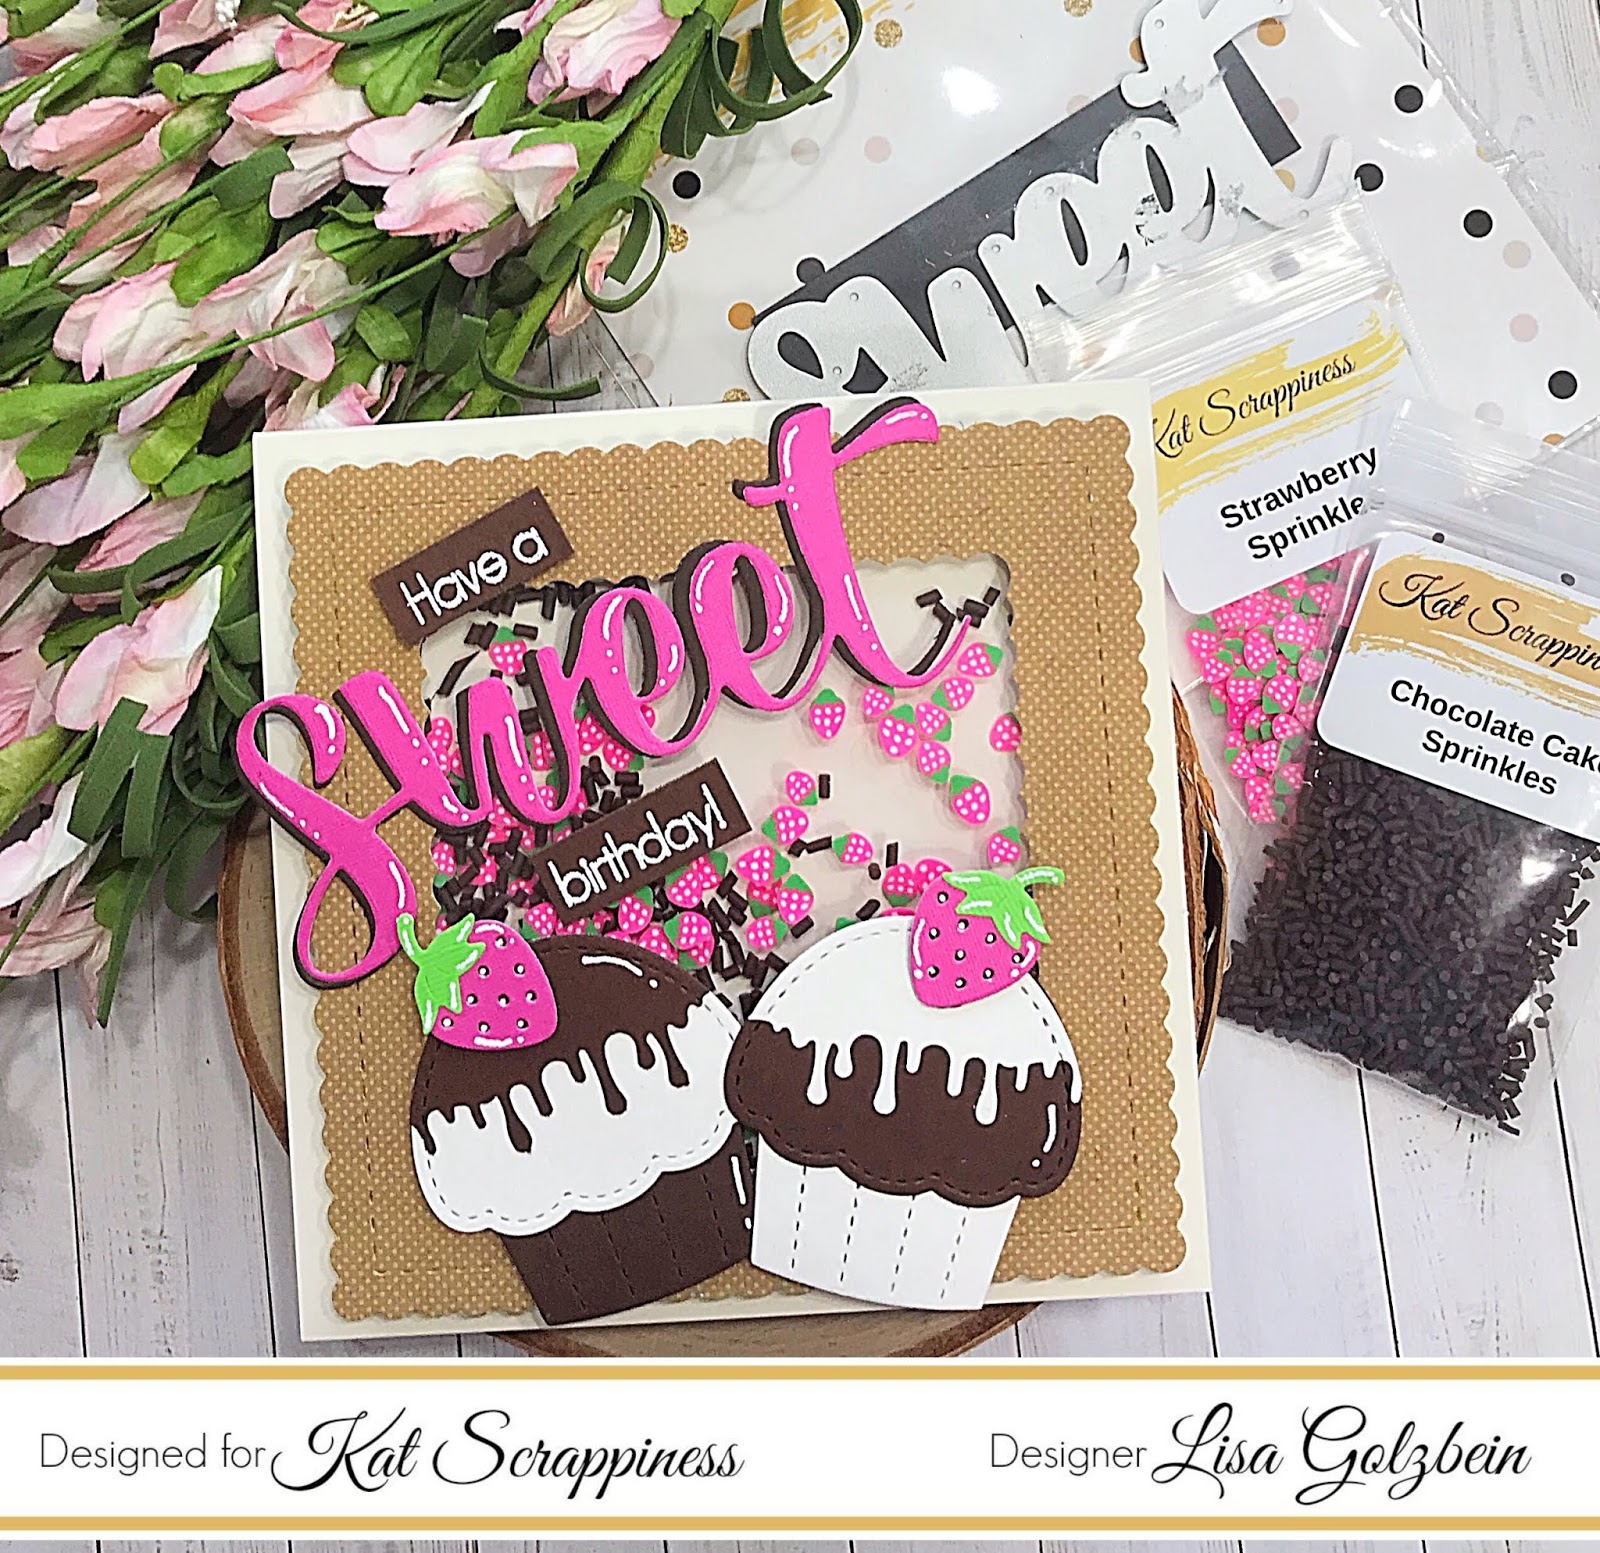
The first project is a card I made for my Mom's birthday.
She is a huge fan of cupcakes..... the cuter the better!
The Lawn Fawn Stitched Cupcake Dies were the perfect dies to use for her card.


The Kat Scrappiness Stitched Scalloped Square Dies were the perfect dies to create the 
frame for this shaker tag. For the clear portion behind the frame I used the 
Lawn Fawn Acetate Sheets. Once the frame was made I filled it with the 
To complete the sentiment on my card I used the Sweet Word Sentiment Die.
I die cut it out of pink paper and backed it in another layer cut with brown
paper to give it a matted look and make it stand out more.

I loved adding the second layer on the cupcakes to make it look like the frosting
was dripping down.  My mom LOVED her card and I LOVED making it for her!

The next 3 projects are shaker tags that I made using more of the fun 
sprinkles and sequins from the shop. 
Since I couldn't get enough of those cute Lawn Fawn Stitched Cupcake Dies,
I made a tag using the cupcake and I cut the frame out using some Doodlebug
patterned paper from the Stitched Scalloped Nesting Tag Dies.


I stamped the sentiment in pink and yellow ink from the Lawn Fawn Tiny Tag Sayings
stamp set inside my shaker tag. I love how the sentiments are hidden by the shaker bits 
until you shake them out of the way!


For this shaker tag I used the Sweet Candy Sprinkles and the Cupcake Sprinkles to fill it up with.
I also added some Pink Solid Confetti Mix to the outside front of the shaker tag.


The last 2 tags I have to share with you are from a fun planner meet up that my daughter
Taylor hosted recently.  They decided to do a make and take project and thanks to 
Mona Toth, I had the idea to dress up mini mason jar cups with a sweet shaker tag!
You can see Mona's sweet project on Instagram here.


These sweet tags were made using the Stitched Scalloped Rectangle Dies for the frame
and some vellum for the base.  To fill these 2 tags I used some glitter and Watermelon Sprinkles 
on one and some Pink Flower Sprinkles in the other.


To decorate the fronts of these tags I used the Lawn Fawn "Flamingo Together" stamp set
and the Lawn Fawn Aloha Stamp and Die Set for the pineapple and sunglasses.
The girls had a great time making these tags and everybody took their creations home
to enjoy! Here is a link to the Instagram post with all of the pictures from the event.
Here's my little secret....... we had a very dear friend of Kat's at our little meet up
to make a shaker tag and have some fun with us!
My second little secret is that Taylor made the second tag with 
the Pink Flower Sprinkles and she had a lot of fun doing it!
All the girls had a blast using their very own mixture of different sequins and shakers!


WHEW! That was a long post with lots of pictures but I had so much to share
with you!  I hope I have inspired you to do a little 
SHAKING, RATTLING AND ROLLING YOURSELF! 
There are certainly enough shaker bits to choose from in the Kat Scrappiness
store to make some fun and unique projects!

If you'd like to purchase any of the products I've linked above 
make sure you use code
LISA10
to save 10% on your order.
I'll include a complete supply list down below for your convenience.

Thanks for stopping by today!
Have a nice day, I already am!
πŸ‰Lisa πŸ“

Product List of Supplies used:


Chocolate Cake Sprinkles
Watermelon Sprinkles
Strawberry Sprinkles
Pink Flower Sprinkles
Sweet Candy Sprinkles
Cupcake Sprinkles
Pink Solid Confetti Mix

Stitched Scalloped Nesting Tag Dies
Stitched Scalloped Rectangle Dies
Stitched Scalloped Square Dies
Sweet Word Sentiment Die

Lawn Fawn Acetate Sheets
Lawn Fawn Stitched Cupcake Dies
Lawn Fawn Aloha Stamp and Die Set
Lawn Fawn Tiny Tag Sayings


Monday, June 3, 2019

Get Creative Challenge - #81

Hi everyone!  I'm back today with another project for
The challenge for June for the pink team is Anything Goes
with an optional twist "your favorite color combo"
and goes from 6/3 - 6/30. 
Thank you to the Etsy shop Pattie's Creations for 
sponsoring the challenge this month! 
She has some adorable digital art, make sure to check her out!
I was so excited to work with the fun Party Gnomes image this month!
Here is my birthday card using my favorite color combo
pink and teal!


I colored those fun party gnomes with some of my favorite
Copic marker colors and popped them up on a fun polka dotted
background. The sentiment is from a Queen and Co. 
word die set. My polka dotted panel is an older Papertrey Ink
patterned paper and I cut it out using the 
Wonky Wavy Stitched Rectangle die from Kat Scrappiness.

I love how this card came out, and I just LOVE those cute gnomes!
Check out what the other DT members have created for you this month!

I hope you'll join us and play along, 

Have a great day everyone! 
I already am!
πŸ§™πŸ»‍♂️Lisa πŸ§™πŸ»‍♂️

Sunday, April 7, 2019

Lovely Florals


Hello again crafty friends!
I love floral cards but I don't make them nearly enough!
I had so much fun playing along with the MFT sketch challenge
last week, I thought I'd play along again!
I was so excited to win last week and I did some fun crafty shopping
(plus a little more)πŸ˜‰ in the MFT store!
What a generous prize!
Today I have some pretty My Favorite Things 
flowers to share with you.
This card was originally made for the MFT Wednesday Sketch Challenge #431
originally but I also noticed that The Card Concept Challenge #112 theme
is Cottage Florals right now so I am entering this card in both challenges.


I used the Watercolor Flowers and the Delicious Birthday stamp sets 
from My Favorite Things for my card.
After playing ink pad roulette for a while, I finally came up
with a combination of colors from Stampin Up and Papertrey Ink
that I liked for the flowers and leaves.
I finished the card off with some pink Nuvo drops.
I love how this card turned out, it's very pink and
dainty, my favorite type of card!

Thanks for stopping by and have a great day!
I already am!
🌸Lisa 🌸


Thursday, January 17, 2019

Foxy KaDoodle Bug Cards

Good morning crafty friends!
For the past 2 weeks the KaDoodle Bug design team has been sharing
Winter Birthday cards in their Facebook group.
I have 2 adorable cards I wanted to share with you using some of the adorable
fox images in the shop.
The first card features 2 foxes from the Playful Foxes file.
I just love those sweet little foxes and I was inspired by the recent 
My Favorite Things release and their adorable foxes!
I made a birthday card using 2 of the sweet images from the file.


The scalloped rectangle panels are from Neat and Tangled and I used
pink polka dot paper from Papertrey Ink for the larger panel.
 The sentiment is from a My Creative Time stamp set called Sweet Wishes.
The hearts are from one of my Recollections punches 
and for the arrows I used a die set from Little B called Party.
I am totally smitten with this card and I LOVE how it turned out!
I can't wait to give it to a sweet someone for their birthday!

For my second birthday card I used the adorable fox image from 
the Woodland Foxes file.


I started by cutting a panel of watercolor paper from the Fancy Frame Dies
by Craftin Desert Divas. I used Peacock Feathers distress ink to give the 
center of the panel a wash of color for my background.
The beautiful Happy Birthday sentiment is from a Close To My Heart
stamp set called Joyful Birthday Occasions and the 
foxy letters are from the Lawn Fawn Quinn ABC's dies.
I just love how that cute little fox looks with his sweet little party hat!

I am thankful that the theme was Birthday because I never seem
to have enough birthday cards on hand!

Thanks for stopping by today to check out my fun foxy cards!
Check out the KaDoodle Bug shop for lots more adorable SVG and Print and Cut
files!  There are some really cute new dragon files available that I will be using soon!

Have a great day, I already am!
🦊Lisa 🦊


Thursday, December 13, 2018

Purr-fect Birthday

Hello everyone! I'm up on the Kat Scrappiness blog today and I have an adorable
birthday shaker card to share with you featuring 
one of those adorable kitties from Newton's Nook!
My card for today uses several fun products from the Kat Scrappiness shop
including the stamp set Birthday Bash by Newton's Nook!
Here's a look at the card I made:


I used the Stitched Scalloped Rectangle Dies to make a frame 
for the shaker element on my card and instead of using
acetate for my window I decided to use vellum to 
give it a softer look. On the vellum I stamped the confetti and the
sentiment from the stamp set with Versamark Ink and then I heat embossed 
The cute birthday kitty was colored with copic markers and was
given highlights with my Uni-Ball White Gel Pen.
I then popped up kitty up on foam tape on the front of the shaker.
My shaker element is filled with lots of 
For the base of my card I used Kraft cardstock and I embossed 
some teal cardstock with a pawprint pattern. I adhered the teal panel
to the base with Nuvo adhesive.
Here is a close up look at the card so you can see the 
pretty confetti behind the vellum window:


Thanks for stopping by today and if you'd like to recreate this card
you can use code Lisa10 in the shop to save 10% on your entire order!

Have a great day everyone!
I already am!
🐱Lisa 🐱


Thursday, July 5, 2018

Patriotic Birthday Card

Good morning crafty friends, today I'm up on the Kat Scrappiness blog 
to share a new card with you!  

I hope everyone who celebrates the 4th of July had a safe and enjoyable day yesterday!  
In honor of the 4th I thought I'd use the new 
Crafter's Essentials 1 dies to share a patriotic birthday card with you!
The Crafter's Essentials dies have 13 individual dies in the package and there are literally an endless number of combinations available for making cards.  These dies are a cardmaker's best friend! There is a great picture showcasing 9 different sketches as examples using these dies which I'll share below. 
My card was a quick and easy one to make and I decided to use quite a few different embossing folders on the card to give it a lot of texture.
I used polka dot folders on the card background and mini polka dots on the letters from the Condensed Lowercase Alphas. The smaller white panel was embossed with a brick background folder and the circle die was run through my paper crimper to give it some texture as well.
I heat embossed my sentiment from Everyday Brush Strokes on to the blue strip across the circle in white.  I popped the circle, stars, white panel, sentiment and letters on foam tape to give it even more dimension.  Here is a picture of all the supplies used.  

Head over to the shop today to take advantage of the sale going on.  15% off storewide and a free sequin package with all orders!

Thanks for stopping by today, all products will be linked below.
Have a great day everyone!
I already am!
πŸ‡ΊπŸ‡ΈLisa πŸ‡ΊπŸ‡Έ

Sunday, June 3, 2018

Angie's Digital Stamps June Challenge

Welcome back to another monthly challenge over at Angies Digital Stamps. This week I  chose to play with this adorable Heart cupcake image from Angies shop.  It paired so well with this cute sentiment from a Clearly Besotted stamp set I had.  I colored the cute little cupcakes with some copic markers and added some glitter to the hearts on top of the cupcakes.  I added some tiny metal seed beads to the shaker element on the card  
This month is challenge #21 and it runs from 6/3 - 6/29
 and the theme is Anything goes with an optional twist Bingo
(Use any 3 across, down, or diagonal.)
I used the middle horizontal line for my card.
Blue cupcake, Glitter on the hearts and Metal seed beads in the shaker.

Make sure to visit the other Design Team members blogs and see the beautiful cards they've created! Please remember you have all month to play along.
See challenge blog for official rules and have fun!
Thanks for stopping by and have a great day, I already am!
🍰Lisa 🍰