Showing posts with label KaDoodle Bug Design Team. Show all posts

Tuesday, April 2, 2019

You Mocha Me Crazy


Hello crafty friends, I have another design team project for 
KaDoodle Bug Designs! Today I made a super cute shaker tag using 
an image from the Valentine Frappuccino Cutie file.


I am totally in love the that cute frap and her big eyes!
I used a Stitched Scalloped Nesting Tag from Kat Scrappiness for the base.
I die cut 2 tags at the same time inside of one another to get the frame 
for the shaker. I cut the larger tag a second time from pink polka dot 
paper from Papertrey Ink for the back of the tag.
All the pretty sequins inside of the tag are from the 
I used at least 3 different pink mixes to get some real sparkle!
The heart banner at the top is from Jaded Blossom and it is called
Banner Dies. These banners are so cute because they come with the 
banner and the nesting shape for inside!
A few Kat Scrappiness Pink Jewels and some Stickles 
on the hearts and this tag was done and CUTE!
The sentiment is also from the KaDoodle Bug file where I 
got the cup and I matted it on some pink paper.

Thanks for stopping by today and if you do any shopping
at Kat Scrappiness you can always use my code Lisa10 
at checkout for 10% off your order anytime!

Have a great day, I already am!
πŸ’“Lisa ☕️ 


Wednesday, March 6, 2019

If Friends Were Flowers I'd Pick You

Hello crafty friends!
 I want to share a cute card that I made using an adorable 
image from KaDoodle Bug Designs with some beautiful spring colors!


This adorable bear is part of a trio of images called 
Busy Bee Bears and is available for download at KaDoodle Bug Designs.
They seriously have some of the cutest critters for any occasion!
I knew this sweet bear needed a flower filled frame with some
pretty pastel colors!

My friend MaryAnn over at Paper Dreamz has already done the 
legwork for me and put together this wonderful combo 
of Distress Oxides for the perfect Spring palette!

and

I blended all 5 of those colors on to some Bristol Smooth card stock
and then I cut out the panel with the Outline Floral Frame
from Simon Says Stamp. It is breathtaking how gorgeous
that frame looks in those colors!

I stamped the sentiment from the Whimsical Flowers 
stamp set also from Simon Says Stamp on to the base of the
card. Next I die cut the word "you" (also SSS) in pink glitter paper 
and glued it under the sentiment.

After I adhered the frame down with liquid adhesive
I placed the bear image on the card with foam tape.

Now the fun part! I took some Kat Scrappiness
jewels in 3 different colors and glued them all over the 
card for some beautiful sparkle and shine!
Here they are:
and


This card is like a breath of fresh air and I adore the pastel colors!

Thanks so much for stopping by today!
I love sharing my cards with you and I hope I've 
inspired you to create your own pastel Spring themed card!

If you are interested in any of the supplies that I linked to in
the Kat Scrappiness store you can use code LISA10 to save 10%
on your entire order anytime!

Have a great day, I already am!
🐻Lisa 🐻


Tuesday, November 20, 2018

You Mocha Me Crazy

Hello crafty friends, I have a card to share with you today!
I'm interrupting this winter holiday cardmaking time of year to bring
you a card with pink and hearts for a day!
I'm up in the KaDoodle Bug Facebook group today and for my design
team project I used an adorable file called
Valentine Frappuccino Cutie!
I saw an awesome video on the Unity Facebook page and fell in love
with the technique they showed.  They made their own background for a donut 
card and I knew I had to try it out!
Here is the card I made with the cute Frappuccino image
and the handmade background.


I started with a piece of Bristol Smooth Cardstock and die cut a panel
I then stamped a scribbled heart image in Versamark Ink from a Maymay Made It 
stamp set called "Love Is".


I heat embossed the hearts with WOW gold embossing powder.
The next step was to mask off the outer edge of the card with purple tape and 
ink the panel with Spun Sugar Distress Oxide Ink.

After I was done sponging I removed the tape to reveal a crisp white border.
The gold hearts had white areas in between the embossing so 
I colored them in with my Copic marker RV21 for a little
added color. Next came the fun part, splattering the background
with 2 different color oxide inks.

I smooshed the colors on to my Tim Holtz media mat
and sprayed them with water.  I put my paintbrush into the colors
and tapped them onto my background.  I just love the effect I get from
splattering paint randomly on my cards!


The only thing left to do was to pop my cutie Frappuccino up on 
some foam tape and add my sentiment!

I am in love with this background and I think I will be making a lot more
of them!  There are so many colors, stamps and themes it could be used for.

I'm so glad you stopped by today, I hope you like my card and technique!
Have a great day, I already am!
πŸ₯€Lisa πŸ₯€


Tuesday, October 16, 2018

I Love You S LO W Much!

It's Tuesday so it's my day to share another project with you from the Kadoodle Bug Design Team!
Where are my sloth fans? Is there such a thing? 
🀷🏼‍♀️ πŸ€·πŸΌ‍♀️ πŸ€·πŸΌ‍♀️ πŸ€·πŸΌ‍♀️
These cute little sloths seem to be everywhere these days and after making this card, 
I just might be a sloth fan too!


This adorable little sloth file from Kadoodle Bug Designs is available for only $1.00.
Click on this picture to see her and so many more adorable SVG and clipart files:


This card came together so quickly with the help of some of my 
FAVORITE Kat Scrappiness dies!

The BEST part is that you can save 10% on your order at Kat Scrappiness 
if you use my code Lisa10 at checkout!
You will find tons of crafty supplies for sale including stamps, ink and so much more!

For the border of my sloth panel I used the largest die from the Stitched Postage Stamp Rectangles and I inked the edges with Mermaid Lagoon Distress Oxide Ink.  I wanted a little more color for the background so I cut another panel out of some Bitty Big Sweet Blush polka dot paper from Papertrey Ink. I used the Stitched Postage Stamp die again and then 
cut the panel  down with one of the dies from the Stitched Scalloped Border Dies.
I inked the edge of the polka dot paper with the same ink for consistency.

All that was left was the sentiment and after searching tons of sloth sentiments...
Yes that is a searchable thing 
🀣πŸ€ͺπŸ˜‚πŸ˜‰
I settled on "I love you s-l-o-w much"
The "I Love You" and the word "much" are from an older Lil' Inker stamp set called Rainbow and Cloud Sentiments and I stamped the word "slow" with a Stampin' Up set called 
Rough Type just to make it look a little quirky!

Thanks so much for stopping by today, make sure to leave me a quick hello so I know you were here and so I can come visit your blog if you have one!

I hope you go get crafty and enjoy your day, I already am!
🌸Lisa 🌸


Tuesday, October 2, 2018

Adorable Apple Gift Bag

Welcome back to my blog! 
Today I have another adorable Design Team project  to share with you from 


These days our teachers have so much to deal with besides reading, writing and math, we need to give them all the appreciation they so richly deserve!
One way is to give them little gifts throughout the year and this 
ADORABLE gift bag is a cute way to dress up a little treat! 

This cutie patootie apple is called 
School Apple Cutie and the file to make it
can be found in the KaDoodle Bug Designs shop here.

I made the tag with a Papertrey Ink tag die and two sentiment dies and 
the large scalloped circle was cut out of notebook paper with the largest Stitched Scalloped Circle die from Kat Scrappiness.

Thanks again for joining me today!
Enjoy your day, I already am!
🍎Lisa🍎


Thursday, September 27, 2018

Frap Bear and PSL's


Hello again, are you ready for some more Fall themed projects?  
I'm up again today on the KaDoodle Bug Facebook page with 
another adorable design team project!  

This just might be the first Fall season ever that I finally try a Pumpkin Spice Latte! 
It might be due to this adorable Frap Bear I found over in the KBD shop! 
Oh she is so stinkin' cute I can't even stand it! 

Since one project was not enough I created 3! 
I made the card pictured above using some patterned paper from Papertrey Ink and the Stitched Scalloped Rectangle Dies from Kat Scrappiness.
I stamped the sentiment onto a Stitched Flag Die also from Kat Scrappiness and layered it onto 2 more in orange and black.

The second project is a tag using the print and cut file from the 
Frap Bear image in the KaDoodleBug shop.  
I die cut a tag out of burlap and added some fun twine and ribbon to the top.
I glittered up the pumpkin and leaves with some sparkly 
Stickles just like in the card above.


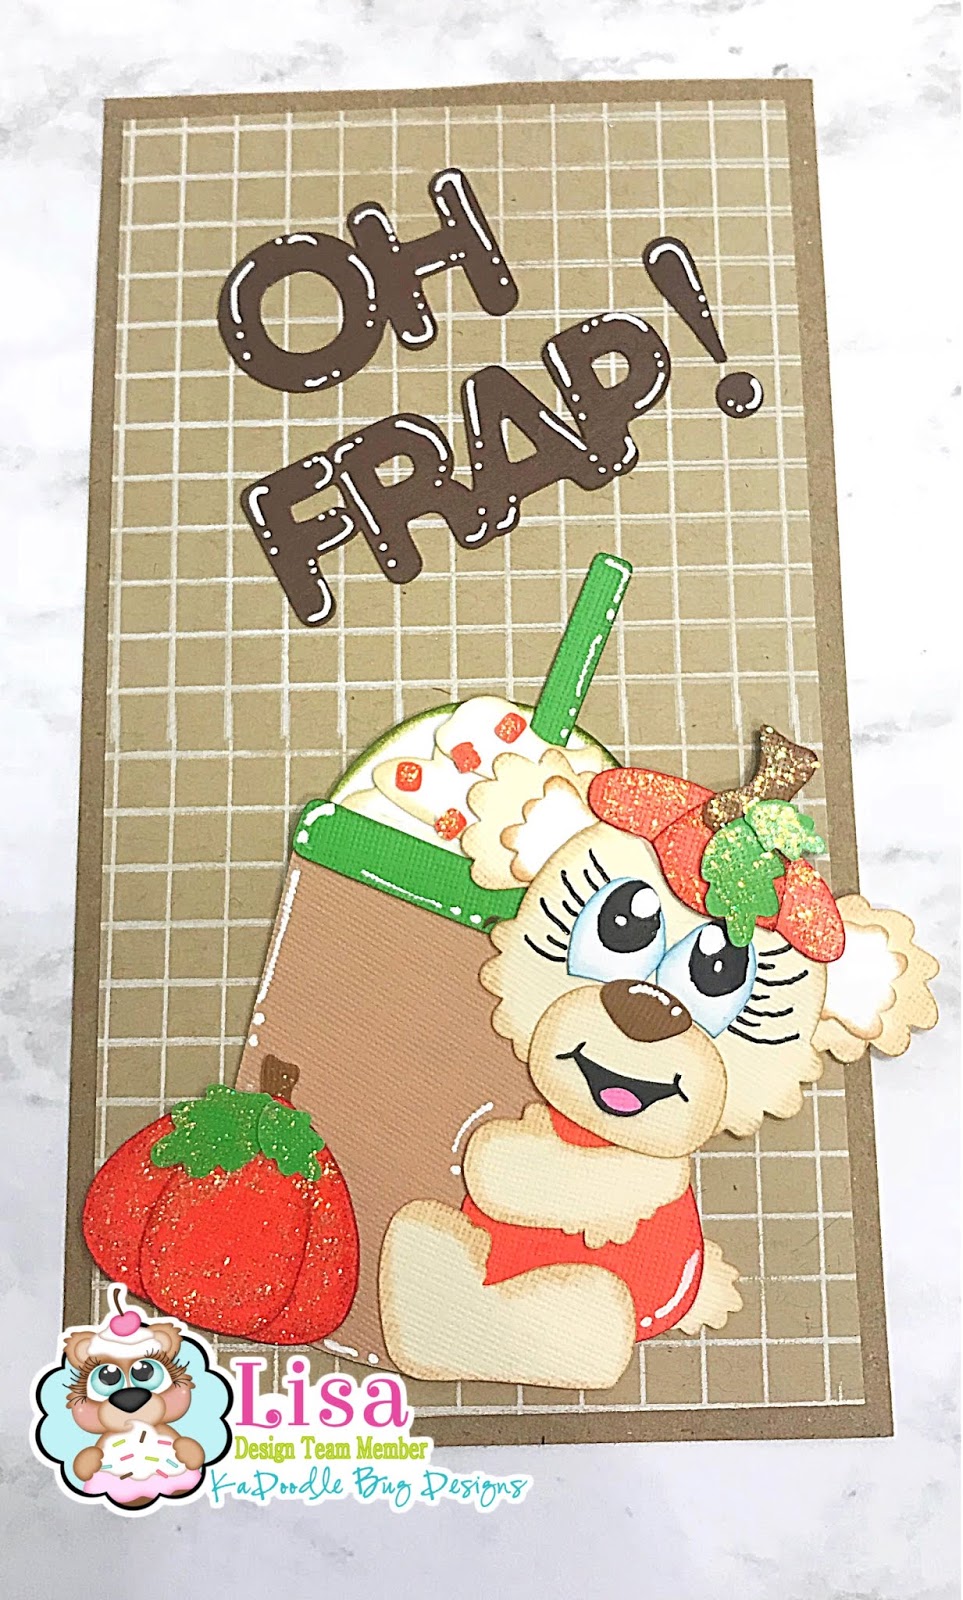
 The 3rd and final project was a dashboard I created for my daughter's planner!
She usually wants one of every cute thing I create!  It sure makes for one cute planner!
I sized the Frap Bear down a bit from it's original size to fit on this dashboard.
The background grid stamp is from Papertrey Ink and the "Oh Frap" sentiment 
I cut out using my Brother Scan N Cut and 
added some highlights with my white Gelly Roll pen.
I have been loving these pens in the #10 size.  
They are so bright and white and they go on smoothly on dark paper!


Well that's all the Pumpkin Spice Latte goodness I have for you today! 
I might have to get over to Starbucks, or Dunkin Donuts and finally try one of these 
Pumpkin Spice Lattes after all! 

Enjoy your day and get in some crafty time today with your PSL's!
I'm headed back to the craft table to enjoy mine!
πŸŽƒLisa πŸŽƒ


Tuesday, September 25, 2018

Witchy Bears Trio


These 3 cuties just flew into town and they brought treats!!!
They must know me very well!
🍫🍫🍫🍫🍫🍫

I just fell in love with these Witchy Bears the minute I saw them!
You can find them in the KaDoodle Bug Designs online shop and 
so many other adorable SVG files at great prices!

I have been enjoying creating with these SVG files!  
They are so easy to download and send over to my Scan N Cut machine.  
I separate the colors on the screen and then tape the coordinating colors of paper
down to my mat and the machine does the rest! 
Easy Peasy Lemon Squeezy!

I added some fun gold glitter paper to my Witchy Bears brooms 
today and I thought they would look adorable attached to some treat bags 
with tiny clothes pins. 
Here are some individual pics of the trio!


Wouldn't these be adorable treats to pass out at a kids Halloween party!

Well that's my design team project for today!
Make sure to check out the fun projects from all the DT members in 

Have a great day!
I already am!
🍫Lisa🍫


Tuesday, September 18, 2018

Exciting Announcement!


I have some exciting news to share with you today! I am delighted to announce that I am joining the talented Design Team at 
I wanted to thank Melissa for this amazing opportunity to show off some of the cutest SVG images around.  For my first project I will be sharing one of the Cute Animals from the new releases.
Melissa has designed some adorable Halloween animals and I've chosen to use the 
on my card for today.


This little tiger is dressed as a ghost and couldn't be more cute!
I die cut some colorful patterned paper from Papertrey Ink with the 
from Kat Scrappiness.
For the"BOO"letters I used the 
Stitched Alphabet Dies from 
Craftin Desert Divas.
I love how this card came out and I am looking forward to working with more of these cutie patootie images!
Thank you for stopping by today and have a great day, I already am!

πŸ‘»LisaπŸ‘»