Thursday, April 16, 2020

Paper Sweeties April 2020 Release Rewind


Hello everyone and welcome to the Paper Sweeties April 2020 Release Rewind!
Today we are introducing 2 new stamp sets that are part of the April Sweet Kit.

and 

Here's a look at these 2 sets:


Sweet Mini Duo: Just a Note Stamp Set 
Sweet Mini Duo: Have a Happy Day Stamp Set

These sets are part of the Sweet Kits Quarterly Club.
You can read all about member benefits HERE!
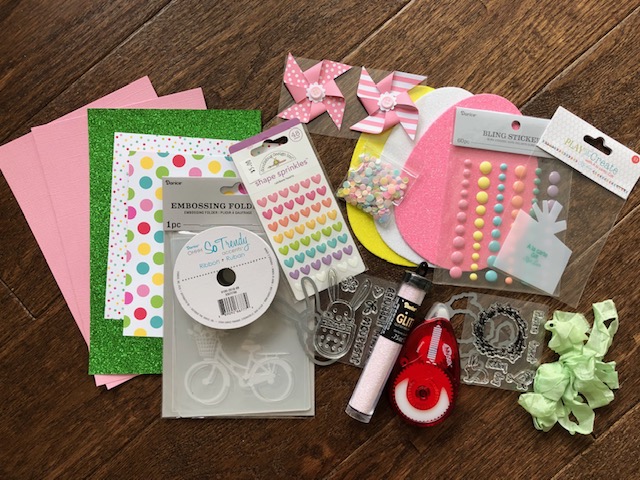
Here's a look at all the fun goodies you'll receive in this month's quarter kit!


I am in love with all the sweetness in this month's kit and I made a card using one of the gorgeous pinwheels from the Sweet Kit. The "Love" die cut is from the Sweet Cuts Wishes set and the "ya bunches" is from the For You stamp set. I masked off the word love from the sentiment so I could use the die cut instead.  I also added some of the pretty pastel sequins from the 
Sweet Kit to finish off my card.


If you’re not interested in the AWESOME Kits, at this time you can find the sets created exclusively for the quarter kits in the Sweet Minis category on our website … WHILE SUPPLIES LAST.  These sets are created for the kits and will NOT be restocked after they sell out!!
 Please continue to hop along and visit our talented Design Team Contributors’ blogs to be inspired by their AMAZING projects:
Debbie Marcinkiewicz – Paper Sweeties 

 Thanks so much for visiting and looking around today and be sure to stay tuned to Paper Sweeties social media for more inspiration during the month from the April Sweet Kit!

Have a sweet day, I already am!
🐰Lisa 🐰 

Wednesday, April 15, 2020

Paper Sweeties April 2020 Release Party


Hello everyone and welcome to the Paper Sweeties April 2020 Release Party!
Today we are introducing 2 new stamp sets that are part of the April Sweet Kit.

and 

Here's a look at these 2 sets:


Sweet Mini Duo: Just a Note Stamp Set 
Sweet Mini Duo: Have a Happy Day Stamp Set

These sets are part of the Sweet Kits Quarterly Club.
You can read all about member benefits HERE!
Here's a look at all the fun goodies you'll receive in this month's quarter kit!


I am in love with all the sweetness in this month's kit and I made a tag using the adorable bunny  from the Sweet Mini Duo: Just a Note Stamp Set ! I also used the For You stamp set and Sweet Cuts die for the tag and sentiment.  
I finished the tag off with some enamel dots and ribbon from the Sweet Kit.


If you’re not interested in the AWESOME Kits, at this time you can find the sets created exclusively for the quarter kits in the Sweet Minis category on our website … WHILE SUPPLIES LAST.  These sets are created for the kits and will NOT be restocked after they sell out!!
 Please continue to hop along and visit our talented Design Team Contributors’ blogs to be inspired by their AMAZING projects:
Debbie Marcinkiewicz – Paper Sweeties 

 Thanks so much for stopping by and be sure to stop by tomorrow for another project using the sweet products from the 
April Sweet Kit!

Have a sweet day, I already am!
🐰Lisa 🐰 

Tuesday, April 14, 2020

Caffeinated Personality


Good morning and welcome back to Lisa's ICU! The ICU is where I post my monthly Coffee Loving Cardmaker's projects and where I infuse caffeine in your veins via IV!
Just kidding but the image in my head is SOOOOO FUNNY!!

Anyway on to my card.  Today's card makes good use of some GORGEOUS patterned paper from Gracielle Designs. The patterned paper on my card is from a digital download and was made into a physical paper pack.  It is called Coffee Lovers Digital Pack and has 13 high quality 12"x12" printable patterned papers. I ordered the physical paper pack when it was available at Unity Stamps but it is no longer available.  Of course being the paper hoarder that I am, I had to order 2 packs.  I am seriously in LOVE with ALL the patterns in the pack.  I thought it would be fun to make the paper the main focus of my card since it is so full of color and personality!


For the large letter "C" on the front of the card I used the Mega Alphabet C die from Altenew. I grabbed up the whole alphabet during the holidays when they were on sale.  I love the large size of these letters and I wanted it to pop up off the card so I cut it out of the patterned paper and popped it up on foam and set it back in the negative space.  
This picture shows off the dimension in the letter C backed by foam.


To finish off my card I used one of the snarky coffee sentiments from The Rabbit Hole Designs stamp set called Perfectly Blended. I just love how the words pop when you heat emboss them in white on dark paper.

When you have such gorgeous patterned paper to start with, the rest of the card just falls into place!
Thanks for stopping by today for your caffeine fix!
Have a caffeinated day, I already am!
 ☕️Lisa ☕️ 

Paper Sweeties April 2020 Release Sneak Peeks!!


Hello everyone and welcome to the Paper Sweeties April 2020 Release Sneak Peeks!
Today we are introducing 2 new stamp sets that are part of the April Sweet Kit.

and 

Here's a look at these 2 sets:


Sweet Mini Duo: Just a Note Stamp Set 
Sweet Mini Duo: Have a Happy Day Stamp Set

These sets are part of the Sweet Kits Quarterly Club.
You can read all about member benefits HERE!
Here's a look at all the fun goodies you'll receive in this month's quarter kit!


I am in love with all the sweetness in this month's kit and I made a card using the adorable bunny  from the Sweet Mini Duo: Just a Note Stamp Set  and the sweetest little die cut flowers!


If you’re not interested in the AWESOME Kits, at this time you can find the sets created exclusively for the quarter kits in the Sweet Minis category on our website … WHILE SUPPLIES LAST.  These sets are created for the kits and will NOT be restocked after they sell out!!
 Please continue to hop along and visit our talented Design Team Contributors’ blogs to be inspired by their AMAZING projects:
Debbie Marcinkiewicz – Paper Sweeties 

 Thanks so much for stopping by and be sure to stop by tomorrow for another project using the sweet products from the 
April Sweet Kit!

Have a sweet day, I already am!
🐰Lisa 🐰 

Sunday, April 12, 2020

Bunny Tails


Hello there! If this is your first time here, welcome, so nice to have you!
Thanks for joining me on Easter, let's get to the card!
I'm up on the Kat Scrappiness blog today and I have a cute Easter card for you.
I die cut three of the Stitched Easter Bunny Outline dies out of kraft paper and lined them up across my card on some pretty patterned paper from my collection.
I gave each one of them a cut little White Bunny Tail and they look so cute!
I finished off this simple card with a Happy Easter stamp from an older Lawn Fawn set.

This card was super simple to make and would be a great card to reproduce if you had to make multiples. It is also an easy card to make with kids.

That's all for today, don't forget to follow Kat Scrappiness on all
social media platforms to be alerted to new releases, sales and giveaways!


Have a great day, I already am!
🐰Lisa 🐰 

Wednesday, April 8, 2020

Paper Smooches April Challenge


The Paper Smooches challenge for the beginning of April is all about beautiful pastel colors!

I was one of the lucky winners from the Paper Smooches March challenge and I decided to use one of the stamp sets I ordered with my gift certificate to make today's card.  I used the So Fairy Cute stamp set and I did a little masking to make my card.  I am just in love with that cute fairy bear and I decided to add lots of sparkle to my card! 


What a fun whimsical card and I just love using pastel colors!
Stay safe everyone and have a great day!
🧚‍♂️Lisa 🧚‍♂️ 

Sunday, April 5, 2020

Funny Bunny


Hello there! If this is your first time here, welcome, so nice to have you!
I'm up on the Kat Scrappiness blog today and I have a funny bunny card for you.
I die cut one of the Stitched Easter Bunny Outline dies out of brown paper and used a small circular scallop punch to take a piece of the bunny's ear and butt off. If you don't have a scallop punch you could easily use the smallest die from the Stitched Scalloped Circle dies to get the same effect.
Now it looks like someone took 2 bites out of your chocolate bunny. 

🐇 🐇 🐇  

The next step was to build my card.  I cut some white card stock to 4" x 5 1/4" and embossed it with a polka dot embossing folder from my collection and then adhered it to a teal card base. I used the same teal paper and cut a zig zag oval from the largest Zig Zag Oval dies and then cut one smaller circle using kraft paper.  I mounted my semi-eaten bunny on the kraft paper with foam tape.

All that was left was to stamp and mount my snarky sentiment from The Rabbit Hole Design's 
Sassy Sentiments with the same color card stock I had already used.

There you have it...... your funny bunny card.  It's good for Easter, Valentine's Day or just a funny card to lift someone's spirits! I hope you enjoyed today's card and you'll try looking at how you can use your dies in different ways.

That's all for today, don't forget to follow Kat Scrappiness on all
social media platforms to be alerted to new releases, sales and giveaways!


Have a great day, I already am!
🐰Lisa 🐰 

Saturday, April 4, 2020

Hope anchors the soul...


If you've visited my blog before then welcome back!
Today I am up on The Rabbit Hole Design's blog with this super cool anchor card.
The Old School Tattoo - Anchor  is my favorite stamp from the April release. I love how these tattoo stamps can be tailored to your needs whether you are making a masculine or feminine card just be changing up the colors. 
I loved coloring this anchor up with my Copic markers in a rainbow pattern and then giving it a real grungy feel with a faux metal background. I did some dry embossing with silver foil card stock for a really cool diamond plate effect.  The word HOPE comes from the Old School Tattoo - Affirmation stamp set and I made sure to ink the edges to add to the grunge feel of the card.  I finished off the sentiment with a computer generated strip that reads "anchors the soul". I love using my computer and printer for sentiments because I can tailor almost any card to fit my needs.

I can honestly say I LOVE everything about this card and I don't say that about every card, trust me!
I encourage you to check out the rest of the April release over at The Rabbit Hole Designs, you won't be disappointed! If you like the old school tattoo style than you'll be downright overjoyed!

Thank you so much for stopping by my blog today!

For more inspiration, updates, and news make sure to check out these places ...


Have a great day, I already am!
⚓️Lisa ⚓️

Wednesday, April 1, 2020

The Rabbit Hole Designs April Inspiration Hop - Day 3

Ok guys we made it to the final day of the April release for The Rabbit Hole Designs.
I don't know about you guys but I really love this release, these Old School Tattoos are so cool and have so many possibilities for color and design! They can be used for feminine cards, masculine cards and everything in between. The final 2 products we are showcasing today are the


Old School Tattoo - Affirmation stamp set
and the
Tattoo Icon Stencil


I had so much fun with the Affirmation stamp set and decided to make a post it note holder using one of the bird stamps from that set.


I thought it would be fun to decorate something other than a card and a post it note holder was the perfect size project for this stamp.  I found an easy tutorial on YouTube for a post it note holder and I made it out of black card stock.  I decorated it with bright patterned paper and after I colored the bird image I cut it out with a heart shaped die.  I matted it on a black heart and stuck it to the top half of the post it note holder. Sometimes it's fun to make something other than a card.


For my second project I made a birthday card using the Tattoo Icon Stencil.
I started by doing some rainbow ink blending with Distress Oxide Inks and stenciling black ink over the new stencil.  What a cool look! I finished the card off with a snarky sentiment from the
Sassy Birthday 2 stamp set. It's always nice to have an extra birthday card on hand.


Thank you for joining me for The Rabbit Hole Designs April release!
For more inspiration please visit the other design team member's blogs to see what they have made using the new products as well and check back often for more awesome Rabbit Hole inspiration!


Lisa
Michelle


GIVEAWAYS:
To celebrate the next three days of release, The Rabbit Hole Designs is giving away two gift certificates; one to a lucky Instagram Follower and one to a lucky Fan Page follower. Winner will be chosen at random from the comments left on the INSTAGRAM post, and tagging friends, and also from commenting on the Fan Page post. So make sure to head on over to INSTAGRAM and look for the giveaway post @therabbitholedesignsllc and look for the post at The Rabbit Hole Designs Fan Page by 11:59 p.m. PST 04-03-2020. Winner will be announced on The Rabbit Hole Designs blog 04-03-2020.

Thank you so much for stopping by my blog today!

For more inspiration, updates, and news make sure to check out these places ...


Have a great day, I already am!
🐦Lisa 🐦  

i-Crafter April Release Hop


Hello i-crafter fans! Today is an exciting day because we are releasing new never before seen products and you are going to LOVE them! Here is a list of the new products with links:


I have 2 projects for you today using the new products.


The first project is a calendar frame and I've decorated it using the 
Rose Heart and the Alphabet, Carly dies.


You would be surprised how difficult it is to get a good picture without a glare when you're photographing a lucite frame.  I had to take my project outside to avoid the glare in the house. That is why my frame is sitting in the grass. Here are 2 more views from the side so you can see the frame it is in.


The i-crafter products are so versatile and can be used for so many projects like home decor, gift giving and anything you'd like to decorate! I took some musical patterned paper and inked the edges with brown ink.  I printed out a blank April 2020 calendar from the internet and labeled it with the 
Alphabet, Carly dies cut from gold foil cardstock.  I added the beautiful Rose Heart die to the top of the paper after I water colored it.  I cut the outline out of gold foil paper and watercolored the inside of the petals with my Zig markers.  I did the same technique with the leaves. Once the calendar and rose accent were adhered I slipped my project into an 8x10 lucite frame so I could sit it up on my desk. I just love how this came out and it is a beautiful piece of decor to keep on my desk to show me April at a glance.

🌹 🌹 🌹 

For my second release project I made a beautiful thank you card using the new Doily die. This die is very large and intricate and cuts out absolutely beautifully! 


I decided to do some ink blending on some smooth paper with Spun Sugar and Squeezed Lemonade Distress Oxide inks and then cut the Doily out from the inked panel. I backed the Doily with some vellum paper to give it a more soft look.  For the base of my card I used a pretty teal paper that I dry embossed with a tiny polka dot embossing folder.  I just love the texture it gives to any card.  I die cut the word THANKS out of some teal glitter paper using the Alphabet, Carly dies and adhered them to the middle of the doily.  To finish off my card and give it some shine, I added some flat backed clear jewels around the doily and the top and bottom corners of the card.


Make sure you hop around to all of the other design team member's blogs to see what they have created for you using the new products from the April release!
Here is the hop list:

Lisa

Thanks so much for joining me today for the April i-crafter release!
Have a great day, I already am!
🌹Lisa 🌹 


Tuesday, March 31, 2020

The Rabbit Hole Designs April Inspiration Hop - Day 2


Welcome back to my blog for the second day of the New Product Release for April 2020 over at The Rabbit Hole Designs and the theme for the next 2 days is OLD SCHOOL TATTOOS!

I hope you enjoyed all the amazing inspiration yesterday from the design team, we have so much more in store for you today and tomorrow! Today we are showcasing one more stamp set and one stencil.  They are the:

Old School Tattoo - Anchor
and the
Dotted Flower Stencil


If I'm being honest I have to say that the anchor stamp is my favorite stamp of this release! This anchor is way cooler than most because it has the heart and flower in it and the cool rope intertwined around it.  I just love everything about it! My first card uses the anchor and I did a bit of masking on my card.


I started by stamping the anchor on some masking paper and fussy cutting it out.  I then stamped the anchor again on the middle of the front panel of my card and placed the mask over it. Once the mask was down I took my wave stencil and laid it over top of the panel.  I used 3 different color distress inks over the stencil and when I was finished stenciling I peeled the stencil and the mask off for the big reveal. Here is a quick video of the reveal:


It's like magic, I love watching what is left behind when the mask is removed. The next step is to color the anchor with my Copic markers.  I have to admit it is a little nerve wracking to color directly on the already stenciled panel.  I always need to convince myself that I can start over if necessary, but who wants to do that? 
 😂 😂 😂 
Once the coloring was done, it was just a matter of stamping the sentiments on the card.  The "love" stamp is from the Love You More stamp set from a previous release. Instead of going on a scavenger hunt for a stamp that said "is" I decided to write it in.  I figure it's just 2 letters, how bad could it be? LOL! The "forever" stamp is from the anchor set and I just love that funky font!
I really love how this card turned out and I'm happy with the coloring as well.  I have done a lot of Copic color practicing over the years and it's just finally starting to click.  I'm not the best colorer out there but I'm happy with my progress up until now.


For my second card I used the Dotted Flower Stencil and I did some foiling with it.


Since I have a laser printer I like to do my foiling with the toner ink.  I started by placing the Dotted Flower Stencil over my card panel and inking it up in jet black ink.  It doesn't matter what type of ink you use because you're just going to photocopy it in the laser printer.
I placed the inked panel in my scanner on top of the printer and I printed the image on card stock. Then I placed some rainbow decofoil from Therm-O-Web over the printed image and ran it through my Minc. The results are breathtaking and the reveal is just as good as the masking results.


All that was left to do was to cut the panel down and mat it on to black card stock. I added a Happy Birthday sentiment and my card was done! The Dotted Flower Stencil is going to be one of my favorite stencils, I can already tell!


I hope you have enjoyed my cards today! For more inspiration please visit the other design team member's blogs to see what they have made using the new products as well!


Lisa


GIVEAWAYS:
To celebrate the next three days of release, The Rabbit Hole Designs is giving away two gift certificates; one to a lucky Instagram Follower and one to a lucky Fan Page follower. Winner will be chosen at random from the comments left on the INSTAGRAM post, and tagging friends, and also from commenting on the Fan Page post. So make sure to head on over to INSTAGRAM and look for the giveaway post @therabbitholedesignsllc and look for the post at The Rabbit Hole Designs Fan Page by 11:59 p.m. PST 04-03-2020. Winner will be announced on The Rabbit Hole Designs blog 04-03-2020.

Thank you so much for stopping by my blog today!

For more inspiration, updates, and news make sure to check out these places ...


Have a great day, I already am!
⚓️Lisa ⚓️