Friday, November 6, 2020

Fall/Winter Coffee Lovers Blog Hop 2020


Hello all of you Coffee Loving Card Making peeps!
Are you ready for another super duper Coffee Lovers Blog Hop?

Today is the day where we kick off the 2020 Fall/Winter Coffee Lovers Blog Hop and there are over 70 Super Sponsors participating and as usual they are giving away very generous prize packages!

Our fearless leader Amy Tsuruta has once again taken on the enormous task of running this amazing event and I am in awe of her every single time! Please make sure to show her some love and say thanks for all of the hard work she puts into this hop!

You can check out the main post on the Coffee Loving Cardmakers Blog here:
and for purposes of social media make sure you tag your projects with this hashtag:
Make sure you link up all of your fabulous projects during the week to be eligible to win some of the fabulous prizes being given away by the Super Sponsors!

☕️ ☕️ ☕️ ☕️ ☕️ ☕️ ☕️ ☕️ ☕️ ☕️ ☕️ ☕️ ☕️ ☕️ ☕️ ☕️ 

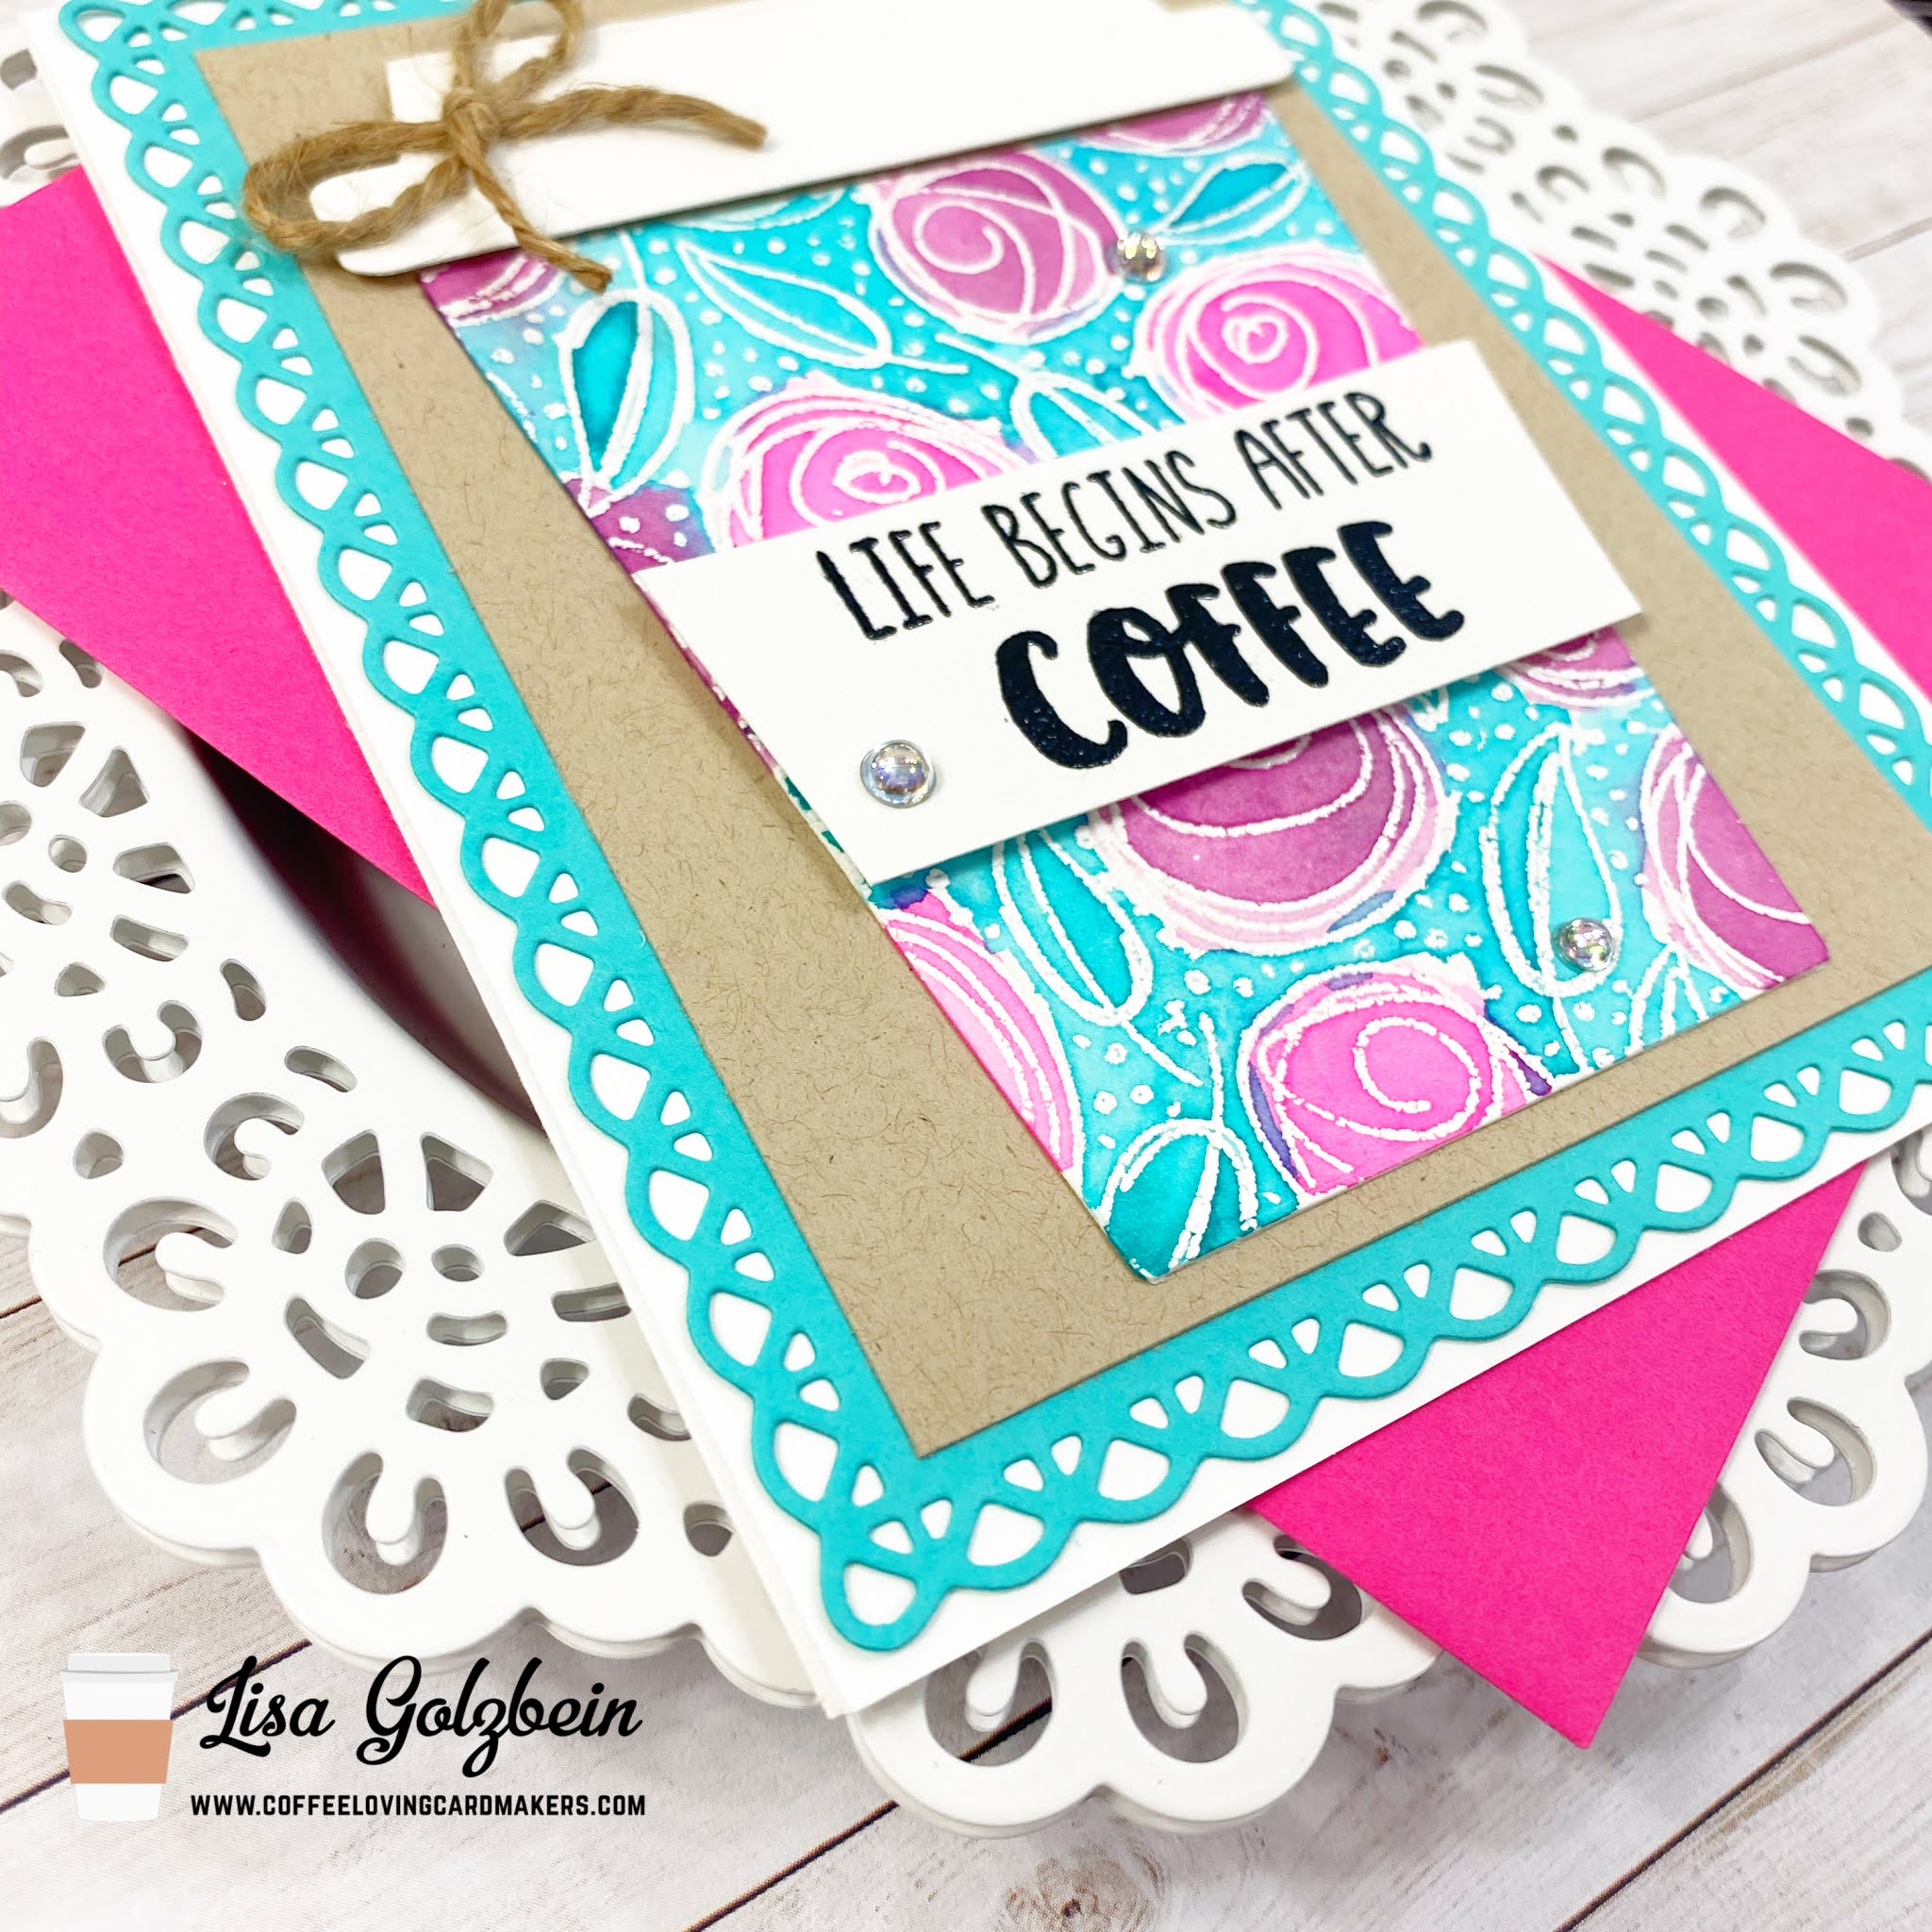
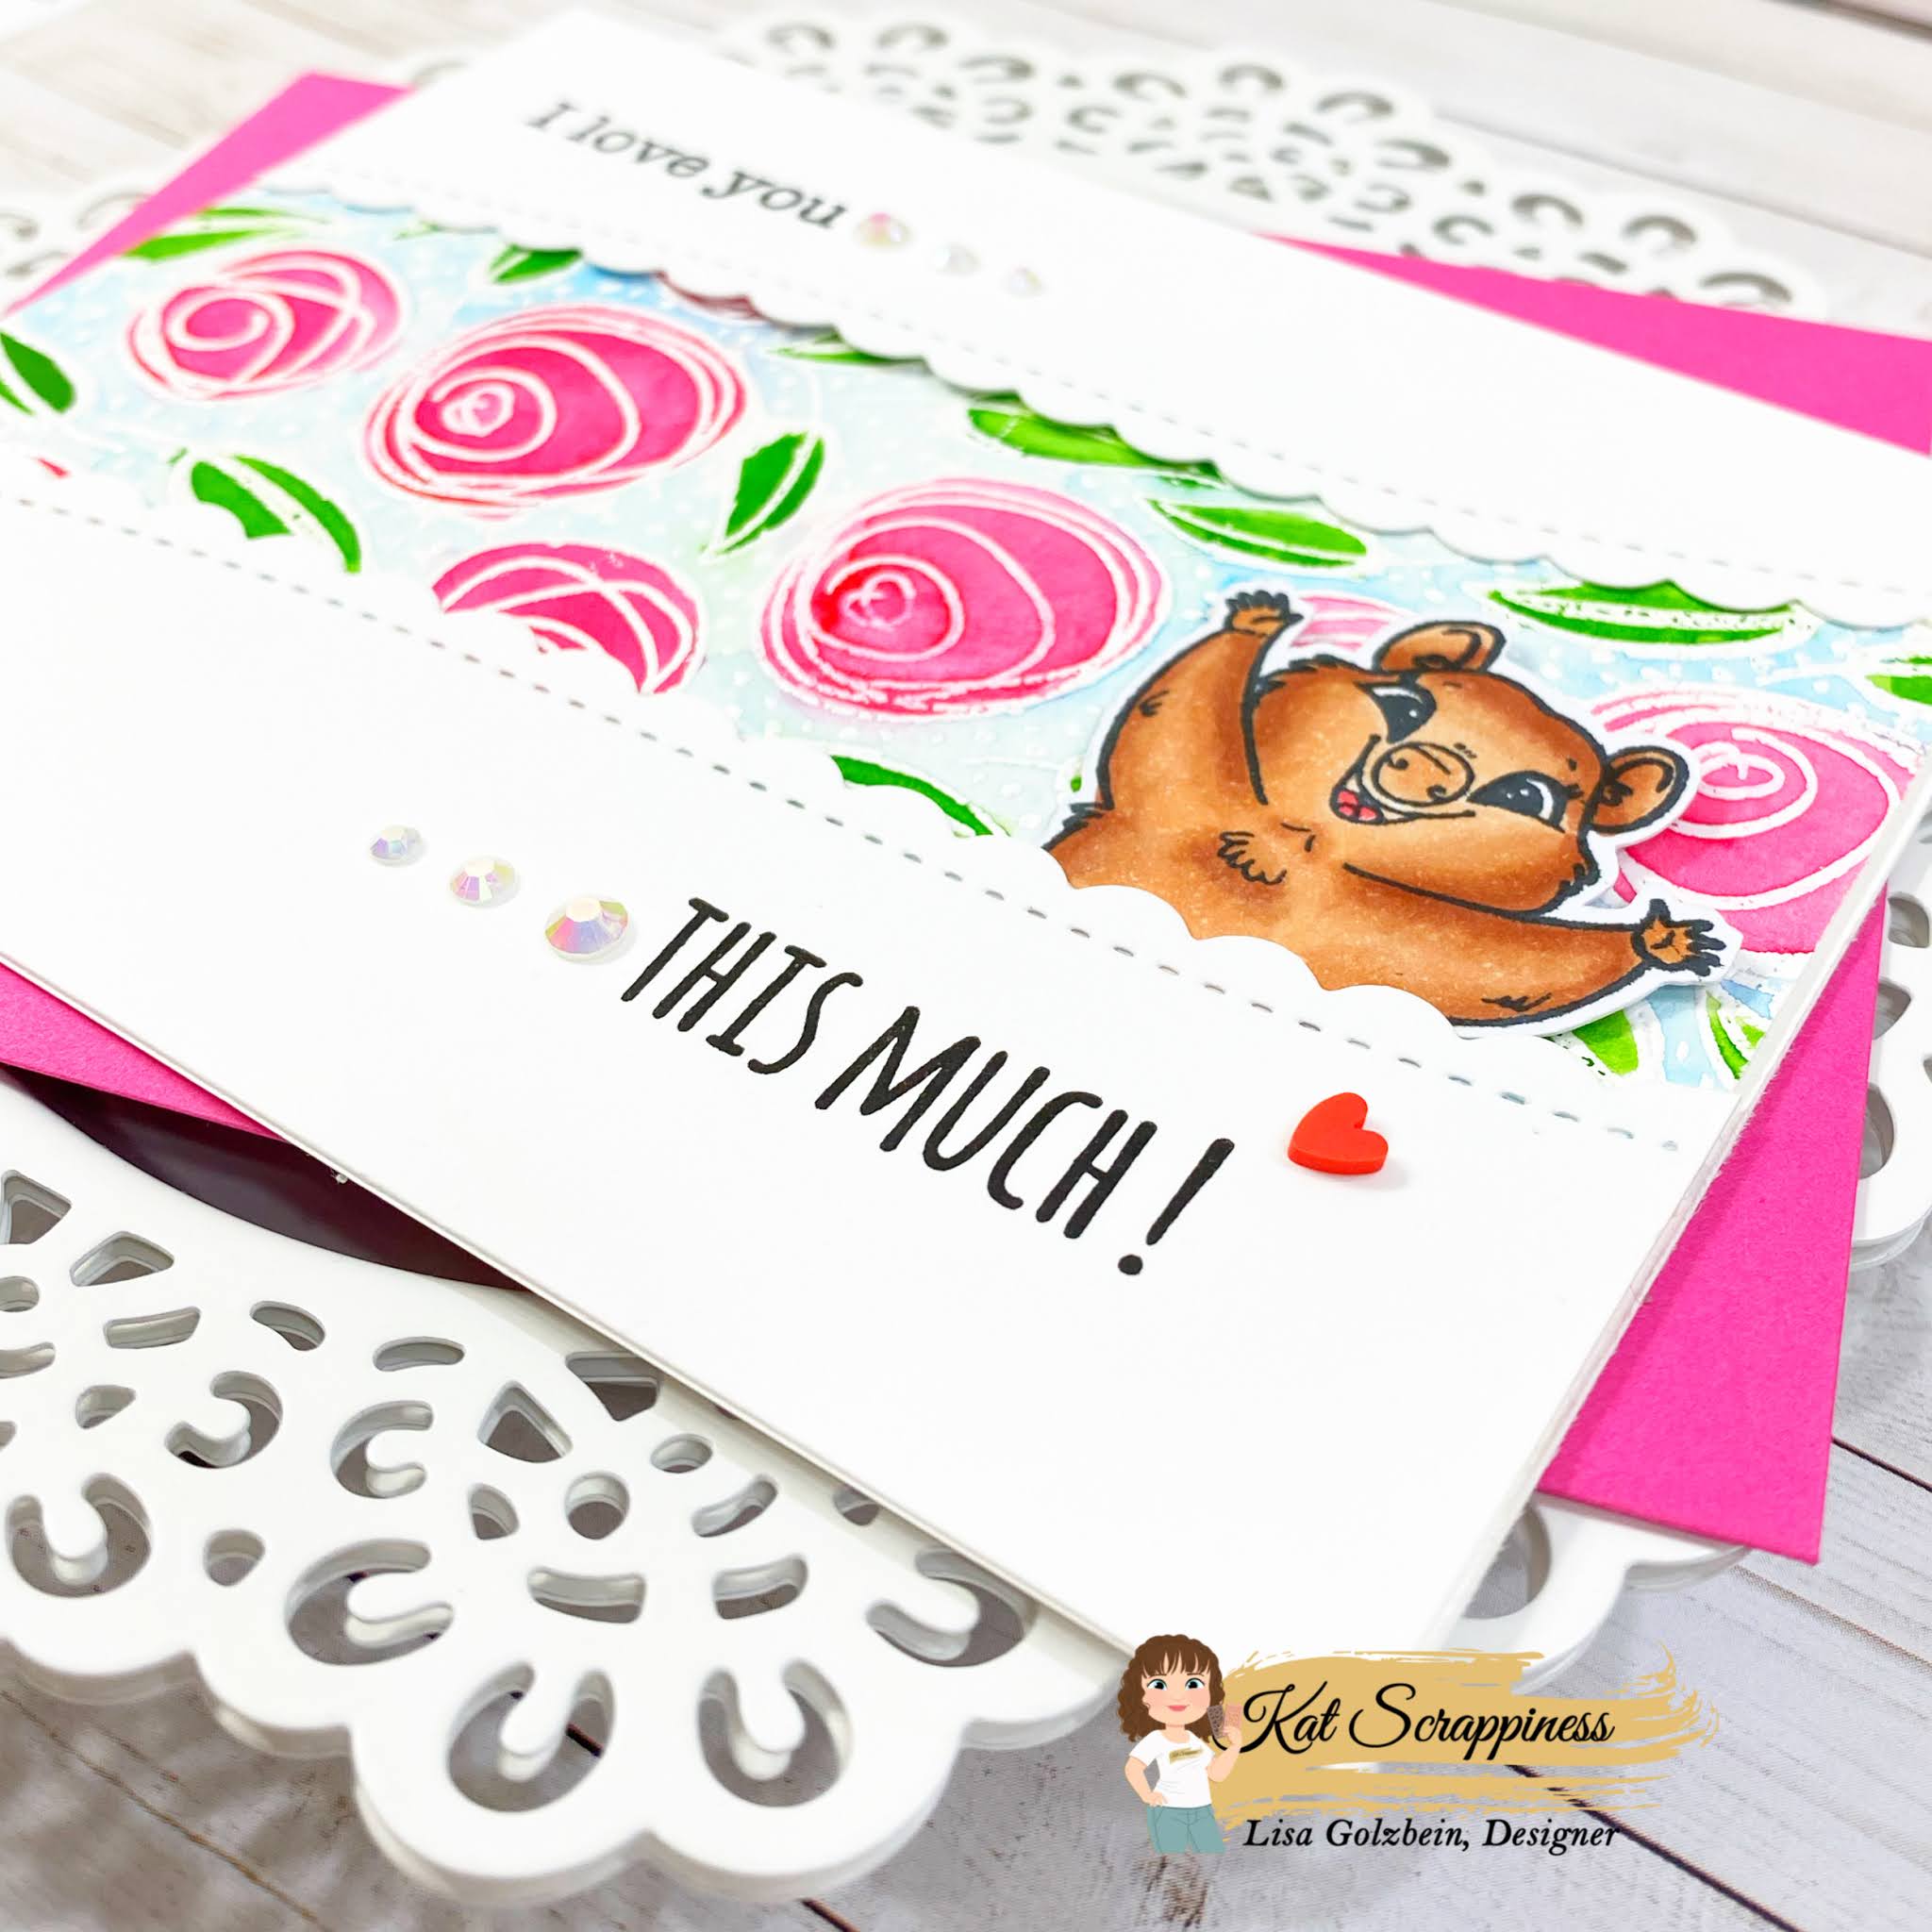
I have the pleasure of being on the Coffee Loving Cardmaker's design team and the Kat Scrappiness design team so today I am sharing a card I made using some fun Kat Scrappiness products and a lineup so you can visit all of the other KS team members to see their fun cards as well!
See graphic below for a coupon code to Kat Scrappiness to save 15% on coffee themed products!


Kat Scrappiness is one of the super sponsors for today's hop and they just released an adorable slimline paper pack that is coffee themed and Oh So Adorable!
My project today uses the Layered Coffee Cup die set, the brand new Cuppa Christmas paper pack and the elegant Sweet Word and Sentiment die.


Here is the lineup for all of the other Kat Scrappiness DT members so you can hop around and see their amazing cards as well! I hope you'll join in the fun all week and link up your coffee themed projects and visit all of the super sponsors taking part in this fun hop!

Lisa (you are here)

Thanks for stopping by today!
Have a great day, I already am!
☕️  ☕️ ☕️ ☕️ ☕️ ☕️ ☕️Lisa ☕️ ☕️ ☕️ ☕️ ☕️ ☕️ ☕️ 

Thursday, November 5, 2020

Clean and Simple Calming Cards


Welcome to my blog, take a deep breath and relax!

2020 has been a stressful year and the past few days of this crazy election hasn't made it any easier.        No matter which side of the political fence you are on, the stress is running high!
The ugliness in the world only seems to be getting worse and it is so scary!

As card makers we tend to craft away the stress and it can be very calming to immerse yourself in making art and pretty things! Today is my day on the Kat Scrappiness blog and I knew I wanted a pair of clean and simple cards to deliver a calming message. It felt so good to sit at my desk and use minimal supplies and some of my prettiest pattern paper to make 2 cards to share today.

I don't know who needs to hear this today but keep taking deep breaths and surround yourself with people who bring you peace! My 2 cards today are centered on the words PEACE and BREATHE.


I created these 2 cards using minimal supplies but I think they came out so pretty!

I started by taking some of my favorite floral patterned paper from my stash.  I've had this paper forever and it is my go to when I want some pretty dainty florals. I cut out all the letters for both cards using the Condensed Lowercase Alphabet Dies  by Kat Scrappiness and put them aside. Next I took some beautiful linen paper and cut out 2 panels using the largest die from the Stitched Scalloped Rectangle die set.


I wanted to place the letters down evenly so I used my Wendy Vecchi MAKE ART Stay-tion to line them up. I laid out my letters evenly and placed a thin piece of purple tape over them that extended beyond the letters. I took the strip of letters still on the tape and flipped them over to apply my Nuvo adhesive to the back side of the letters. Having them on the tape made it easier to lay them down on the card panel. Once I laid them down I carefully peeled off the purple tape and pressed the letters down one by one allowing the glue to seep in.


After I adhered both panels to a soft pink piece of card stock the only thing left to do was add some sparkly Pretty Pink Jewels around the letters.

When I apply my jewels and embellishments I like to use the Kat Scrappiness Jewel Picker tool and a Triangle Sorting Tray. It makes the application and clean up so much easier. I pour my embellishments into a sorting tray and pick them up with the jewel picker and place them on a small dot of glue on my card. The process is super easy and very efficient.  After I'm done the triangle tray makes it so easy to pour the jewels back into their bag.

There is even a Kat Scrappiness Mini Pink Funnel Tray to keep your embellishments confined and make it easy for you to funnel them back into whatever is holding them. 


Kat has also just released a brand new item that is a MUST HAVE for anyone with multiple packs of sequins and embellishments. It is called the Embellishment Organizer Solution and it is FABULOUS! This awesome case has 64 individual containers to hold all of your beads, sequins, jewels and other such embellishments. It also comes with 196 label stickers so you can remember the names of all of your pretty embellishments.


Here is one more look at my cards with all of the products I used.
You really don't need a lot of supplies to make beautiful cards!


Thank you so much for joining me today, I hope I brought a little PEACE into your life and encouraged you to BREATHE deeply and go make some pretty art!

Stay tuned to all things Kat Scrappiness because the new release is coming out November 7th and 8th, just a couple of days away and you don't want to miss it! There will be lots of holiday themed Dies and brand new Sprinkles! 

Don't forget to follow 
Kat Scrappiness on all
social media platforms to be alerted to new releases, sales and giveaways!


Thanks for stopping by and enjoy your day, I already am!
🌸 Lisa  🌸 

Tuesday, October 27, 2020

Life Begins After Coffee


Hello Crafty Coffee Loving Peeps! Today I am up on the Coffee Loving Cardmaker's Blog with a brand new caffeinated card and I had some fun with watercoloring for this one!
Let's get crafty in the ICU!


I started out with a piece of Canson Watercolor paper and I stamped the Scribbled Roses cling stamp from Taylored Expressions in Versamark ink. Next I sprinkled Brutus Monroe Alabaster embossing powder all over my paper and heated it until it was shiny. The next step was where I had all my fun! I used 2 different Distress Ink colors, Picked Raspberry and Peacock Feathers and I smooshed them onto my Tim Holtz Media mat and sprayed them with water. I had a lot of fun coloring in my roses, leaves and background with all of that vibrant ink!

After the watercoloring was dry I took the Honey Bee Gift Card Holder die and cut out the front panel of the coffee cup from the watercolored panel. I stamped the sentiment from the Honey Bee Perfect Blend stamp set onto the koozie and adhered it to the front of my coffee cup and placed a plain white lid on the top of the cup. Next I added some fun Taylored Expressions Drip Drops for some bling and a simple twine bow to the top of the cup.

Lastly I adhered the cup to a piece of kraft card stock and then to a pretty teal scalloped frame panel. 
Everything was then placed on a top folding A2 white card base.

I really love how this card turned out, the color combination is one of my favorites!
I'm not sure why water coloring intimidates me because I thoroughly enjoy it every time I do it and the results are so beautiful!

Thank you so much for joining me today, I'm glad you stopped by!

Have a great day, I already am!

☕️  Lisa 🌺 

Monday, October 26, 2020

Quokka Love ❤️


Hello everyone! I hope you're having a good day, if not than just take a look at my card and it should brighten it up! That cute little animal is called a Quokka and it is known as the world's happiest animal! If you're interested in learning a little bit more about this adorable little marsupial, you can read this POST where I went into a little more detail.

The Quokka is the main character of the brand new 

stamp set from Kat Scrappiness called Quokka'n Up!


This Quokka a selfie loving animal and will add the cute to your cards and projects!


For my card today I did some watercoloring on a beautiful rose themed background.
I used the Stitched Scalloped Border dies to cut some white card stock for the top and bottom of my card.
I thought they framed the roses beautifully and toned down the busy pattern. Once I had the two scalloped panels glued down I tucked my cute little Quokka into the bottom panel and added the sentiments to the top and bottom of the card. To finish it off I added some fun bling to the sentiments by adding a trail of White Jewels and a single sweet Red Heart Sprinkle.
To make placing my embellishments easier I used the brand new Embellishment Pick Up Tool and Triangle Embellishment Tray recently released by Kat Scrappiness.  No more embellishments all over my desk and on the floor and the pick up tool makes placement a breeze!


I hope you enjoyed my card today and I hope you'll check out all of the fun crafty goodness over at
Kat Scrappiness! New products are arriving frequently and the signature line of Kat Scrappiness stamps, dies, embellishments, patterned paper and tools is expanding quickly!

Don't forget to follow 
Kat Scrappiness on all
social media platforms to be alerted to new releases, sales and giveaways!


Have a great day, I already am!
Lisa 

Friday, October 16, 2020

Paper Sweeties October 2020 New Release Rewind


I'm glad you're here today! It's time for the Paper Sweeties October 2020 
New Release Rewind!
Today I'm showcasing the 
Let's take a look at the new kit!


This kit is full off some shabby and vintage items and your imagination is your only limit to what you can create with all of this goodness!

Today I have a card and a tag I made using the sunflower from the stamp set and the H,M, and E stamps.  The "sweet home" part of the sentiment is also from the stamp set in this kit.  I just love the brush lettered font that the sentiments are written in.

I did some repeat stamping with the sunflower in Versamark ink and then white heat embossed them all. Then I took some Fossilized Amber and Gathered Twigs Distress Oxide ink and did some ink blending over the sunflowers. I colored in an extra sunflower to take the place of the O in HOME.


Now you can hop along and visit the rest of the Design Team's blogs to be inspired by their AMAZING projects:


Have a great day!
I already am!
🌸  Lisa  🌸

Thursday, October 15, 2020

Paper Sweeties October 2020 New Release Party


I'm glad you're here today! It's time for the Paper Sweeties October 2020 
New Release Party!
Today I'm showcasing the 
Let's take a look at the new kit!


This kit is full off some shabby and vintage items and your imagination is your only limit to what you can create with all of this goodness!

Today I have a card and a tag I made using some of the fun elements from the kit!


For this card I decided to use the pumpkin die and the orange and white twine from the kit. The sentiment is from a previous Paper Sweeties stamp set called 


For my second project I made a tag using the "H" stamp from the sweet kit and the red twine. The "O" in Ho Ho Ho was made using the rusty jingle bell from the kit as well.
The tag was made using the Sweet Cuts "For You" die.


Now you can hop along and visit the rest of the Design Team's blogs to be inspired by their AMAZING projects:


Have a great day!
I already am!
🌸  Lisa  🌸

Wednesday, October 14, 2020

Paper Sweeties October Release 2020 Release Sneak Peek


Today I'm showcasing the 
Let's take a look at the new kit!


This kit is full off some shabby and vintage items and your imagination is your only limit to what you can create with all of this goodness!

I decided to think outside the box for this kit and decorate a frame using the rustic flowers and leaves. The main focal point of the frame features a beautiful sentiment from the stamp set included in this kit.
I just love how this frame turned out!


Now you can hop along and visit the rest of the Design Team's blogs to be inspired by their AMAZING projects:


Have a great day!
I already am!
🌸  Lisa  🌸

Tuesday, October 13, 2020

Pumpkin Spice Latte K-Cup Holder


I am up on the Coffee Loving Cardmaker's blog today and I have a special project to share with you!
Although I live in Florida and we won't feel cooler weather here for quite some time, it doesn't change the fact that Fall is here and that means Pumpkin Spice Latte season is here as well!

For today's project I thought it would be fun to create a custom made K-cup holder with a PSL theme!


I followed a very easy YouTube tutorial that you can find by clicking on this link:

Here are the basic scoring measurements and the rest of the assembly is super easy!

The holder itself only uses one piece of 8 1/2 x 11" piece of card stock.
With the 8 1/2" side up, score at 2" and 6 1/2"
With the 11" side up, score at 4", 6 1/4", 8 1/4" and 10 1/2"
Cut 2 pieces of patterned paper in sizes 2" x 4 1/4" and 1 3/4" x 4 1/4"

After assembly you can decorate your holder any way you want.  It's super easy and fun!
I cheated on mine because I didn't have any PSL coffee in the house, I printed the graphic off of the internet for the Starbucks PSL K-cup, cut it out and stuck it on my Vanilla flavored K-cups.


Since the holidays are coming up this holder is a quick, easy and inexpensive treat that can be mass produced! It would be perfect for teachers, mail carriers, nail techs, or anyone who deserves a little treat for all they do! The best part is that it can be decorated for any occasion and it is universally sized to fit all K-cups. 


For my holder I used some patterned paper from my stash and some clipart for the sentiment on top.
The coffee cup die is an old Top Dog Die that I love and the sentiment on the bottom is from an older Reverse Confetti stamp set.


This was a lot of fun to make and I hope that you'll give it a try! I know you'll be amazed at how truly easy it is to make one yourself! If you want a 4 cup holder you can make 2 of these and glue them back to back to each other! The video even shows you how to cut a handle into the top!

Thanks so much for joining me today!
Have a great day, I already am!
☕️ Lisa  🎃 

Monday, October 12, 2020

Quokka'n Up with Kat Scrappiness!

I'd like to introduce you to the Quokka! 

The world's happiest animal! 

Isn't that the cutest face you've ever seen?


Ok, why am I introducing you to the Quokka? Well, Kat Scrappiness has come out with a new stamp set called Quokka'n Up featuring this adorable marsupial! Marsupial you ask? Yes a marsupial...... here is a brief history lesson on this adorable chipmunk looking creature.

The Quokka is found on some smaller islands off of the coast of Western Australia and is 
the only land mammal on Rattnest Island. They are marsupials which means that they have a pouch that their baby Joey stays in. Just like the Kangaroo! They are herbivores and they eat grass and leaves. They live for an average of 10 years.

I'd like to thank my son Matthew for researching this adorable little guy for me. I had never heard of a Quokka up until now but Matthew knew all about them.  He's a huge animal buff and he was more than happy to provide me with some interesting facts that I'd thought I'd pass along to you.

Here is the adorable new stamp set from Kat Scrappiness appropriately called Quokka'n Up!


Here are a few cards I made using this cute new stamp set with this selfie loving cutie!


My second card is a slimline card with a bright happy scene and a Quokka couple!


Aren't they just adorable together! This card is also showcasing the brand new slimline dies available now at Kat Scrappiness called the Fancy Scalloped Nesting dies. I also added some fun bling on this card with the Clear Sparkling Jewels.


Thanks for joining me today and I hope you learned a little bit about this cute little animal from Australia!
 
Check out Kat Scrappiness for all of your papercrafting needs plus all of the sequins, sprinkles and embellishments you'll ever need.

Don't forget to follow 
Kat Scrappiness on all
social media platforms to be alerted to new releases, sales and giveaways!


Have a great day, I already am!
🐿 Lisa 🐿   


Tuesday, September 29, 2020

National Coffee Day with Kat Scrappiness


Welcome to National Coffee Day 2020

Kat Scrappiness is a Super Sponsor for the Coffee Loving Cardmakers National Coffee Day blog hop!

To celebrate National Coffee Day the design team from Kat Scrappiness has made some fun coffee related projects to share with you today. There are also three $10.00 gift cards to Kat Scrappiness, as well as a secret coupon code!

All the details will be posted on the Kat Scrappiness blog where you can find out how to win one of the gift certificates and hop along with the DT.

Here is my caffeine inspired card for today's hop:


Here are the products with links that I used to make my very slothy coffee card.

Coffee Time Background Die

Stewart the Sloth Stamp Set

Layered Coffee Cup Die

Got Coffee? Die

Coffee Beans


Here is the list so you can hop along with the Kat Scrappiness DT

Kat Scrappiness

Marla

Tina

Priscilla

Meghan

Lisa (you are here)

Kathy


There will also be a secret code for Coffee Lovers!

Save 15% on all Coffee related items at Kat Scrappiness

Just use coupon code: ICD2020

Coupon is valid from 9/29 - 10/4 at Kat Scrappiness


Thanks for stopping by today and having some coffee fun with me!

Have a great day, I already am!

☕️  Lisa  🦥 

Saturday, September 26, 2020

Slimline Dies Two Ways


Welcome to my blog! Today I have 2 cards for you using some of the newest Slimline Dies from Kat Scrappiness. I used the same Stitched Scalloped Nesting Slimline Dies on both cards yet they have 2 very different looks to them!

---------------------------------------------------------------

Let's start with the card that uses the Stitched Scalloped Nesting Slimline Dies in the traditional way that you are used to seeing it.


For this card I cut a piece of Bristol Smooth card stock using the largest die from the 
Embossed Edge Nesting Slimline Dies and did some rainbow ink blending with a polka dot stencil.
The black scalloped inner frame was made using the second and third largest dies from the Stitched Scalloped Nesting Slimline Dies. I nested them inside each other and sent them through my die cut machine together together at the same time and the result was that cool scalloped black frame that I adhered to the inside of the polka dot panel.
For the sentiment I used the Condensed Uppercase Alpha Dies and the Condensed Number Dies to cut out HB2U in glitter paper which is short for "Happy Birthday to You". I popped the letters and number up on foam tape for some dimension. To finish off the card I added some fun and colorful 
Party Confetti Sprinkles to mimic the fun polka dots in the background.

I took the entire panel and matted it on to black card stock and then adhered all of that to a side opening slimline card base measuring 8 1/2" x 3 1/2".


The brand new Triangle Embellishment Trays and
Embellishment Pick Up Tool are super helpful when picking up and adhering embellishments to my cards.


---------------------------------------------------------------

 For my second card today I also used the Stitched Scalloped Nesting Slimline Dies but in a less traditional way. 


I began by using the largest die and cutting out a piece of Bristol Smooth card stock so I could do some ink blending. After I cut out the paper, instead of using it as a traditional slimline panel, I folded it in half to make a notecard.


These dies are the perfect size when folded to make the cutest little notecards!
Once it was folded I did some ink blending using Distress Oxide inks and then some stenciling in the same colors.


I just love the way this panel came out. These 3 colors blended together so well!
For the main focal point on my card I stamped and Copic colored the adorable little giraffe from the 
Lola the Giraffe Stamp Set. She cut out perfectly on my Scan n Cut but she could be easily hand cut as well. Before I adhered that cute little giraffe down with foam tape I stamped the sentiment in black ink on the bottom of the card. That beautiful "Thank You" is from the Friendship Greetings Stamp Set and looks lovely on any card! After I had Lola down and the sentiment stamped I added a few random sequins from the Aww-tumn Sequins Remixed and Fall Blessings embellishment sequin packs.


Pictured above are the brand new Triangle Embellishment Trays and
Embellishment Pick Up Tool and I love using them when I have to place sequins or sprinkles on my cards.


Here is one more look at both cards photographed with all of the supplies I used on them.


Thanks for stopping by today! I hope I gave you some new ideas for using your slimline dies in a not so traditional way. The sky is the limit with your imagination and creativity!
Here is a complete list of Kat Scrappiness products used on both of my cards including links.


Have a great day, I already am!
🎉  Lisa  🦒