Thursday, April 12, 2018

Simon Says: Add Some Texture

SSS Wednesday Challenge Add Some Texture

I love this week's challenge to add some texture to your project.  I knew I wanted to use a woodgrain embossing folder on the main card but the treasure map on the front wound up having it's own texture.  I didn't realize how much until I showed my son this card and he actually wanted to feel the map, he said it looked like leather.  That's when I knew it was the perfect project for this week's challenge.  I just love the little DeNami chickie stamps and their Pirate Chickie was just meant for this treasure map!  I used the Distressed Edges Rectangle dies from Kat Scrappiness for the map and I inked the edges with Tim Holtz Ground Espresso Distress Ink after I sprayed it with water and crumpled it up a few times.  

I used the SSS "Circle Friends" stamp set for the fun stitching lines and the Stitched Alpha Dies from Craftin Desert Divas for my "X" marks the spot embellishments.  The sentiment "Ahoy Matey" came from the Papertrey Ink stamp set "Out to Sea" and the banner and circle seal dies are from the 
Spellbinders "Hipster 1" dies.  

I actually made a list of how many companies products I used on this card just for fun and it came to 11.  I really enjoyed making this card and it turned out just like I wanted which is rare.  Sometimes the card ideas in my head don't actually make it to the card itself.  See you next week for another 
SSS Wednesday challenge!
Thanks for stopping by today.  
Have a great day, I already am!
☠️Lisa ☠️

PAPERTREY INK MIM #318: SIMPLE STITCHED STEMS


PTI MIM #318 Simple Stitched Stems

Another Monday, another PTI Make it Monday and this week I have to say that Michelle definitely had me step outside of my comfort zone.  The challenge was to stitch stems on a card and I've never tried it before.  After ripping the cardstock on my first attempt I tried again with a smaller needle and had success.  Maybe if I practiced more I could get less space between the stitches.  I do like how it turned out in the end and it was fun to try a new technique.  I was inspired by Laurie Schmidlin and the pocket card she made recently.  I used one of the lacy Edgers dies on the front of the pocket.  I fell in love with the style and I couldn't wait to try it.  

I used the Farmers Market florals for the flowers on the stems and The Sweet Life stamps for the large rose on the front pocket.  I watched Lizzie Jones Make it Monday challenge recently and it reminded me how much I LOVE the Sweet Life stamp set.  So much inspiration from PTI and their design team! 
I finished it off with a sentiment from the Butterfly Blooms stamp set and matted it on some Aqua Mist card stock.  Thanks for stopping by today!  Can't wait for next week's MIM, I'm enjoying this weekly inspiration!
Have a great day, I already am!
๐ŸŒนLisa ๐ŸŒน


Lots of Envelopes

๐Ÿ’ŒHAPPY MAIL๐Ÿ’Œ
I don't know about you but that sentence brings a smile to my face whenever I hear it, not to mention when I see it in my mailbox and at my front door!
Today I'm over on the Kat Scrappiness blog with some fun envelopes to give your snail mail an upgrade!

The April Card Challenge over at Kat Scrappiness is Envelope Art and there are 2 new stamp sets that make it easy to add some PIZZAZZ to your envelopes!  Giraffe Envelope Art and Owl Envelope Art. Here are 2 examples of how you can use the Giraffe stamp set to take your
envelopes from drab to fab!

On the first envelope I stamped the Giraffe with some Memento Tuxedo Black ink so I could color him with copic markers and then cut him out so he could sit at the bottom corner and then I added some fun leaves around him. The stamp set also comes with 2 cute stamps that say "to" and "from" in a fun font.  I thought it would be fun to stamp them and highlight them with Lawn Fawn Cilantro ink using the rectangle shape from the Swatches stamp set.  To finish the envelope off I stamped the cheeky sentiment "It has been so long" diagonally near the giraffe's head.  For the second envelope I stamped the entire Giraffe with his sign and colored him in and then added some fun leaves around the border of the envelope.  The sign is the perfect space to add your recipients name and address. The "to" and "from" stamps look cute in their respective places on the envelope as well.  HAPPY MAIL for KAT!!

The next envelope I have to show you is a mini envelope that is meant for hand delivery as opposed to sending in the mail.  It has a super fun shaker element on the front and uses the star stamp from the Swatches stamp set again and some dreamy Sent from Heaven sequin mix.  I stamped the star with some Golden Glitz Pigment ink by Delicata for a sparkly look.  This envelope will be a keepsake that your lucky recipient won't stop shaking!
The last 3 envelopes I decorated using the Swatches stamp set one more time.  This stamp set is so versatile with its basic shapes and the sky is the limit with what you can create after you've swatched your inks and markers with it.  For the top envelope I stamped only half of the circle stamp in a rainbow of Lawn Fawn inks to give the look of a fun scalloped border along the bottom edge.  I highlighted the "to" and "from" stamps with that same circle in red and blue ink.  The "happy mail" sentiment from the Giraffe Envelope Art set was the perfect addition to repeat 
along the scalloped border.
For the bottom two envelopes in the picture I combined the Swatches stamp set with the Everyday Brush Strokes set for fun side border stamped in Distress Oxide inks.
I love the chalky appearance the Oxide Inks give and I love the look on kraft paper!
I hope that I have inspired you to have some fun with your envelopes today and dress them up with your stamp sets!  It is our responsibility to add some fun to the mailbox for our hard working post men and women!  Not to mention distracting your recipient from those nasty bills and junk mail!
Thanks for joining me today!  All supplies will be linked down below and don't forget to use code: Lisa10 to receive 10% off your purchase at checkout in the Kat Scrappiness shop! 
Have a great day everyone!  I already am!
๐Ÿ’ŒLisa๐Ÿ’Œ
Kat Scrappiness Supplies Used:

Thursday, April 5, 2018

CAS(E) this Sketch #266


It's not very often I get almost an entire day to stamp and play but today was one of those days!  I've had the Tiny Dancers stamp set from Sunny Studios for quite some time now and haven't been able to get it inky.  I'm happy to say that today was THAT day!  Those ballerinas are so STINKIN' cute!!! When I saw the sketch this week at CAS(E) this sketch I knew that the tiny dancers would be perfect!
Here is the sketch and the card:

Oh I am in love with those cute little ballerinas!  I probably love them so much because I wasn't allowed to be one growing up.  Yup, I was the only little ballerina who was thrown out of ballet class.  We can't all be graceful ๐Ÿ˜ฌ.... oh well.  I'll settle for coloring them now and putting them on cute cards!  I love how the little pink tutus look against the black and white polka dot paper and I love this week's sketch!
Thanks so much for stopping by today!
Enjoy your day, I already am!
๐Ÿ’ƒLisa ๐Ÿ’ƒ

Happy 9th Birthday Simon Says Stamp

๐ŸŽ Happy 9th Birthday Simon Says Stamp!๐ŸŽ‚
The Wednesday challenge at Simon Says Stamp is a Happy Birthday theme for their 9th birthday!  

In celebration I took out my SSS birthday stamps and my Gina K Wreath Builder
 stencil again and got to work!  
Thank you Gina K!  I have had so much fun with my Wreath Builder stencils and I have been looking at my stamp sets in a new way.  I love flower wreaths but I have been enjoying finding other stamps that would look good in a wreath pattern.  Today I took out my SSS set called Birthday Balloons and those cute little balloons were just the perfect size for the wreath stencil!  I also had fun looking through my ink pads for the perfect rainbow colors!  I backed the balloon panel on black cardstock because I always love the look of rainbow colors against a black background.  The sentiment is from an older SSS stamp set called Square Sayings.  I just love how this card came out!  

Thanks so much for stopping by today!
I hope you get some crafty time in today and have a great day!
I already am!
๐ŸŽˆLisa ๐ŸŽˆ

Got Coffee?

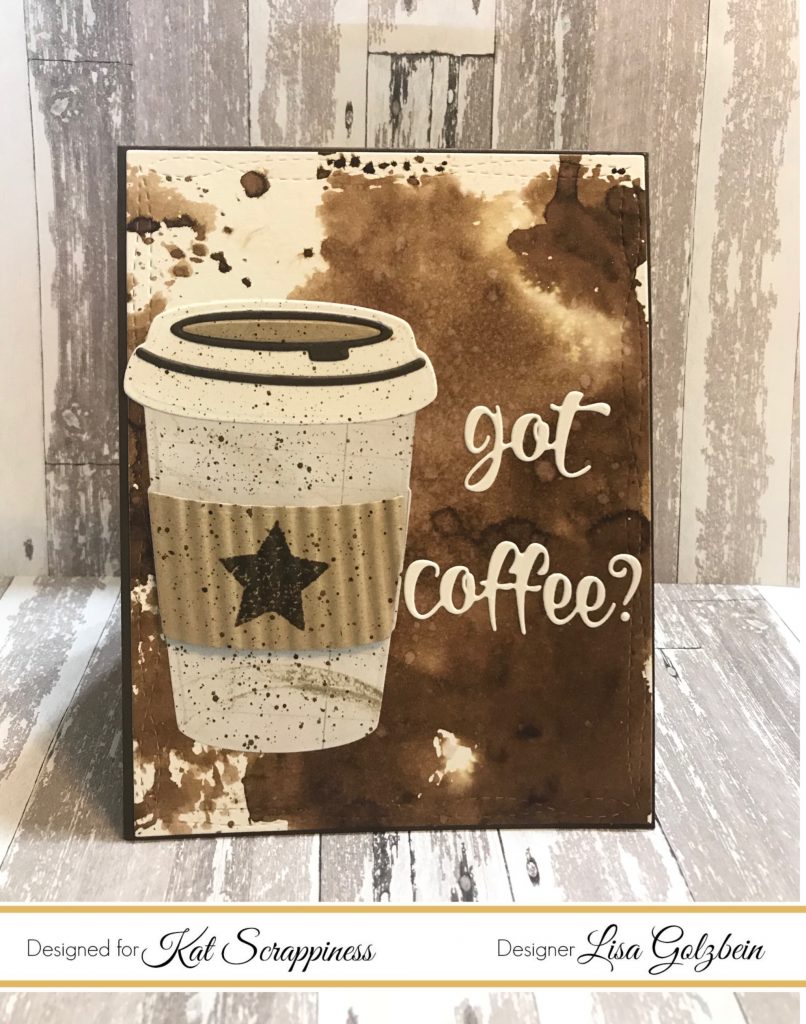
Hi crafty friends, today I'm on the Kat Scrappiness blog to share a cup of coffee with you.  If you've already had your morning cup, pour another and relax.  This month Kat has come out with an awesome new Layered Coffee Cup Die and I'm in love!  I'm a big fan of all coffee themed projects.  I'm not a huge coffee drinker but since I work night shift at the hospital I do find myself reaching for it at 3 and 4 in the morning to stay awake.  If the truth be told I just enjoy a little coffee in my half and half.... heh heh heh.
Ok enough coffee talk, on to the card.  I wanted this card to have a "coffee stained" background so of course I reached for my Ground Espresso colored Distress Ink pad and  I "smooshed" (technical crafty term) some ink onto a piece of acetate and then sprayed it with water.  When the ink was moving around I placed the acetate onto a piece of watercolor paper and the results were gorgeous!  I then assembled my coffee cup out of various colors of card stock and patterned paper.
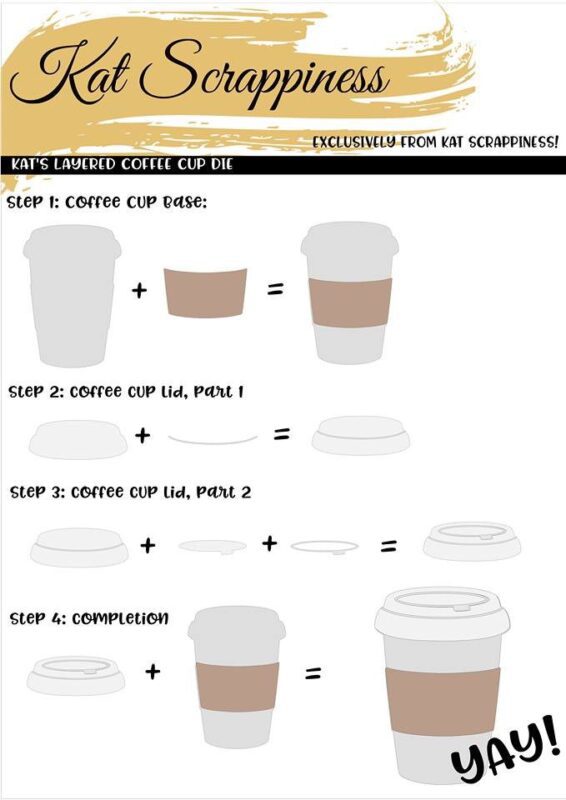
Here is a very handy instruction sheet to show you how to assemble the pieces from the die.
For the coffee cozy section of the die I used kraft cardstock and I stamped a star from the new Kat Scrappiness Swatches stamp set.  After that I ran the cozy through my paper crimper to give it a realistic look with some dimension and I added it to the cup with some foam tape.  When the coffee cup was fully assembled I added some paint splatter with the Ground Espresso color to the whole cup.  I just love the added interest paint splatter gives to any project!
For my sentiment I used the new Kat Scrappiness "Got Coffee?" die and added it to the side of the card.  This sentiment is awesome and uses a fun whimsical font that is perfect for any coffee themed card.
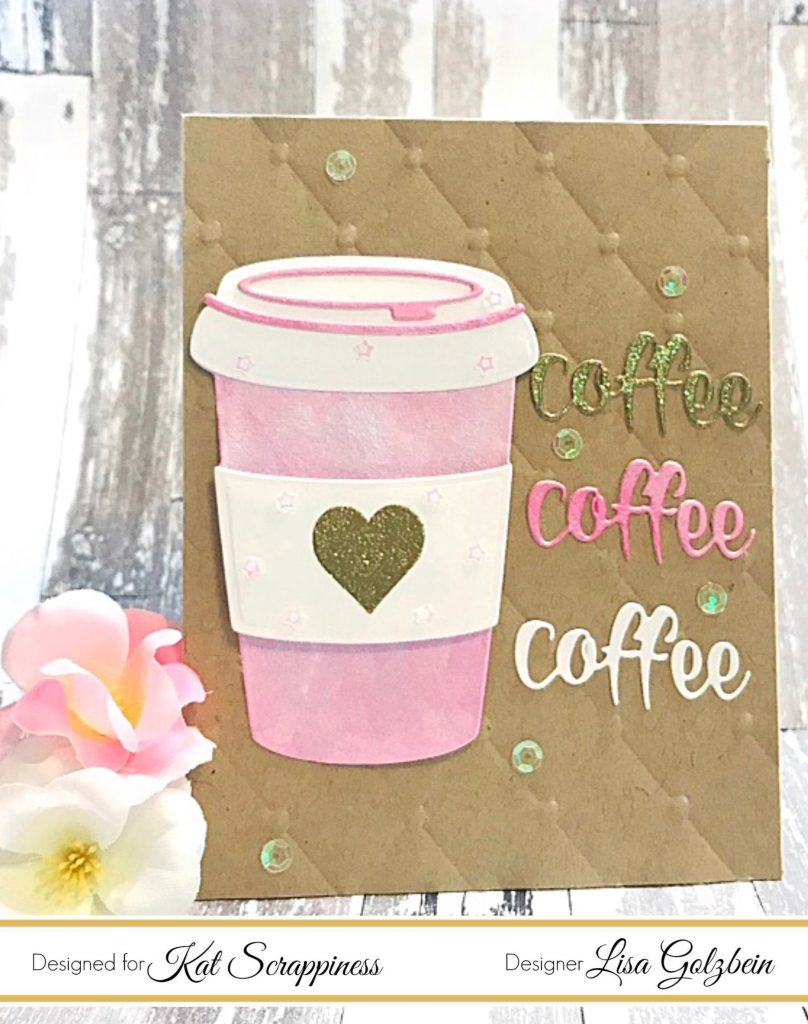
For this next card I used just the word "coffee" and cut it out 3 times in different colors for a fun look.  I painted the coffee cup with a pink pearlescent color from the Kuretake Gansai Pearl colors watercolor set and I added a heart to the cozy from the "Swatches" stamp set and heat embossed it with Ranger Gold powder.  I placed it on a diamond embossed background and added some fun
Kat Scrappiness Barbie sequins for a feminine touch.
Such a different look with the same die!
If you added the sentiment "Wanna" above this die, it would make a cute card for a friend inviting them to get together over coffee reading "Wanna Get Coffee?"
This coffee cup die makes it easy to create an eye catching card in no time!
Make sure to stay tuned this month to the blog to see what my talented fellow design team members have come up with for this die and all of the other new release stamps and dies!  You'll be glad you did!
That's all for today, I am glad you stopped by and I hope you have a great day crafty friends!
I already am!
☕Lisa☕
Supplies used on Coffee cards:
Be sure to use code: Lisa10 to get 10% off of your purchase at checkout!
Layered Coffee Cup Die
Got Coffee Word Die
Swatches Stamp Set
Barbie Sequin Mix
Ground Espresso Distress Ink
Kuretake Gansai Pearl Watercolors
Ranger Gold Embossing Powder

Wednesday, April 4, 2018

Gina K Wreath Builder and DeNami ❤️

My long awaited Gina K Wreath builder set came the other day and I've been working so I haven't had a chance to play with it but tonight I got to have at it!  SO MUCH FUN! If you don't own the wreath builder set yet I highly recommend it!  When I pictured little stamps to use with it I pictured my adorable little DeNami Chickie and the Heart Flower stamps and boy did they work perfectly!  This card came together so quickly and I can't wait to make more wreath cards.  I decided to enter it in this week's Simon Says Stamp Wednesday challenge since it's an anything goes week.
Thanks for stopping by and have a great day!
I already am!
๐ŸฅLisa ๐Ÿฅ


Tuesday, April 3, 2018

PTI Make it Monday #317 Using Outline Images

One of the things I love about the MIM challenge is that it gives me a chance to go through my PTI stash and pick out goodies to create with.  I love looking through my stamps and deciding which ones will go well with the current challenge.
This week Stephanie is using outline images to frame a beautiful sentiment. After looking through my stamps I decided to use 3 different sets.  The first is Circle Scribbles and the second and third are Beautiful Brushstrokes Additions and Sentiments.  Here is a picture of all the supplies I used.
I love the combination of Hibiscus Burst and Hawaiian Shores together so I stamped the 2 sizes of circular brushstrokes from Beautiful Brushstrokes Additions in those colors and then my outlined image in black from Circle Scribbles. I added my sentiment from the Beautiful Brushstrokes Sentiments set and finished my card off with some matching twine.  Here is my card for the week:

I really love how it turned out and how quickly it came together!
Have a great week everyone and I'll see you back here next Monday for challenge #318!
Enjoy your day!
I already am!
๐ŸŽจLisa ๐ŸŽจ

Monday, April 2, 2018

Angies Digital Stamps Design Team

I wanted to share some happy news.  I will be joining the design team over at Angies Digital Stamps.  Angie has a monthly challenge blog using digital images and anything goes with an optional twist on some months.  My first DT project is up on the blog using one of Angies cute images with 3 sweet birds playing in a bird bath.  Here is my card:
Come play along, any digital image is welcome in this fun challenge.  Angie has lots of cute digital images for sale in her shop.  This week is Challenge #19 and has an optional buttons/bows twist.
Thanks for stopping by today!
Have a great day,
I already am!
๐ŸŒธLisa ๐ŸŒธ

Sunday, April 1, 2018

SSS Wednesday Challenge andCAS(E) this Sketch #265


Hello everyone.  Today I want to share a card with you that I made for two different challenges.  The SSS Wednesday Challenge which is anything goes and the CAS(E) this Sketch Challenge #265.
I just love this sweet little cat from Papertrey Ink and my "Sweet" sentiment is from 
My Creative Time!
Thanks for stopping by, make sure to get some crafting in today!
Have a great day!
I already am!
๐Ÿ˜ปLisa ๐Ÿ˜ป

PTI Make it Monday #316 Stenciled Edges

I love Mondays because I get to play along with Papertrey Ink Make it Monday challenges!  This week Lizzie has a really fun challenge to create stenciled edges to bring attention to the focal point. It's such a pretty look and so soft.  I fell in love with the Layered Banner Die she used so I just HAD to order it after I saw the video.  I love how she layered the dotted paper behind it!  Here is my card for this week's MIM.


I started with some Aqua Mist ink and I used a Heidi Swapp stencil.  I really love how it turned out.  It's such a subtle look but so beautiful!  I stamped the sentiment from an older PTI stamp set called Scrolling Script and heat embossed it with gold powder on a frame that I die cut from the Mix and Mat confetti die set.  Lastly, I die cut two birds from the Songbirds dies.  I die cut the birds out of kraft and aqua mist card stock and then I inlaid the aqua mist flowers into the kraft birds.  I just love that color combination!
I enjoyed this technique and I think I will be using it again very soon!
Have a great day everyone!
I already am!
๐Ÿ’Lisa ๐Ÿ’

Thursday, March 29, 2018

So Egg-Cited for Easter


Hi crafty friends!  I'm up on the Kat Scrappiness blog today to bring you another fun card using an awesome stamp and die set from "Your Next Stamp".  This stamp set is called "So Egg-citing" and there are cute matching dies.  It features the most adorable egg carton to put some little chickies and eggs into.  Since Easter is on Sunday I thought it would be fun to make a cute Easter card featuring that cute carton with some sweet baby chicks inside.
I started out by stamping all the images I wanted to color and place on my card.  I colored them with my Zig Clean Color Brush Markers and blended them out for a watercolor look.

After the coloring was done I used the matching dies to cut out my cute little chickies and eggs.

Next I stamped the egg carton image with Versafine Onyx Black ink and heat embossed it with Hero Arts Clear Embossing Powder so that I could watercolor it with my Pearl Colors by Kuretake Gansai Tambi.  This technique seals the black ink preventing it from smearing when it gets wet. I just love the pearlescent shine of these paints.

Next I worked on the sentiment.  For this card I used one of my favorite techniques for die cutting letters.  I love to make a beautiful watercolor backgrounds and die cut letters out of it.  It gives them a very random and pretty pattern.  The Kat Scrappiness Condensed Lowercase Alphabet Dies were perfect for this technique.  I used my Pearl Colors by Kuretake Gansai Tambi again and I took some watercolor paper and randomly painted 4 different pastel colors.  The result was a very pretty pastel background from which I cut my letters out for a very bold sentiment.
Next I cut out a piece of cardstock with the Kat Scrappiness Rectangle Stitched Dies and ran the panel through my die cut machine with a wood grain embossing folder for some dimension and texture.  I adhered the wood grain panel to a standard card base and glued my letters down.  After gluing my chicks and eggs down inside the egg carton I popped it up over the letters with some foam tape for added dimension.  I added a few more chicks and eggs to the letters for some fun and finished the card off with some Kat Scrappiness Rainbow Splash and Barbie sequins. And of course no card is complete without some sparkle and shimmer so I took my Spectrum Noir Sparkle Marker to add some glittery goodness to my chicks and eggs.

I hope you enjoyed today's card and I hope you'll try cutting some alphabet dies from some handmade watercolor or painted cardstock!  All supplies linked below.  Check out KatScrappiness.com to find the supplies used to make this card and lots of other crafty goodness!  Don't forget to use code Lisa10 to save 10% off of your total purchase at checkout!
Have a great day everyone!
I already am!
๐ŸฃLisa๐Ÿฐ

Supplies used:

Friday, March 9, 2018

Video: Kat Scrappiness Design Team Project: Rainbow Brush Strokes

I'm so happy to be bringing you another fun project from the Kat Scrappiness design team!  Today I have a really fun and colorful card to share!  One of the new stamp sets in the shop this month is the Everyday Brush Strokes stamp set.  I'm a sucker for rainbow colors, I have been since I'm a kid! 
❤️ ๐ŸŒˆ ๐ŸŒˆ ๐ŸŒˆ ❤️ 
Those bright colors just make me happy!
Here is the card I'll be sharing with you today.


I used 4 different colors of Distress Oxide inks and I stamped a repeating background in a rainbow pattern on the front panel that I die cut from the
Kat Scrappiness Stitched Postage Edge Rectangle Dies.


Once I stamped all the colors all the way down the card I decided to play with a little black paint splatter.  I love to add some fun paint splatter to my cards, it really adds a ton of interest to any project, not to mention it's just plain FUN!!  I'll show you a tip for adding this look to your cards with a fan brush in the video below.
After I was happy with the paint splatter on the background, I stamped the sentiment in Versamark Ink and heat embossed it with white embossing powder.  Then just because I couldn't get enough paint splattering I decided to do it again with white paint on the black sentiment panel! What a stress reliever!  You must try this technique if you haven't already!

After I had just the right amount of white paint splatter on the sentiment, I popped the black panel up on foam tape over my rainbow background.  To finish off the card I added some Sparkling Clear Solid Confetti Sequins randomly over the card and a colorful pink heart die cut from the Concord and 9th Quilted Heart Die set.

That's all the rainbow ๐ŸŒˆ paint splattery ๐ŸŽจ  fun for today!
I hope you'll try some paint splattering for yourself!
You can see the process on YouTube or click on the video below.


Products used on card will be linked below and you can use code: LISA10 at checkout
to get 10 % of your order at KatScrappiness.com.

Have a great day!
I already am!
๐ŸŒˆ Lisa ๐ŸŒˆ


Products Used:


Monday, March 5, 2018

Video: Kat Scrappiness Design Team Project: Out of the Box!


I am very excited to be posting my first design team project for Kat Scrappiness.  Up on the blog today I am sharing a fun new project using one of the adorable new stamp sets available this month.  It's called Punny Snacks and it features some really cute food stamps and some cute punny sayings.  I decided to think "outside the box" for my project and create a mini pizza box to hold some small note cards that are food themed as well.  This little box could also be a 3-D card by itself or it could hold a gift card as well.  
When I first got my hands on this fun stamp set I immediately broke out my copic markers and colored up all of the cute little food stamps.  I made a chart showing the exact colors I used for each stamp to save me time later when I wanted to use them again.  Here is the chart all colored with a list of all the copic markers that I used if you're interested.


The only marker I didn't list was the colorless blender, marker "0", which I used to draw some color away from the hamburger bun to give the appearance of seeds.  

The first thing I did was create the mini pizza box to put the note cards in.  It looks complicated but in my video I will show you step by step how to assemble this cute little box.  

The next step was to decorate the top of the box with some traditional red gingham patterned paper to match the decor of a real pizzeria.  I added the sentiment "you have a pizza my heart" to the top and I hand cut two slices of pizza to pop up on opposite corners of the box.  


I then made 5 cute little notecards to fit inside of the box.  I used the rest of the food stamps and funny puns to decorate the top of 5 mini note cards.  I used the Stitched Postage Stamp Edge Rectangle Dies to showcase the stamps and sentiments on the cards.  
I just love how they all look together with all those fun colored images!

The last step was to decorate the inside of the box so it could be used on its own as a 3-D card or gift card holder.  I colored and cut 6 slices of pizza and assembled them on a white circle to resemble a pizza pie.  Just for some added interest I used a paper crimper to give some texture to the bottom piece of paper in the box and make it look like corrugated cardboard.  I also added the sentiment "we're made for each other" to finish it off.

This was a super fun project to make and you can watch the process in a video below or on my YouTube channel.  I will list the products below with links.  


Be sure to check out all of the new products at Kat Scrappiness and use 
code: LISA10 to get 10% off your order at checkout.
Have a great day everyone!
I already am!
๐ŸŒญ๐ŸŒฎ๐Ÿ”๐Ÿ•Lisa๐ŸŸ๐Ÿฆ๐Ÿฉ๐Ÿฅค


Products used: