Tuesday, October 16, 2018

Paper Sweeties October 2018 New Product Release Rewind!

Thanks for joining me on day #3 of the October 2018 *NEW* product release for
Today is Release Rewind day and I will be sharing 2 cards with you
that combine some previous stamp sets with the 2 new ones!

The first card I'm sharing today is a circle easel card and it was so much fun to make!
It looks a lot harder to make than it actually is and if you search easel cards on YouTube you'll find multiple tutorials that show how to make them.
I used both of the new stamp sets on this first card

and

Here is my first card:


I started by stamping the leaf image from Bee Happy all over the two scalloped circles to give the background some interest and the acorns from I'm Nuts About You were the
perfect size to hold up the easel part of the card.
My favorite part of the card has to be Miss Madison's cute acorn hat.
It just so happens that the top portion of the acorn from I'm Nuts About You
is the perfect size for a hat for Madison!
The beautiful sentiment is from Happy Fall Y'all and
Madison's outfit is from I'm So Proud Of You.
Madison also looks so cute with her little apple basket and cute little
pumpkin from Happy Fall Y'all!
The only thing left to do was add some beautiful Creamsicle Sequins to the card!

My second card for today features the power couple
Madison and Jake!


I spent the entire day knitting an Irish Fisherman Cable Knit sweater for Jake 
and a matching poncho for Madison!
Ok so maybe it was an embossing folder but still it was time consuming!
πŸ˜‚πŸ€£πŸ˜‚πŸ€£πŸ˜‚πŸ€£πŸ˜‚πŸ€£
But seriously, how cute are those matching outfits!!!!!

Here is the card I put them on:


I stamped the sentiment from Happy Fall Y'all on to a die cut from the 
Oval Scallop Frames and inked the edges so it would stand out.
I wanted the couple to stand out from the wood background so I backed them with a piece of vellum that I die cut from the Rectangle Scallop Frames set.
The bow in Madison's hair is from the Happy Fall Y'all set as well and I placed a 
Gold Sequin on it and also one on the sentiment tag for a little something extra!

Thank you so much for joining me for the last day of the 
New Product Release over at Paper Sweeties!

I hope you'll hop on over to the rest of the New Release Team's blogs to see all of the 
creative inspiration they have for you!

NEW RELEASE TEAM

Larissa Heskett
Lisa Bzibziak
                       Lisa Golzbein (you are here)
Mackie Robertson

All products used today are linked below.
Thanks for stopping by and please consider leaving me a comment so I know you were here!
Please leave me your blog link, if you have one, so I can visit you too!
Enjoy your day, I already am!

πŸ’—LisaπŸ’— 


Monday, October 15, 2018

Paper Sweeties October 2018 New Product Release Party!


Welcome back to day #2 of the October 2018 New Product Release Party
with Paper Sweeties! Today is the day that you can get your
hands on all the crafty fun we sneak peeked yesterday!

This month there are 2 new Fall themed stamp sets available:

Happy Fall Y'all


AND


For my 2 cards today I used both stamp sets.  On the first card I used most of the sentiments from the I'm Nuts About You set with the pumpkins from Happy Fall Y'all.  The leaves under the pumpkin were taken from the Bee Happy stamp set.  To get the variegated look on the leaves I used distress inks on some watercolor paper and splattered some black paint on it to give it a more organic look.  After the paint dried I stamped the leaves and cut them out. I colored the pumpkins with Copic markers and popped them up on foam tape over the leaves.  
For some extra added sparkle I added some Gold Sequins around the pumpkins.
I love using sentiments as focal points on cards.


I went very clean and simple with my second card and used the 
little acorn from I'm Nuts About You.
I thought it would be interesting to color the acorns in some 
non traditional acorn colors and make a rainbow pattern with them.
I layered the main panel on some very colorful patterned paper for a 
pop of color in the background.
I also love the fun font of the sentiment.
Come back and visit tomorrow and you'll see another card I made using 
a more traditional color for those sweet acorns!


Thanks for coming by today and taking a look at my cards for the New Product Release, I hope you'll join me tomorrow for the New Product Release Rewind! 
Make sure you check out all of the other projects from the New Release team.
You can click on their blog links below:

NEW RELEASE TEAM

Larissa Heskett
Lisa Bzibziak
                       Lisa Golzbein (you are here)
Mackie Robertson
Nancy Salkeld


Thanks for stopping by and please consider leaving me a comment so I know you were here!
Please leave me your blog link, if you have one, so I can visit you too!
Enjoy your day, I already am!
πŸŽƒLisa πŸŽƒ 

Sunday, October 14, 2018

Paper Sweeties October 2018 New Product Sneak Peeks!

Welcome to my blog if this is your first time here,
if you've been here before welcome back!

This is my first blog post as a Design Team member for Paper Sweeties and
I'm so excited to share some Sneak Peeks with you!
It's day #1 of the October 2018 *NEW* product release.
There are 2 new stamp sets being released TOMORROW in the shop and they are
full of fun Fall images and sentiments!
I can't wait to show you the cards I've made for the Sneak Peek!

For the first card I used the new stamp set Happy Fall Y'all!


I decided to dress Miss Madison up in the new Fall outfit from the stamp set!
She looks like she's ready for apple bobbing and a visit to the
pumpkin patch in her pretty plaid shawl and matching bow!
This stamp set has the cutest little pumpkin and a sweet basket of apples.
I stamped the basket onto some patterned paper that looked like wood for a more realistic look.
I just love that sweet sentiment in that adorable Paper Sweeties font!
I finished off the card with a pretty little twine bow and some Creamsicle and Gold Sequins for some extra added sparkle. Oh and one more sequin for her hair bow!
Here is a sneak peek of the new stamp set Happy Fall Y'all that will
be available tomorrow to purchase!


For my second card today I used the pumpkin image from Happy Fall Y'all. 


I stamped the pumpkins in a random pattern on kraft card stock and then colored
them in with my Polychromos colored pencils. 
I love the smooth shading you can achieve with these pencils 
and how it looks on kraft colored card stock.
I also used 2 different sized hearts from other stamp 
sets to fill in the blank spaces around the pumpkins.
The larger heart is from the Planner Series: Coffee stamp set and the smaller heart
is from the Sent From My Heart stamp set. I colored in the hearts to match the pumpkins.
For some added interest I used the end of a paintbrush to add 
black and white dots to fill the empty spaces.
I added an orange card base and my card was complete.

I hope you enjoyed both cards for sneak peek day and I hope you'll join me again tomorrow for another sneaky peek at another fabulous stamp set being released!
It's called I'm Nuts About You and
I'll have 2 more cards to share with you using this stamp set!


Thanks for stopping by my blog today, don't forget to check back tomorrow for Release Day!
Make sure you visit all of the other New Release Team members blogs to 
see what they have created for the sneak peaks!

Nancy Salkeld


Thanks for stopping by and please consider leaving me a comment so I know you were here!
Please leave me your blog link, if you have one, so I can visit you too!
Enjoy your day, I already am!
🍎Lisa 🍎


Thursday, October 11, 2018

Puppy Love

For those of you who are new to my blog Welcome 
and for those of you returning, Welcome Back!

Today I had a chance to play with some of my favorite Paper Sweeties stamps and dies so I thought I'd start off  by making my own background for this adorable puppy card.


I started off with some Kraft colored card stock and I stamped the paw print and bone from the Sweeties Pets stamp set.  I stamped the paw print in brown ink and the bone in kraft ink and I colored them in with my Polychromos colored pencils.  I love how smooth that color goes on.  I also stamped the heart from the Planner Series: Coffee stamp set in brown ink and colored it in with the colored pencils as well.  For some added interest in the background I spotted it with brown and white dots with the point from a paintbrush.  
I love the random look it gives to backgrounds.

The sweet puppy is from the Sweeties Pets stamp set and I stamped him in brown ink and colored him in with my copic markers.  I used a die from the Sweet Cuts Oval Scallop Frames to cut him out and decided to make a little shaker window to go on top of him.  
I die cut a scalloped frame several times and adhered some acetate to the frames and 
added some seed beads in clear and red for some fun!

For the sentiment I decided to use the sweet sentiment from the Sent From My Heart stamp set and frame it with the Sweet Cuts Rectangle Scallop Frames. 
I cut out the frame several times and layered it on top 
of the sentiment to give it some dimension.

Thanks for stopping by today! I hope you enjoyed my sweet puppy card and I hope you'll give your stamp sets a second look and make your own background 
with some of the smaller stamps. It's a lot of fun!

I hope you'll stop by again for more inspiration, leave me a note to let me know you were here and leave your blog in the comments so I can come see your work!
Enjoy your day, I already am!
🐢Lisa 🐢


Give Thanks Card with Video

Welcome back to my blog. 
Today I'm up on the Kat Scrappiness blog and I have a 
Fall themed card to share with you.
I used one of my favorite techniques on this card and 
I filmed a video to show you the process.

I love to make watercolored backgrounds with Distress Inks and then die cut shapes out of it.  Once the background is colored the way I like it, I splatter some black paint onto it to give it an organic look. For this card I chose some pretty Kelly Purkey feather dies that I've had for a long time. I thought they would go nicely with the theme for this card. 


For this card I used the vase and pumpkin images from the new stamp set called "Happy Fall Y'all". 
I colored the vase with 4 colors of Distress Inks and then I cut the vase out with a die from the 
Stitched Scalloped Oval Dies. The vellum background behind the oval was die cut using the 
Stitched Scalloped Rectangle dies. I arranged the feathers behind the scalloped circle and added some yellow and orange jewels around the vase for some added interest.

Finally I stamped the sentiment on to some brown card stock in Versamark ink and heat embossed it with white powder.  I didn't like how the sentiment looked after I hand cut it so I used my 
Scan n Cut to cut the sentiment out.

Here is the video showing how I made this card or you can watch it on YouTube.


Thank you so much for joining me today!
Don't forget to check out our monthly challenge.  
There will be a different theme every month and a chance to win a $25.00 gift card to the store.
Also if you use my code Lisa10 at KatScrappiness.com you can save 10% on your purchase.
Thanks for stopping by today!

Enjoy your day, I already am!
⚱️Lisa⚱️

Products Used:


Wednesday, October 10, 2018

Happy Little Stampers ATC October Challenge


Hello everyone!
I am back again with the 


Every month Happy Little Stampers has an 
ATC challenge and the theme for October is Holiday.  
For anyone who isn't familiar with ATC cards, they are mini
works of art that measure 2.5" x 3.5" and are traded around the world.
Usually they are numbered and signed on the back by the artist.

For my holiday ATC card this month I decided to made a mini Christmas card.
I mounted my chalkboard style sentiment onto a red and white 
polka dot glittered card stock background.
I also added some holly leaves with berries to the upper corner in some green and red glittered card stock.  It was a very glittery project and I might be cleaning up glitter for months.
πŸ˜‚πŸ˜‚πŸ˜‚


I hope you'll play along with us this month
 and enter the ATC challenge at 
The winner for this challenge will receive a $20 coupon to spend at the shop!

IF YOU USE STAMPS BY HAPPY LITTLE STAMPERS 
AND YOU ARE OUR RANDOM WINNER,
YOUR PRIZE WILL BE DOUBLED!

Have a great day, I already am!

πŸŽ„LisaπŸŽ„

Tuesday, October 9, 2018

Happy Meowloween

Happy Tuesday everyone! If this is your first visit to my blog Welcome, 
if it's not than Welcome Back!
Today I have some Meowloween fun for you with this adorable 
Cat Bat from Kadoodle Bug Designs!
The file is called PG Spooky Halloween Kitties.
I just couldn't resist those cute wings and her little horns!


I wanted a glittery background for her so I used black acrylic paint on a star patterned stencil and while it was still wet I sprinkled it with Tim Holtz Distress Stickles dry glitter.  
It's hard to see in the picture but the stars are twinkling!  
I also added wet Stickles to the cat's wings and horns.

I added some patterned paper from Papertrey Ink from an old Halloween themed paper pad and I cut it out using the largest die from the Kat Scrappiness Distressed Edge Rectangle dies. 
I just love the edge that die gives to all Halloween cards and 
here's a great little tip.... it also makes a great pirate map! 
☠️Ahoy maties☠️

Finally for the sentiment I cut it out using my Scan n Cut.  
I love how I can customize any sentiment I want in a few easy steps in any size and color.
And Meowloween is a real word.........right???
Well for today it is!

Thanks for stopping by today and please come visit again,  I do love the company!
Leave me a quick note to let me know you were here.  
I'd love to visit your blog as well if you have one!  Inspiration is everywhere!

Have a great day, I already am!
😸Lisa😸

Sunday, October 7, 2018

Angies Digital Stamps October Challenge


Hello crafty friends and welcome back to another monthly challenge over at 
Angies Digital Stamps! This month the theme is Anything Goes with an optional Halloween twist.
The challenge will run from 10/7-10/26.

The image I chose for my card is a sweet Heart Cupcake.
I've used this image before but with a very different color scheme.
I thought it would look really cute in an orange and black theme all dressed up for Halloween.


I just love how this sweet cupcake looks as the focal point on this card.
The patterned paper framing the background of the card is from Papertrey Ink.
I love the orange and black combination on Halloween cards.
The "Happy Halloween" sentiment is from the Toil and Trouble stamp set at Kat Scrappiness.

Make sure to visit the other Design Team members blogs and see the 
beautiful projects they've created!
Please remember you have all month to play along.
See challenge blog for official rules and have fun!

Thanks so much for stopping by today!
Have a great day, I already am!
πŸŽƒLisaπŸŽƒ


Friday, October 5, 2018

Matchbook Pop-Up Gift Card Holders and a Video

Welcome back to my the blog!
I'm here with you today and I have a fun project to share!
Since the holidays are just around the corner and gift cards are
such a popular gift giving idea,
I thought I'd show you a cute way to package them.
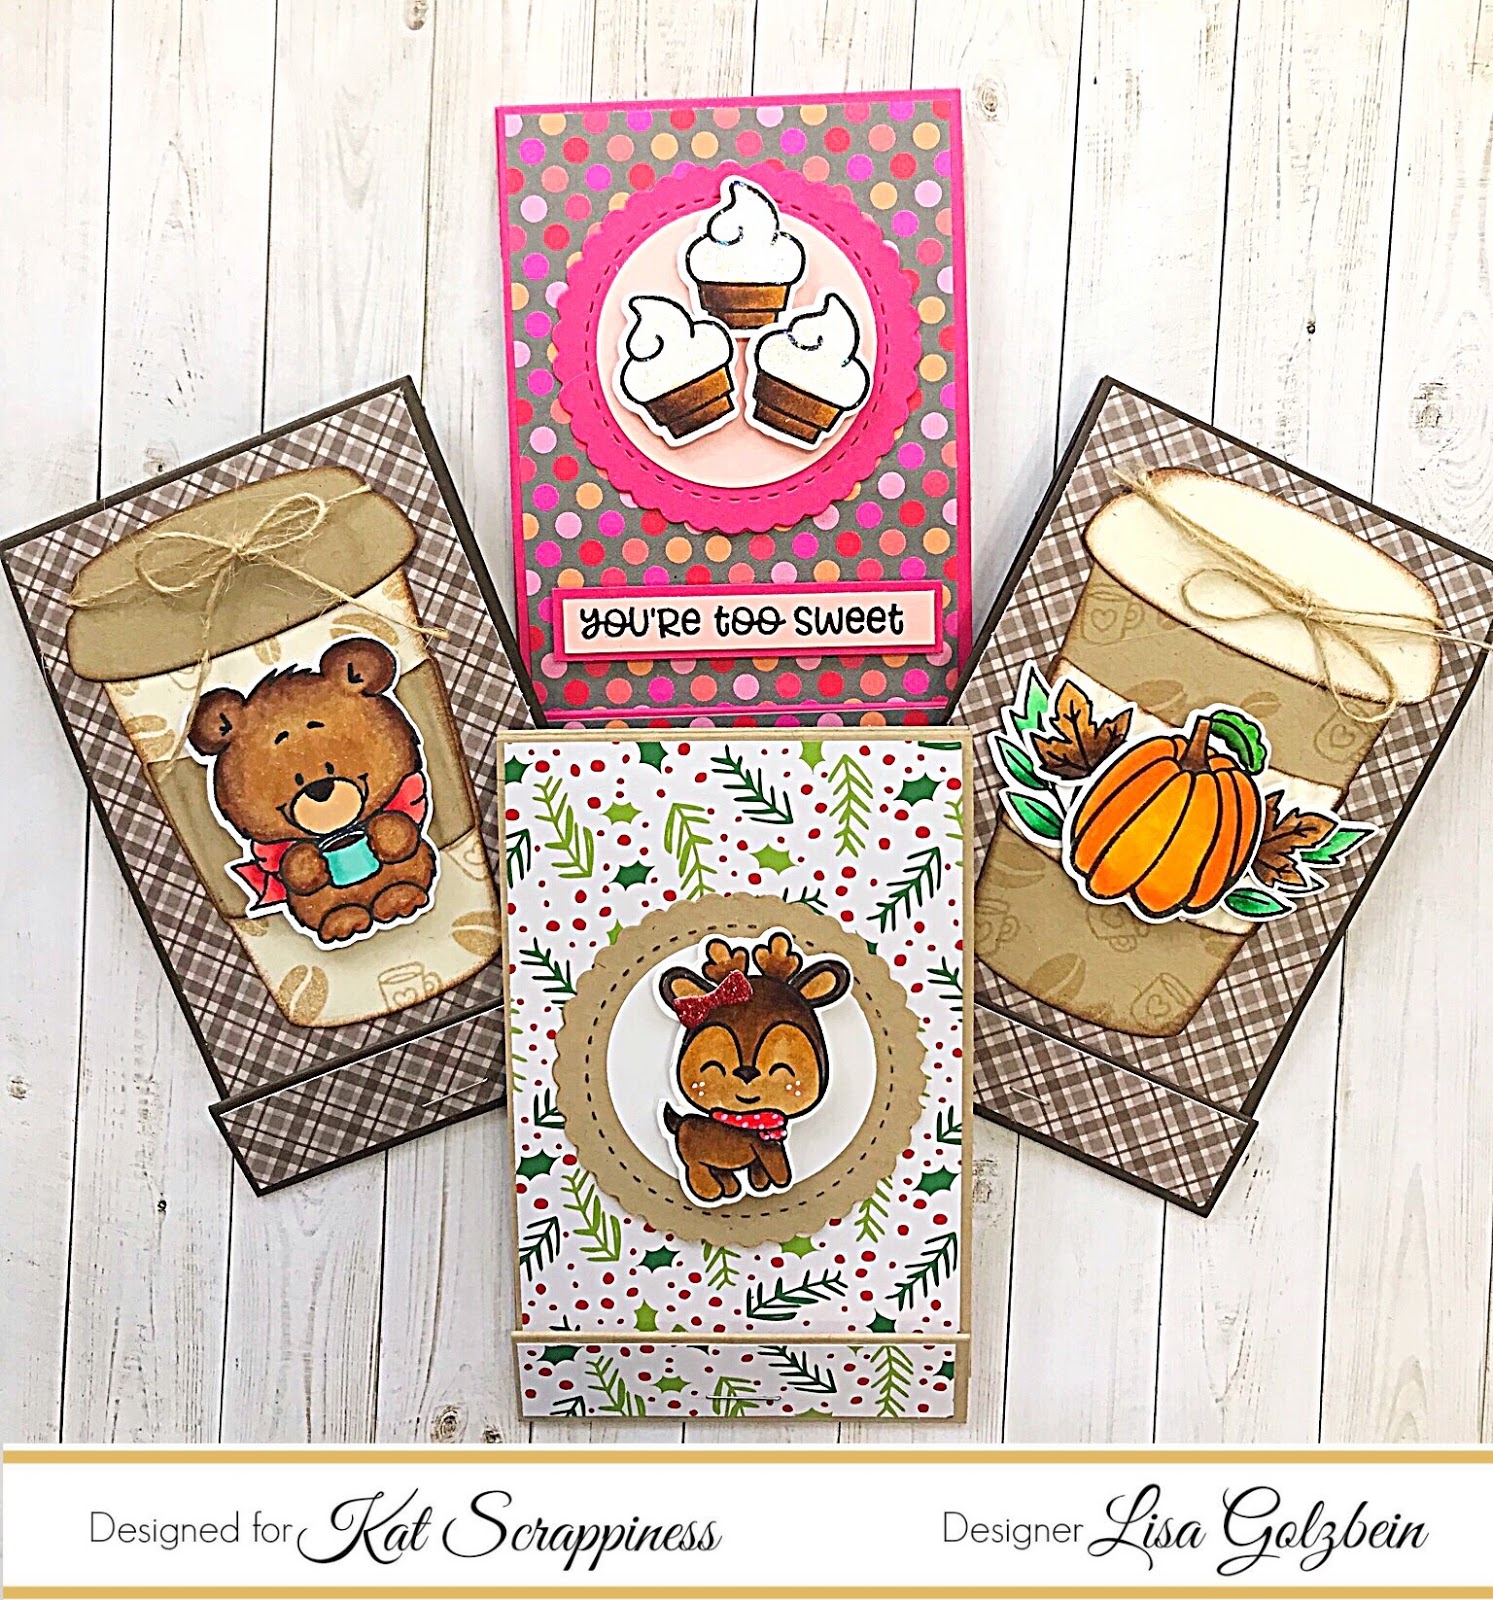
I made a matchbook to put them in so that they pop-up when you open them!

I made 4 matchbook gift card holders and decorated them with various 
stamps and dies from the Kat Scrappiness shop.

Here is a look at all 4 of them:


And here is how they look when you open them and the gift card pops up:


Aren't they adorable!
The fun part is that there are so many ways to decorate them and they can be used for any holiday or occasion depending on the paper and embellishments you use.


I also filmed a video to show you how to make your own.
I used 5 different stamp sets on my matchbooks, 3 of which were just released at 
Kat Scrappiness along with many various dies also available in the shop.

In the video I'll show you all of the products used on each matchbook and
I'll go through a quick tutorial on how to make your own!
It's really simple and they come together very quickly once you've made one.
I'll have all of the measurements in the video that you will need.

Heres a link to the video on YouTube.


As always, thank you for joining me today! I hope you'll give one of these matchbooks a try. It will give your gift cards a facelift and you'll have fun making them!
All of the products I used in today's project are listed and linked below.
If you want to purchase any of these fun products at Kat Scrappiness, you can use
my code Lisa10 and save 10% on your order!

Have a wonderful day, I already am!
πŸ›LisaπŸ›


Products Used on Matchbooks:  

Simply Create Too October Challenge 143


Hello crafty friends and welcome back to my blog!
This month the Simply Create Too Challenge Blog is challenging us to make
one of my favorite types of cards!
SHAKER CARDS!
The October challenge goes from 10/5-10/26

Since it is so close to Halloween and I had to make a birthday card for a 
friend who has a birthday on the 31st, I knew just what to do.


Lot's of shaker bits and sparkly fun!
I used quite a few sequin mixes from Kat Scrappiness.  
You really need to check out the sequin section at Kat Scrappiness, it is unparalleled and you will find every single style and color you could possibly want!

You can do some extra shopping if you want because if you use code Lisa10 you can save 10% on your entire order!  Go on and have some SPARKLY SEQUIN FUN!!!

Make some crafty time this month and try your hand at a shaker card! 
They are so much fun and picking out the shaker bits is the best part! 
Now you have an excuse to go sequin shopping!!!

Make sure you play along with us at the Simply Create Too challenge blog!
Official challenge rules on website.
Have a great day,  I already am!
πŸŽƒLisaπŸŽƒ


Tuesday, October 2, 2018

Adorable Apple Gift Bag

Welcome back to my blog! 
Today I have another adorable Design Team project  to share with you from 


These days our teachers have so much to deal with besides reading, writing and math, we need to give them all the appreciation they so richly deserve!
One way is to give them little gifts throughout the year and this 
ADORABLE gift bag is a cute way to dress up a little treat! 

This cutie patootie apple is called 
School Apple Cutie and the file to make it
can be found in the KaDoodle Bug Designs shop here.

I made the tag with a Papertrey Ink tag die and two sentiment dies and 
the large scalloped circle was cut out of notebook paper with the largest Stitched Scalloped Circle die from Kat Scrappiness.

Thanks again for joining me today!
Enjoy your day, I already am!
🍎Lisa🍎


Sunday, September 30, 2018

Happy Halloween

***EDITED TO ADD LINK TO ***
click here→ FALL CRAFTERS ESSENTIALS DIES


It's my turn today on the Kat Scrappiness blog and I have a cute Halloween card to share with you.
I'm not a fan of the scary, creepy side of Halloween so I usually make projects that are more cute in nature.  The card I am sharing with you today is just that! 
It has some very happy little pumpkins and a not so scary scarecrow!


I used the new Fall Crafters Essentials dies that will be available at Kat Scrappiness very soon!
This set of dies comes with 8 different fall themed dies and you will love every one of them!


There is a scarecrow, a bat, a moon, a tree, a fence, a pumpkin, a fishtail banner and a separate stitched panel die that measures approximately 4" x 5 1/4".  
The panel die has a maple leaf in it so it's like getting 2 dies in 1. 

This die set will surely become a staple in your collection quickly!
It can be used for so many types of cards such as Fall, Winter, Halloween, Thanksgiving and with a little bit of snow that tree could find its way on to a Christmas card!
I am also picturing that little fence on a Spring or Summer card as well!

To give my card some extra detail I dry embossed the white background with an swirly embossing folder from my stash to give the look of a windy fall day.  I cut my fence out of some wood grain patterned paper and my scarecrow was die cut from a watercolor panel I made for another card.

Check back on October 12th to see how I made that watercolor panel. 
There will be a video as well showing the technique.

I finished my card off with a Happy Halloween sentiment from the Kat Scrappiness 
Toil and Trouble stamp set.

Thanks for joining me today and I hope you'll check out these new 
Fall Crafters Essentials dies soon, I know you will love them!

If you use my code Lisa10, you can save 10% on your order at Kat Scrappiness!

Have a great day, I already am!
πŸŽƒLisa πŸŽƒ


Saturday, September 29, 2018

National Coffee Day Blog Hop


Hello Coffee Lovers!  This month Kat Scrappiness is hopping along with the
2018 National Coffee Day Blog Hop!


This month at Kat Scrappiness there is a new stamp set called Let's Get Caffeinated and it has 6 fun coffee themed sentiments. 
You will also find 3 different size coffee bean images and one cute heart!


For my card I used the sentiment "COFFEE IS THE MOST IMPORTANT MEAL OF THE DAY" and I paired it with some really cute stamps from the Gerda Steiner Coffee Monster stamp set which are also available in the Kat Scrappiness shop.

Personally I like a little bit of coffee in my cream but that's just me... 
πŸ€£πŸ˜‚πŸ€£

To make the background of the card I took some Bristol Smooth card stock and placed a Heidi Swapp chevron stencil over it.  I used 3 different color Distress Inks to sponge over the stencil. 


I love how well these colors blended together!


When I peeled the stencil off of the paper I took the small coffee cup stamp from the Coffee Monster set and stamped it evenly among the chevrons.  I also colored the hearts on the coffee cups with Zig Markers to match the Distress Inks as closely as possible.  I die cut the panel with the largest die from the Kat Scrappiness Stitched Scalloped Rectangle Dies for a finished look and adhered it to a teal blue card base. 


NOW FOR THE FUN PART!
COLORING THE MONSTERS!
πŸ–πŸ–πŸ–
I stamped all of the monsters from the set with Gina K Amalgam Ink so I could color them with whatever markers or paint I wanted. 
I decided on Zig Markers because I get the best results with blending.  
I don't mind coloring a lot of images at once because I can make quick work of cutting them out with this BAD BOY!


MAN I LOVE my Brother Scan N Cut for cutting out stamped images!!  Don't get me wrong... I still love my dies but this machine really cuts down on the tedious process of cutting out multiples of the same images!  It was well worth the investment!  

{pay no attention to that poor overused cutting mat}

The only thing left to do was prepare my sentiment and adhere it to my card base!  I stamped it onto the same color paper as my card base with Versafine Black Onyx Ink and then heat embossed it with clear powder to give it a shiny appearance.  I die cut it out with the second largest die from the Stitched Scalloped Rectangle Dies and adhered it to the center of the card.  

I picked out two of the monsters that yelled and stomped the loudest and popped them up on foam tape on the top and bottom of the sentiment and my card was DONE!

Phew!!! That was a long post!! 

If you are still with me here I have a reward for you. 
 πŸ€©πŸ€©πŸ€©

You can use my code LISA10 in the Kat Scrappiness shop to
save 10% on your entire order. 

Make sure to check out the other Design Team projects from my teammates
over at Kat Scrappiness!
If you leave a comment on the different blog posts Kat will choose
2 winners who will each win a $25 gift card to the store!

If you are interested in any of the projects I used in this card
I will list and link them below. 

Thanks for hopping along with me and Kat Scrappiness today for the
National Coffee Day Blog Hop!

Now what are you waiting for?  
Go get crafty!!!
I already did!!
☕️Lisa☕️ 


Products Used on Card


Thursday, September 27, 2018

Frap Bear and PSL's


Hello again, are you ready for some more Fall themed projects?  
I'm up again today on the KaDoodle Bug Facebook page with 
another adorable design team project!  

This just might be the first Fall season ever that I finally try a Pumpkin Spice Latte! 
It might be due to this adorable Frap Bear I found over in the KBD shop! 
Oh she is so stinkin' cute I can't even stand it! 

Since one project was not enough I created 3! 
I made the card pictured above using some patterned paper from Papertrey Ink and the Stitched Scalloped Rectangle Dies from Kat Scrappiness.
I stamped the sentiment onto a Stitched Flag Die also from Kat Scrappiness and layered it onto 2 more in orange and black.

The second project is a tag using the print and cut file from the 
Frap Bear image in the KaDoodleBug shop.  
I die cut a tag out of burlap and added some fun twine and ribbon to the top.
I glittered up the pumpkin and leaves with some sparkly 
Stickles just like in the card above.


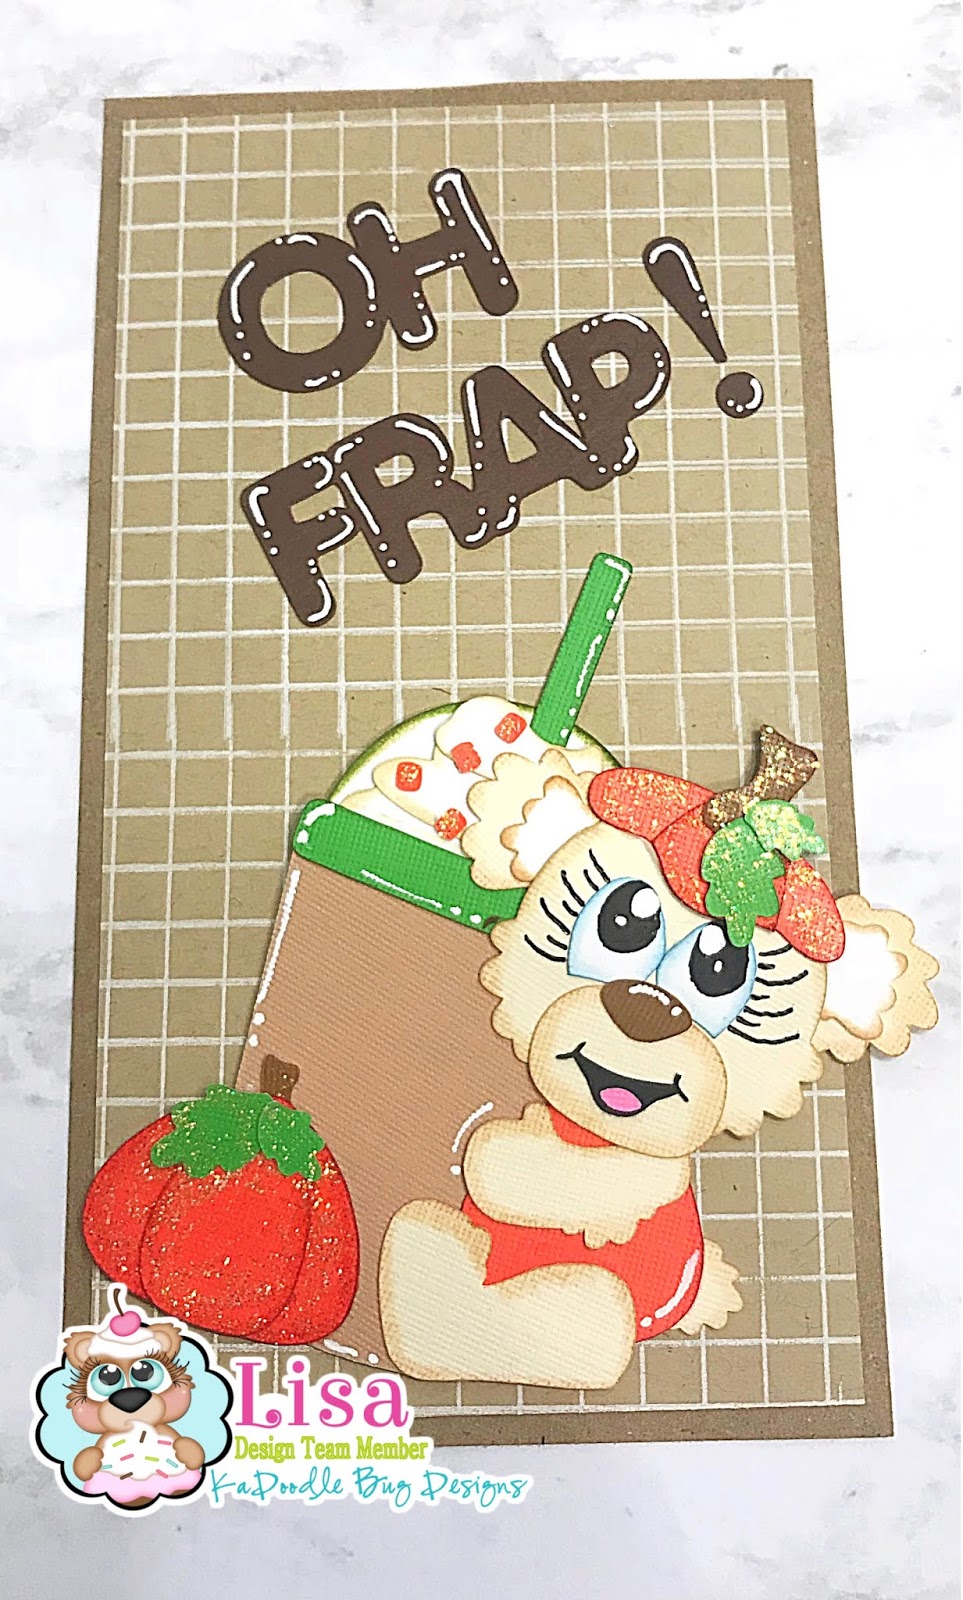
 The 3rd and final project was a dashboard I created for my daughter's planner!
She usually wants one of every cute thing I create!  It sure makes for one cute planner!
I sized the Frap Bear down a bit from it's original size to fit on this dashboard.
The background grid stamp is from Papertrey Ink and the "Oh Frap" sentiment 
I cut out using my Brother Scan N Cut and 
added some highlights with my white Gelly Roll pen.
I have been loving these pens in the #10 size.  
They are so bright and white and they go on smoothly on dark paper!


Well that's all the Pumpkin Spice Latte goodness I have for you today! 
I might have to get over to Starbucks, or Dunkin Donuts and finally try one of these 
Pumpkin Spice Lattes after all! 

Enjoy your day and get in some crafty time today with your PSL's!
I'm headed back to the craft table to enjoy mine!
πŸŽƒLisa πŸŽƒ