One of the things I love about the MIM challenge is that it gives me a chance to go through my PTI stash and pick out goodies to create with. I love looking through my stamps and deciding which ones will go well with the current challenge.
This week Stephanie is using outline images to frame a beautiful sentiment. After looking through my stamps I decided to use 3 different sets. The first is Circle Scribbles and the second and third are Beautiful Brushstrokes Additions and Sentiments. Here is a picture of all the supplies I used.
I love the combination of Hibiscus Burst and Hawaiian Shores together so I stamped the 2 sizes of circular brushstrokes from Beautiful Brushstrokes Additions in those colors and then my outlined image in black from Circle Scribbles. I added my sentiment from the Beautiful Brushstrokes Sentiments set and finished my card off with some matching twine. Here is my card for the week:
I really love how it turned out and how quickly it came together!
Have a great week everyone and I'll see you back here next Monday for challenge #318!
I wanted to share some happy news. I will be joining the design team over at Angies Digital Stamps. Angie has a monthly challenge blog using digital images and anything goes with an optional twist on some months. My first DT project is up on the blog using one of Angies cute images with 3 sweet birds playing in a bird bath. Here is my card:
Come play along, any digital image is welcome in this fun challenge. Angie has lots of cute digital images for sale in her shop. This week is Challenge #19 and has an optional buttons/bows twist.
I love Mondays because I get to play along with Papertrey Ink Make it Monday challenges! This week Lizzie has a really fun challenge to create stenciled edges to bring attention to the focal point. It's such a pretty look and so soft. I fell in love with the Layered Banner Die she used so I just HAD to order it after I saw the video. I love how she layered the dotted paper behind it! Here is my card for this week's MIM.
I started with some Aqua Mist ink and I used a Heidi Swapp stencil. I really love how it turned out. It's such a subtle look but so beautiful! I stamped the sentiment from an older PTI stamp set called Scrolling Script and heat embossed it with gold powder on a frame that I die cut from the Mix and Mat confetti die set. Lastly, I die cut two birds from the Songbirds dies. I die cut the birds out of kraft and aqua mist card stock and then I inlaid the aqua mist flowers into the kraft birds. I just love that color combination!
I enjoyed this technique and I think I will be using it again very soon!
Hi crafty friends! I'm up on the Kat Scrappiness blog today to bring you another fun card using an awesome stamp and die set from "Your Next Stamp". This stamp set is called "So Egg-citing" and there are cute matching dies. It features the most adorable egg carton to put some little chickies and eggs into. Since Easter is on Sunday I thought it would be fun to make a cute Easter card featuring that cute carton with some sweet baby chicks inside.
I started out by stamping all the images I wanted to color and place on my card. I colored them with my Zig Clean Color Brush Markers and blended them out for a watercolor look.
After the coloring was done I used the matching dies to cut out my cute little chickies and eggs.
Next I worked on the sentiment. For this card I used one of my favorite techniques for die cutting letters. I love to make a beautiful watercolor backgrounds and die cut letters out of it. It gives them a very random and pretty pattern. The Kat Scrappiness Condensed Lowercase Alphabet Dies were perfect for this technique. I used my Pearl Colors by Kuretake Gansai Tambi again and I took some watercolor paper and randomly painted 4 different pastel colors. The result was a very pretty pastel background from which I cut my letters out for a very bold sentiment.
Next I cut out a piece of cardstock with the Kat Scrappiness Rectangle Stitched Dies and ran the panel through my die cut machine with a wood grain embossing folder for some dimension and texture. I adhered the wood grain panel to a standard card base and glued my letters down. After gluing my chicks and eggs down inside the egg carton I popped it up over the letters with some foam tape for added dimension. I added a few more chicks and eggs to the letters for some fun and finished the card off with some Kat Scrappiness Rainbow Splash and Barbie sequins. And of course no card is complete without some sparkle and shimmer so I took my Spectrum Noir Sparkle Marker to add some glittery goodness to my chicks and eggs.
I hope you enjoyed today's card and I hope you'll try cutting some alphabet dies from some handmade watercolor or painted cardstock! All supplies linked below. Check out KatScrappiness.com to find the supplies used to make this card and lots of other crafty goodness! Don't forget to use code Lisa10 to save 10% off of your total purchase at checkout!
I'm so happy to be bringing you another fun project from the Kat Scrappiness design team! Today I have a really fun and colorful card to share! One of the new stamp sets in the shop this month is the Everyday Brush Strokes stamp set. I'm a sucker for rainbow colors, I have been since I'm a kid!
❤️ 🌈 🌈 🌈 ❤️
Those bright colors just make me happy!
Here is the card I'll be sharing with you today.
I used 4 different colors of Distress Oxide inks and I stamped a repeating background in a rainbow pattern on the front panel that I die cut from the
Kat Scrappiness Stitched Postage Edge Rectangle Dies.
Once I stamped all the colors all the way down the card I decided to play with a little black paint splatter. I love to add some fun paint splatter to my cards, it really adds a ton of interest to any project, not to mention it's just plain FUN!! I'll show you a tip for adding this look to your cards with a fan brush in the video below.
After I was happy with the paint splatter on the background, I stamped the sentiment in Versamark Ink and heat embossed it with white embossing powder. Then just because I couldn't get enough paint splattering I decided to do it again with white paint on the black sentiment panel! What a stress reliever! You must try this technique if you haven't already!
After I had just the right amount of white paint splatter on the sentiment, I popped the black panel up on foam tape over my rainbow background. To finish off the card I added some Sparkling Clear Solid Confetti Sequins randomly over the card and a colorful pink heart die cut from the Concord and 9th Quilted Heart Die set.
That's all the rainbow 🌈 paint splattery 🎨 fun for today!
I hope you'll try some paint splattering for yourself!
You can see the process on YouTube or click on the video below.
Products used on card will be linked below and you can use code: LISA10 at checkout
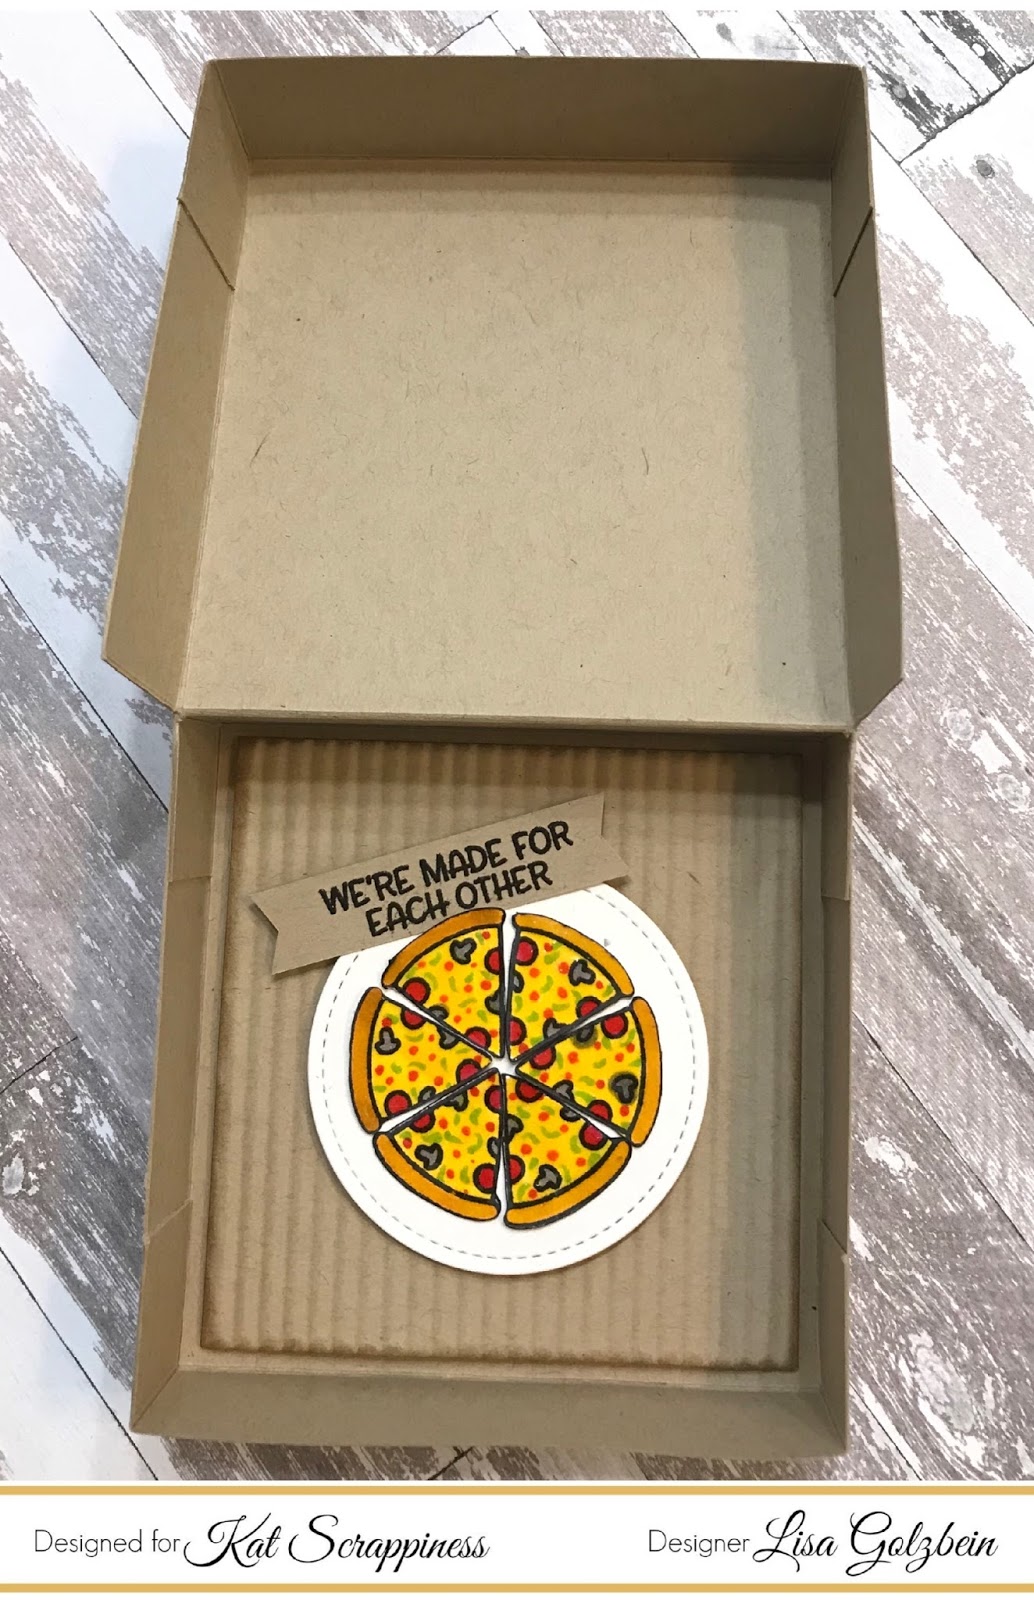
I am very excited to be posting my first design team project for Kat Scrappiness. Up on the blog today I am sharing a fun new project using one of the adorable new stamp sets available this month. It's called Punny Snacks and it features some really cute food stamps and some cute punny sayings. I decided to think "outside the box" for my project and create a mini pizza box to hold some small note cards that are food themed as well. This little box could also be a 3-D card by itself or it could hold a gift card as well.
When I first got my hands on this fun stamp set I immediately broke out my copic markers and colored up all of the cute little food stamps. I made a chart showing the exact colors I used for each stamp to save me time later when I wanted to use them again. Here is the chart all colored with a list of all the copic markers that I used if you're interested.
The only marker I didn't list was the colorless blender, marker "0", which I used to draw some color away from the hamburger bun to give the appearance of seeds.
The first thing I did was create the mini pizza box to put the note cards in. It looks complicated but in my video I will show you step by step how to assemble this cute little box.
The next step was to decorate the top of the box with some traditional red gingham patterned paper to match the decor of a real pizzeria. I added the sentiment "you have a pizza my heart" to the top and I hand cut two slices of pizza to pop up on opposite corners of the box.
I then made 5 cute little notecards to fit inside of the box. I used the rest of the food stamps and funny puns to decorate the top of 5 mini note cards. I used the Stitched Postage Stamp Edge Rectangle Dies to showcase the stamps and sentiments on the cards.
I just love how they all look together with all those fun colored images!
The last step was to decorate the inside of the box so it could be used on its own as a 3-D card or gift card holder. I colored and cut 6 slices of pizza and assembled them on a white circle to resemble a pizza pie. Just for some added interest I used a paper crimper to give some texture to the bottom piece of paper in the box and make it look like corrugated cardboard. I also added the sentiment "we're made for each other" to finish it off.
This was a super fun project to make and you can watch the process in a video below or on my YouTube channel. I will list the products below with links.
Be sure to check out all of the new products at Kat Scrappiness and use
code: LISA10 to get 10% off your order at checkout.
Hi everyone. I've been posting a lot of cards on Instagram lately but my poor blog has been lonely so today I thought I'd take another shot at video making and share a cute Easter card with you that I recently made. 🐣🐥
I recently had quite the happy mail haul from Kat Scrappiness and there aren't enough hours in the day to play with all of these fun stamps and dies. Here is a picture of all the goodies I've been playing with lately.
Two stamp sets in particular I used on my card are from Your Next Stamp and they are so darn cute. They are chock full of little chickies, perfect for popping out of coffee cups and egg cartons. They are the Coffee Chick and So EGG-citing stamp sets and they both have matching dies.
You can check out my YouTube channel for a video showing how I made this card!
If you'd like to do some fun shopping at Kat Scrappiness don't forget to use code: Lisa10 at checkout to get 10% off of your order.
Below are the links to the products I used for this card.
Hello all, I'm so excited today because I want to share my very first YouTube video with you. Since joining the Kat Scrappiness design team I've been playing with some fun stamps, dies and sequins from KatScrappiness.com I made a video showing my haul and 2 new stamp sets due to be released on March 1st in Kat's shop! I'll be making a few process videos soon showing some of the projects in the video and I'll be sharing them on my blog as well. Here is a link to the video and don't forget to use code: lisa10 to get 10% off of your order in the store.
I'm back today to join in the fun today over at The Ton stamps. Their challenge this month is to make a project using the word heart ❤️ as the theme.
With Valentine's Day right around the corner there are a ton of Love themed cards to see right now, however my heart card is a get well card for a dear friend who is sick. I used the timeless peonies stamp as the main focus of my card and this stamp set has a huge WOW factor! After all the layering it truly looks like gorgeous vintage wallpaper!!
💓 💓 💓
Once I got all the stamping done, I cut the panel out with a rectangle wonky stitched die from Mama Elephant. I love that stitched look, it really finishes the card off nicely.
I layered an intricate lacy die from Stampin Up over the top and finished it off with a "get well" die cut sentiment from Queen and Company. I layered the gold sentiment on black card stock to give it a shadowed look. I also added 3 hearts from an SU border punch with the same shadowed look.
Hello all! I have some very exciting news to share on my blog today! I am delighted to announce that I have been chosen to join the design team over at Kat Scrapiness! Kat has so many awesome stamps and dies from so many great companies as well as her own brand of cute stamps, great dies and gorgeous sequins! The sequins were what first brought me to the shop and I fell in love with the unique dies. Come on over to the blog to meet all of the talented ladies I'll be designing with and check out Kat's amazing shop! Make sure to check in often for new projects and monthly card challenges.
Good morning crafty friends. Today I am happily playing along at CAS(E) this Sketch. Here is the challenging but fun sketch for this week.
I love the idea of the repeated elements and I decided to duplicate my fun coffee cups from my Top Dog Dies set. Unfortunately Top Dog went out of business, they had the cutest dies!
To add interest to the background, I used a Tim Holtz coffee cup embossing folder on the background of the card and popped the 3 coffee cups up on foam tape. The cute sentiment is from a Simon Says Stamp set called Coffee and Tea. Here is my entry for this week.
I'm loving how it came out with the pretty watercolor coffee cozies.
I had a revelation today about why Papertrey Ink made their challenges on Monday. Clearly it's to take the drudgery out of mundane Mondays! Since Monday is the most dreaded day of the week, why not make it special and add a fun challenge? And so it was born Make It Monday!!
I don't know where to start with today's card because it brought me such JOY to make! I watched Stephanie's video and I was inspired to go and play with all sorts of different types of paper and ink.
The new release stamps have been on my desk and I have been using the brushed birds stamps quite a bit, I'm smitten! Today I decided to dive in to the Confetti Statements and Mix and Mat
Confetti die as well. I "borrowed/stole" some pretty planner insert papers and ephemera from my daughter and stamped the small elements from confetti statements in the corners. I cut the confetti die out of vellum and inked the edges with a few PTI inks and layered up the card......SO MUCH FUN! For a finishing touch I stamped on top of the ephemera and added two sentiment strips with the tiny attacher.
Here is a picture of the card and all of the wonderful PTI goodies I used.
I sincerely hope you all are enjoying your Monday!
I had forgotten how much I love the Painted Flowers stamp set. I really need to keep that set on my desk and use it more. I made a shaker card today using on of the pretty roses as a background under the shaker bits. This card is really over the top with glitter paper and lots of sparkly sequins but I love how it turned out!
For some reason I had a very hard time photographing this card, I just couldn't get it bright enough. Maybe it was the glitter paper but it was not cooperating with the camera at all!
I used the painted Happy Birthday die from Simon Says Stamp and some gorgeous sequins from Kat Scrapiness. Ok since I work night shift I really should go take a nap now. It's hard to pull myself away from my craft room!
Time for another Make it Monday with Papertrey Ink. Today's technique is shadowed sentiments. It looks nice if you get it right but if you mess up than your sentiment just looks blurry.... ask me how I know😏. After 2 attempts though I was happy with my final result and here is the card.
My card was inspired by a beautiful card made by Melissa Phillips back in 2013. I have always loved her style and I still find so much inspiration in her work! Thank you Melissa💗
I used one of my favorite PTI stamp sets, Rosie Posie, it is timeless. The sentiment is from Boutique Borders : Birthday and I used the Tag Sale #2 die to be the main focus. One beautiful flourish behind the tag is from another PTI oldie but goodie simply called Embellishments. I finished off the card with a sweet little twine bow and I am loving the finished card!
Time for another CAS(E) this sketch card challenge #255. For some reason I've been wanting to make a coffee themed card for a while so I thought this would be the perfect card to add in a cute little coffee cup. When I want cute I reach for my Lawn Fawn stamps and dies. Today I pulled out my Love You a Latte stamps and dies. Cute coffee images and with sweet sentiments in a fun scripty font. I saw a fun technique on YouTube yesterday to make a neat background from distress inks and acetate. I smooshed (technical term)🤣 some walnut stain distress ink on to a piece of acetate and then sprayed it with water. When the ink was running I smooshed the acetate onto my cardstock. It gives a water color like background without the paintbrush. I stamped some coffee beans and coffee mug stains on it for more interest. I watercolored the cute little coffee cup with a water color pencil then stamped a heart on it and popped it up on a brown banner.
The sentiment was stamped, trimmed and the edges were inked.
I love how this card came together so quickly, having a sketch really helps!
Today I'm joining Altenew for their January Inspiration Challenge. The inspiration photo has some brightly colored flowers and I was in the mood to try some watercoloring today. I used the Tulip stamp set and after I stamped the tulip images I watercolored them with watercolor pencils. Next I stamped the stems on a piece of white cardstock and then embossed the panel with a woodgrain embossing folder. The next step was to cut out the tulips and pop them up on the embossed panel. I added some stickles over top of the flowers to give them some sparkle. The sentiment from the same stamp set was then heat embossed in white on a kraft color banner I cut from the MFT fishtail flag die set. Lately I've been loving adding twine bows to my cards so I pulled out my lovely PTI twine and made a bow. Here is my card for today. I'm quite happy with how it turned out. 💗💛💚💙
Thanks for visiting my blog today, I hope you are enjoying your day, I certainly am!
Hello everyone from chilly South Florida. Although we are not having snow and freezing temperatures here it is VERY cold for us Floridians. This morning when I left work it was in the high 30's to low 40's. By the time I got home I couldn't feel my fingers. When I finally got the feeling back I got out my cute Heffy Doodle elephants and started playing. The SSS Wednesday challenge is to add a sentiment. The "Elephant of Surprise" stamp set has such cute sentiments with elephant puns. I stamped my sentient in versamark ink and heat embossed it with some Hero Arts white embossing powder. I stamped a mirror image of the elephant so they could be facing each other. I made the background with a cute heart stamp and I heat embossed it with gold embossing powder and then water colored it with Spun Sugar and Picked Raspberry distress inks.
I'm very happy with the card and I think it really came together in the end.
Thanks for stopping by today, stay warm and have a great day!
I love the days where I can spend time crafting. Lately I've had a lot of them and I am very grateful. Today I am playing along with Papertrey Ink and their Create Along With Us for January 2018. I've been following PTI for years and I am always in awe of the cards and projects that their design team comes up with. These are some crazy talented women and they never cease to amaze me. I have always loved Melissa's shabby style, Betsy's use of bright colors and Dawn's clean and simple cards. Today I got some inspiration from Melissa's card from release day 2. She layered a heart over a fancy frame and I love that look!
Since Valentine's day is just around the corner I decided to watercolor a Wonky Heart die from Simon Says Stamp. Kristina Werner recently shared a video where she used Arteza markers to watercolor with a piece of acetate so I tried it and loved it. I used the Uppercase Block Alphabet dies from Papertrey to cut out the word LOVE in gold foil paper. I used the inlaid die cutting technique to nest the letters back into the heart. A scalloped vellum rectangle with some gold print was the perfect backdrop for the pretty heart. I finished off the project with some gold thread and a few dainty sequins from The Ton.
I also bought a new toy recently that I wanted to share. It's called a Crystal Katana and it works really well at picking up sequins and gluing them down. It's the best placement tool I've ever used! You can see a demo on YouTube of it. They sell it on Amazon and at Kat Scrappiness, check it out!
I am in love with this card and I can't wait to get my new PTI goodies in the mail that I ordered last night.
Have a wonderful week everyone and get some crafty time in!